
I see it all the time – lens jockeys hacking off pixels and tossing them out like they were last week’s kitty litter. It pains me to witness such rampant cropping with so little regard for the consequences – especially since I know how potentially devastating it is to a photo.
What really makes me cringe is watching people accept a distant subject’s diminutive size in the viewfinder when I know they can attach a longer lens, teleconverter (TC), or even (safely) get a bit closer. Instead, they settle for the tiny critter they see through the eyepiece and attack it with the crop tool once they get it home. After all, why get a high-resolution camera if not for cropping? Right?
In fact, one sickening circumstance that repeats itself with frightening regularity is watching someone show off a recently captured subject that was obviously too far away. Invariably, they’ll present the image on the back of the camera for all to see.
Of course, when I examine the little inset that shows the crop, I frequently notice I’m studying the image at full magnification – the actual subject only takes up an area the size of an AF point. Folks, the only place that ever looks good is on the camera’s LCD screen – it’s a recipe for disappointment back home on the computer.
I know, maybe you think it isn’t as horrific as the picture I’m painting, but I can’t tell you the number of times I’ll find myself side by side with someone using the same gear, only I have a TC attached while theirs is snugly tucked away in their camera bag. Sadly, I’ve found that a teleconverter in a camera bag is about as useful as a politician at a construction site. When I ask why they aren’t using the TC, the answer is always the same, “Oh, I’ll just crop back home, it’s fine.”
Well, it’s not fine if you understand the ramifications.
The problem, in my opinion, is that cropping has gone from something we turn to as a desperate last resort to something we do as a matter of course. It’s crept in like a plague upon our imagery and I think it’s time to expose the toll it exacts on your files. In fact, it always strikes me as funny the way people will obsess about the “best” lenses and gear but then casually toss out all the benefits of those careful purchases with hard use of the cropping tool.
One question that I get all the time is, “Hey Steve, how can I make my images look more like yours?”
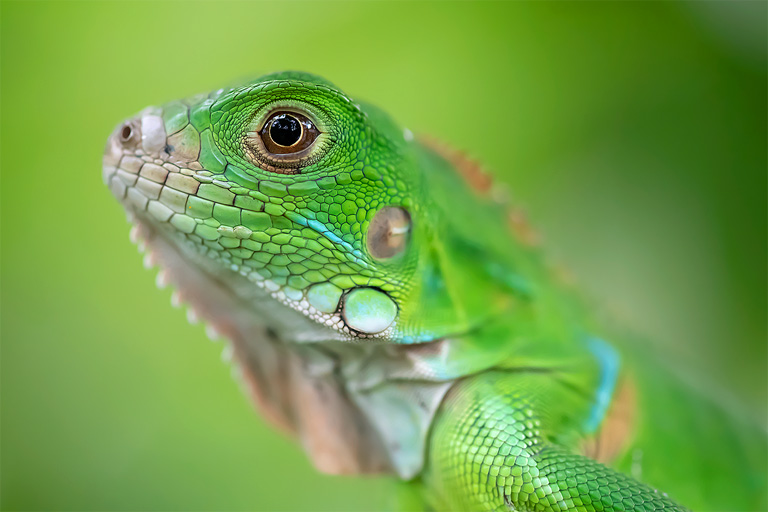
First, that’s usually greeted with a blush and thank you on my end, but the truth is one of the main ingredients is filling the frame properly. See that baby iguana below? Guess how much I cropped…Yup, not one bit! (D850, F/5.6, ISO 4500)
I see so many images where people complain about noise levels, absence of detail, inadequate sharpness, or lack of subject isolation. Most of the time these photos all have one thing in common – they were subjected to a heavy crop.
So, Never Crop?
Although the first few paragraphs may hint otherwise, I’m not saying you should completely abandon cropping either. I hack pixels all the time, usually nothing that would qualify as a “deep cut,” but my crop tool certainly doesn’t gather much dust either.
When I crop, it tends to happen in small amounts and with an understanding of the consequences. When I’m out in the field and know the resulting image will see the crop tool, I’ll take steps then and there to ensure the best results. Still, there are times I refuse to take the shot because I know the subject is simply too far away, despite the chorus of shutters firing around me.
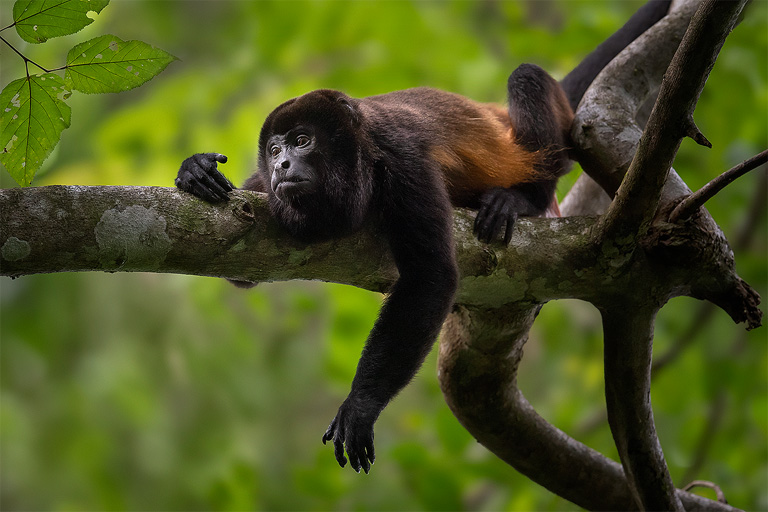
Although the image below was cropped, it was not a heavy crop (about 1.3X crop) – plus I followed the advice I’m about to give you to get the best possible results. (D5, F/4, 1/800th for hand-holding, ISO 3200 – which is like ISO 1600 on everything else.)
Additionally, I have no problem with cropping for improved image proportions. Often an 8×10, 16×9 or even 1×1 crop prove a better fit for a given photo than the traditional 2×3 ratio. However, that exception only applies if you’re hacking off just two sides of the photo to create the new proportions. When three or four sides are getting lopped off, then you’re potentially getting into trouble, depending on the depth of your cut.
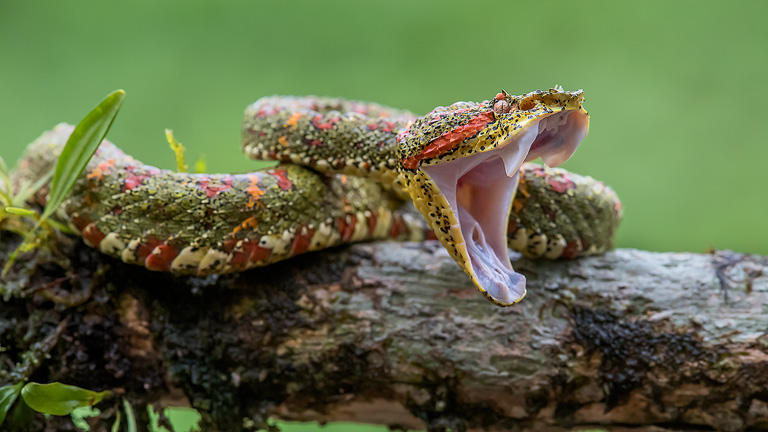
For example, in the image below I didn’t think the top and bottom were adding much to the story, so I decided to crop with a 16×9 ratio. However, I only knocked off the top and bottom, the rest of the image is intact (D5, 300PF, 1/320th, F/9 ISO 3600).
Another time I tend to rely on cropping is when I need a little extra elbow room in the viewfinder for action subjects.
For instance, when I’m pounding off shots of flying birds, I’ll often favor a slightly looser crop to avoid clipped wingtips and tail feathers. However, that doesn’t mean the bird is a tiny spec in the viewfinder either (I see people take this too far all the time). I try to strike a balance between the framing I want and keeping the entire bird (or mammal) in the viewfinder.
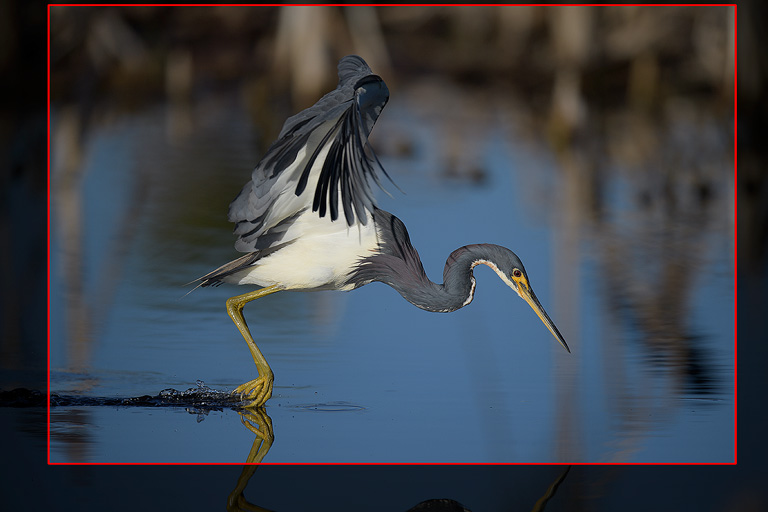
Just so there’s no misinterpretation, below is an example of how I “shoot loose” with my feathered friends as well as the crop I’d likely use afterward (D5, 600mm F4, 1/3200th, ISO 110, F/4).
What happens when you crop too much? Let’s take a look at the following five consequences. After each bullet point, I’ll include some advice for what you can do to minimize the impact of that factor when you’re in the field. These recommendations already assume you have done everything in your power to get (safely and legally) closer, and are using your longest available lens with TC. Always do everything in your power to get more of the subject in the viewfinder.
Also, this isn’t about FX vs. DX vs. M4/3rds – the consequences we are discussing below will have a similar relative impact with any size sensor. The discussion below is meant to serve as a guide to how cropping an image can affect the final output as compared to filling the frame with any given format.
1. Loss of detail
Loss of detail is the most obvious problem of course. The fewer pixels you have on your subject, the less detail you’re able to capture – you can’t beat the physics of it.
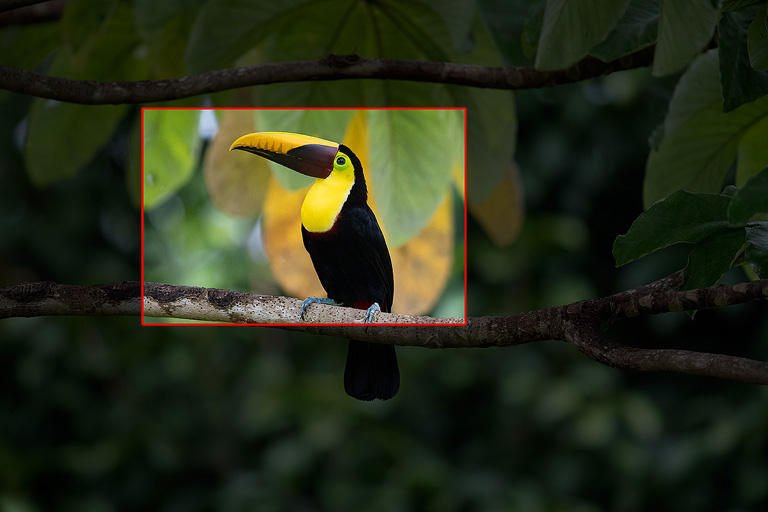
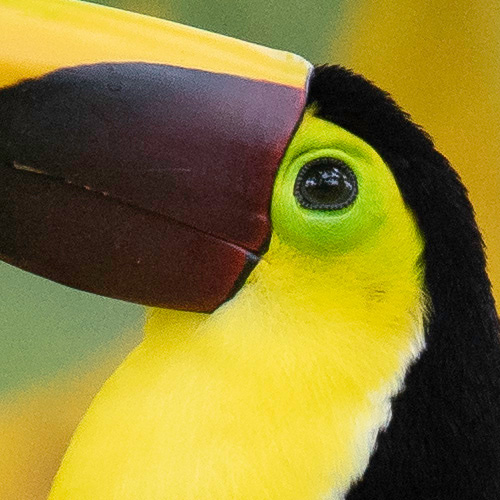
In this case, I think a picture is truly worth a thousand words, so let’s take a look at an example. Below we have a pair of toucan shots (same guy). These were both captured with the same camera (D5), lens (600mm), ISO (2800), F/stop (F/4), and both from a tripod. The only variation is a slight difference in shutter speed (1/400th vs 1/640th). Both are, in my opinion, as sharp as the combo can produce and neither saw any cropping at this stage. Processed with the Lightroom defaults (yes I know they could stand some work, but I wanted to keep things even).

OK, so what happens if you want a 3/4 view shot (like the one on the right), but you’re only able to get close enough for the photo on the left? Well, you’d have to crop – probably something like what you see below. (Keep in mind I’d actually retain a lot more of this image since I like the framing of the branches, but for the sake of the example, we’ll pretend we’re attempting to come close to duplicating the framing we have with the image on the right.) In this case, that crop took the image from 20.8MP down to 3.7MP (2384×1589). I know it seems extreme, but I see people crop like on a regular basis!
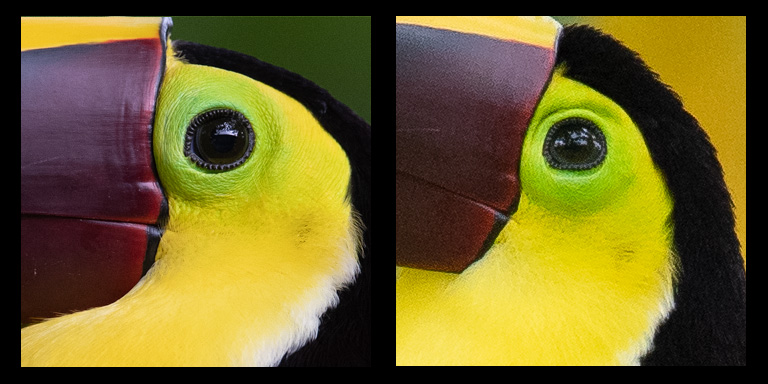
How does heavily cropping the more distant shot compare with filling the frame when it comes to detail? Let’s take a look at a 500 x 500 pixel comparison of the eye area.

Pretty obvious we simply don’t have the same level of detail in the image of the smaller toucan! The truth is, there just aren’t enough pixels there to record the detail at the same level as the closer shot. Of course, what matters is output, so in the sample below I adjusted the image dimensions so the eyes from each shot are the same size. This first comparison is the result of downsampling the closer image (left) so the eye was the same size as it is in the farther shot (right).
Note that, despite the downsampling, we still have far more detail in the closer shot (check out the area around the eye especially). Not only that, but notice how the closer shot (left) now seems to have less noise? The reason is simple – when we downsampled the image to fit the smaller dimensions, we also reduced the “size” of the noise too!
What happens if you enlarge the farther image so the eye is the same size as the closer version? Take a look, but keep a barf bag handy.
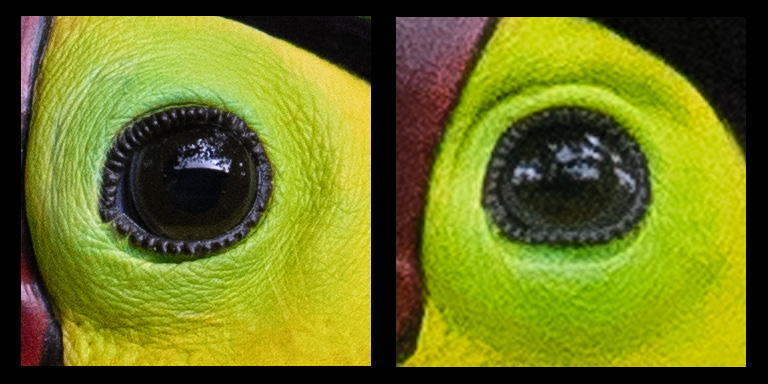
Once again, there simply aren’t enough pixels to pull of that trick compared to the closer image. And yes, this will hold true even on higher resolution cameras. Although the farther image would have more detail in this scenario if captured with something like a D850, the closer shots would ALSO have more detail than what you see from the D5.
The upshot is that you ALWAYS get more detail when you fill the frame vs. cropping on the same camera.
By the way, notice what happened to the noise level on the farther image when we enlarged it? Yeah, we’ll talk about that during the next bullet point.
Minimize The Impact
There’s not a ton you can do here, short of switching to a higher pixel density camera. The more pixels you can put on your toucans, the better the resulting detail. When faced with scenarios like this and shooting a D5, I’d often switch to my D500 since it puts the same 20 or so MP in a much smaller space (the DX sensor). Nowadays, if my D5 comes up short, I switch to the D850 for the same reason. (However, I’m still always better off filling the frame on the D850 than cropping it.)
Decreasing ISO can also help – and we’ll take a look at that next.
2. Increased Noise Problems
Here’s a downside of cropping that comes as a surprise to many photographers – the more you crop, the worse the noise becomes for any given output. We actually had a glimpse of how that works with the previous example.
Sure, at the pixel level a cropped and uncropped version of the image exhibit equal amounts of noise. Of course, we don’t display our images at the pixel level, we output them to a specific size, either in print or digital form. This means that the fewer pixels you have, the larger those pixels must be for any given output. -Since noise is “mixed in” with the pixels, this results in more obvious noise levels.
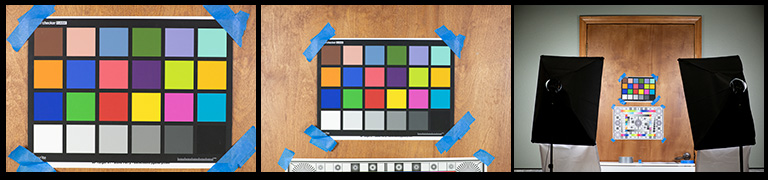
For this bullet point, I have some test shots to share that’ll make this more obvious than a forehead pimple on prom night. Here’s the test target, taken from various distances. The first one (left) is the full frame shot, the next is further back and, if cropped to DX, would look just like the first one. The last one seems a little extreme, but the reason it’s here is because I routinely see people crop images where the subject is that size or even smaller. I want to show you what happens when you crop heavily like that compared to filling the frame. These are all with the D850, ISO 3200, F/8, 1/800th second.
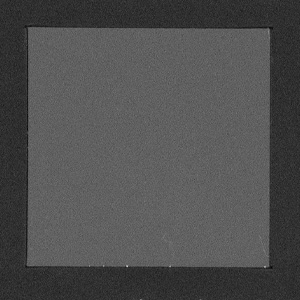
Now, let’s take a look at the little gray patch, each adjusted so it fits into a 300 x 300 space (equal output).
First, we have the full frame shot, looks pretty good and needed some considerable downsizing to get the gray patch to fit in a 300 x 300 space.

Next is the one from a bit further back – again, if cropped to match the framing of the first image, this would be a “DX cropped” version. This too required downsampling to fit in the 300 x 300 space, but not as much as the uncropped version. As you can see, for the same output size, it looks good but not as good as the first shot.
By the way, I have zero problem with cropping to DX on the D850 when needed. I don’t like to do it on the D5, but the D850 holds up well.
Finally, we have the more distant shot. In this case, I had to artificially increase the size to get to the same 300 x 300 output. As you can see, it’s a disaster.

This brings me to an interesting side note. I believe one of the reasons I hear so many complaints about noise is due to the prevalence of heavy cropping. As you can see, digging deeper and deeper with the crop tool takes a tremendous toll on your image quality.
OK, I know some may argue that it’s not fair to upsize the cropped shot to compare it to the others. As a counterpoint, consider that in the real world we may have to up-rez heavily cropped files to produce prints of adequate size. However, to keep things equitable, let’s go ahead and compare the noise levels between the distant shot (without any up-sampling) and the other two closer images.
Below, from left to right, we have the full frame patch, then the “DX” equivalent patch, and finally the patch from the distant shot at normal size – no up or down-sampling (it was only 178 pixels across).
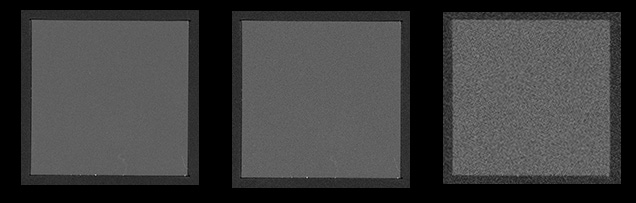
The FX and DX equivalent patches look really good since they were downsized significantly, but the far right patch enjoyed no such output benefit and looks, well, lousy. In fact, it looks so bad that I’ll forgive you for thinking maybe I was trying to pull something here.
The thing is, at the pixel level, the noise all looks like the image on the right – even on the full frame shot. In fact, take a look for yourself with the example below. I grabbed a 178 x 178 pixel slice out of the center of the full frame patch and put it next to our distant shot – note the same noise level. The reason we benefit from the full frame shot (or lighter crops) is that the noise isn’t as “large” in our final output as the crop shot. This means the final image appears cleaner.

In addition, the farther back you are from your subject, the smaller the fine detail becomes in the image (as we saw with the toucans). When the relative size of the detail gets too small, it’s overwhelmed and obscured by noise (it can help to think about it as the “size” of the noise relative to the “size” of the detail). We’ll take a closer look at that in the next section.
Bottom line? No matter how you cut it, the heavier you crop, the worse your noise looks for a given output size – print or web.
Minimize The Impact
The solution here is just what you think – employ less ISO when you anticipate a date with the crop tool. One of the first things I do when I’m in a situation that’s going to require a heavy crop is to decrease the ISO as much as I can. I open the lens as much as possible and drop to the lowest shutter speed that will still allow me to maintain acceptable sharpness.
3. Loss of shadow detail
The other sneaky side effect to cropping is like a twin sister to the last bullet point. As we know, for a given output, the noise in our image looks worse the more we crop. Consequently, that also means our ability to recover shadow detail diminishes the tighter we crop.
The reason for this is simple – useable shadows have discernible detail. When you fill the frame, you put more pixels in your shadow areas. The more pixels you have in a given area, the smaller those pixels are relative to the detail in the photo. Since the noise is mixed in with the pixels we want, it’s grainy appearance is relatively “smaller” in relation to those details as well.
Shadow areas are particularly difficult, especially at higher ISOs, since as you pull the shadows, you see a corresponding increase in noise. For example, if you shoot a photo at ISO 1600 and have to pull the shadows by two stops, those shadow areas will appear as if they were shot at ISO 6400! This makes it easy for the noise to interfere with fine detail – especially in a heavily cropped image where detail in the normally exposed areas is already on the verge of being overcome by noise.
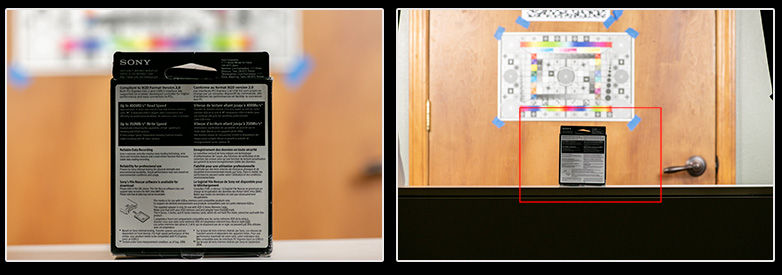
This is another instance where I think a photo is really the best way to tell the story. For the images below, I shot a Nikon D850 at 1/400th, F/8 and ISO 1600. I deliberately underexposed the box (my main subject) by two stops to simulate a scenario where you have a subject in shadow and need to pull those shadows up during post-processing. The only difference between the photos is the distance. (Approximate crop shown on the right.)

Now, with the shadows pulled up.
OK, I realize you may look at those two images and conclude I’m taking this a little too far. After all, the box is pretty small in the shot requiring a crop. However, I see people shoot when their subjects are of that size or smaller ALL THE TIME. It’s called “subject fixation” and people often don’t fully realize at the time of capture just how tiny that subject is. However, I think if we’re honest with ourselves, we’ve all photographed birds, squirrels, or little critters that were that size or smaller in the frame. You know, something like this:

The trouble is, the heavy crop a shot like that requires exacts a heavy toll on shadow recovery.
First, let’s examine a couple of 100% crops, both 500 x 500 pixels. While the noise level is the same, note the difference in text detail and how, in the tighter crop, the noise is competing with the detail at a much higher level than the frame-filling image. You don’t need Nostradamus in your family tree to predict what’ll happen when we compare output in the next step.
Next, let’s look at this from a comparable output standpoint. Let’s say we wanted to print a 12 x 8 of the image, cropping the farther picture so it matched the closer, properly framed photo. We’ll just go 200 PPI on this one, since that’s all the cropped image can tolerate. Cool?
OK, now let’s examine a small section of each to see what it would look like if we were studying the resulting print. We’ll start with the heavy crop and then check out the frame filler.

Pretty dramatic, right? Although these were both captured at ISO 1600, the properly framed image looks like it has a multiple-stop advantage over the cropped shot in the (pulled) shadow areas. This output advantage would apply regardless of the size or output (print or web).
Bottom line – when it comes to pulling shadows, there’s just no substitute for filling the frame.
Minimize The Impact
The answer here is the same as the last bullet point. When you’re facing a heavy crop, keep your ISO as low as you can to still successfully pull off a shot – especially if you’ll need to pull the shadows.
Let’s see this in action.
When I captured the image requiring a crop at ISO 1600, I also shot one at ISO 100. Here’s that same 12 x 8 output exercise from above, but this time using that ISO 100 shot.

Although it still can’t compete with the full frame ISO 1600 shot for detail, it does show roughly equivalent noise performance. Of course, we had to drop four stops to do it!
4. Loss of subject isolation
Another side effect that’s often not considered by croppers is the loss of subject isolation that you can experience.
After all, as you move back, Depth of Field increases and with it we also see more detail in the out-of-focus areas in the background. This, in turn, causes those areas to appear “busier” in the final image and competes with our subject (i.e. less subject isolation). To demonstrate this, I took out a stuffed kitty and perched him on top of a light stand (no, I didn’t shove the light stand anywhere inappropriate).
This first image was shot at 400mm with my 180-400mm and not cropped at all. (Yes, I did finally purchase a 180-400.)

Now, let’s say that you didn’t have a 400mm lens handy and 180mm was the longest focal length in the bag. So, from the same position, this is what you’d get. You’d have to crop the red square to get the same framing as our 400mm shot.
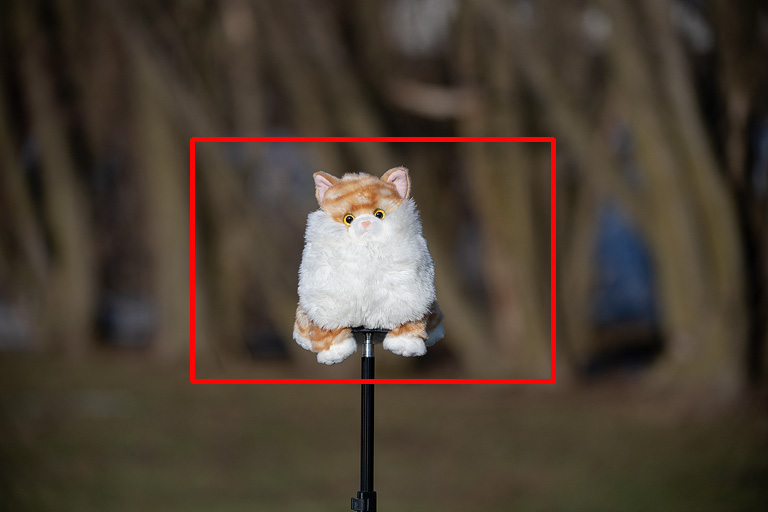
When you crop, this is the result.

While it’s certainly not terrible, it’s not nearly as “clean” as the background from the 400mm shot at the same distance. As such, the subject doesn’t seem quite as isolated as in the 400mm photo – i.e. it doesn’t have the same “3D” look.
Minimize The Impact
What you can do here really depends on the environment. If at all possible, try to utilize an angle that keeps as much distance as possible between your subject and the background. The closer the background is to your subject, the less subject isolation you’ll appear to have. If you can situate yourself at an angle that puts a more distant background into play, you can often retain a degree of subject isolation in the process.
Here’s a cropped 180mm shot (like what we had above) but with the background about 2X as far away.

As you can see, it’s a bit better and almost as good as what we had with our original 400mm shot. However, I was dealing with a stuffed cat on a stick – real animals are frequently more difficult to manipulate. 🙂
5. Too Much Distance
In addition to all of the above, there are other considerations as well, especially for the long glass shooters that frequent this blog.
If your subject is so far away that it requires a massive crop to pull off a shot, then you’re also putting a lot of “atmosphere” between you and the target. This makes problems like heat diffraction far worse than with closer critters. Couple that with increased output noise and fewer pixels on your subject and you’ll be lucky if you can differentiate it from a smudge on the glass.
Here’s an example of what happens with a distant subject when heat diffraction gets involved.
Minimize The Impact
The biggest “atmospheric” problem is typically caused by heat distortion or “heat haze”. I have a video all about it here if you want more info.
The upshot is that your best bet in this scenario is, if you can, move to a location where you’re shooting over a shady rather than a sunny area. When the sun hits the ground, it warms the surface, stirs up the air, and you end up with less than ideal conditions for a distance shot. By keeping as much shady ground as possible between you and the target, you’ll keep the problem to a minimum. Obviously, this isn’t always possible, but short of changing the laws of physics or moving in closer, there’s not much else you can do.
For this image, the sun had been behind the clouds for a bit with only a touch of brightness breaking through. This meant no heat diffraction and a much sharper image.
So, how much cropping is too much?
This is tough to answer because everyone has different levels of quality they deem “acceptable.” Some people are perfectly happy with the results of a heavy crop while others would relegate that same image to the trash bin without a moment’s hesitation. Plus, there are times you simply want proof you saw something extraordinary and a heavily cropped image is your only choice. So, I’ll share my guidelines and how I think about it below, you can take it from there. 🙂
The best bet is to get the image in the field within spitting distance of how you want the final framing to appear. For my wildlife work, my very general rule of thumb is that I want the animal itself taking up a minimum of 1/3rd of the frame – preferably 2/3rds.
Of course, this also depends on the amount of background and surroundings I want in the final image as well. I often want to show some of the subject’s environment and not just a tight shot of the overall critter.
To decide just how much of a scene should be included with the subject is actually pretty easy – simply ask yourself if the additional elements of the scene are contributing to the story you want to tell with your photo. If they are, keep them, if the story is the same (or worse) without them, then banish them from the viewfinder.
For the image below, the elk’s environment is almost as important to the success of the shot as he is. This image never saw the crop tool.

Ideally, try to keep cropping down to less than 25% of the overall image back home on the computer (certainly try to keep at least 50% of the image). I realize that’s not always possible, but if you anticipate 80% or more of your pixels will end up on the virtual cutting floor, you know you have a problem.
What can you do when you simply can’t fill the frame adequately?
My strategy is to turn to longer lenses, high-quality TCs, or try to get closer. None of those work? Find a new subject. Seriously.
The thing is, sometimes there just isn’t a shot. When you’re trying to photograph a red-tail hawk at 200 yards with a 300mm lens, you’re setting yourself up for some self-inflicted photographic torture. Yup, it sucks, but that’s the game.
The thing is, eventually you get to the point as a photographer that you no longer want to wade through hundreds or thousands of images that are simply not up to par. I see it all the time in the field – the more seasoned the shooter, the more likely they are to walk away from a distant, no-win scenario.
On the other hand, if you think you can capture a useable image, remember the potential pitfalls and leverage the techniques mentioned above to give yourself the best possible chance of a keeper when you get back home.
(By the way, I’ve had questions about using a TC vs cropping – see this article for why a TC is usually better.)
Finally, if you enjoyed this article, make sure you subscribe to my e-mail newsletter so you always know when new stuff is posted. 🙂 Just head to the upper left hand-corner of this page.
~Steve
PS – If you enjoyed this post, I think you’ll REALLY like my e-books, Secrets To Stunning Wildlife Photography, Secrets To Exposure And Metering For Nikon, and Secrets To The Nikon Autofocus System – as well as my Noise Reduction video workshop. They’re filled with hundreds of tips, techniques and information just like this. Check ’em out – click here (hey, it’s free to look 🙂 )
PPS – Please remember to share this article – your help is greatly appreciated!
Related Articles:
Cropping Full Frame Vs Shooting A Crop Camera | All About Your Camera’s Crop Modes | Use A Teleconverter Or Crop The Image? | Comparison Test – A Crop Camera vs A 1.4x Teleconverter On Full Frame


This article is exactly what I needed! I know the feeling of taking shots of subjects far away, only to find out later on my computer how horrible the images are. I wholeheartedly agree that some shots should not be taken – they are simply not worth it unless they are just for your own memory. Thank you for highlighting the details and explanations to help me understand the mess I was dealing with. That will help me to improve my images and make a call on when not to shoot.
Steve, excellent article. I like to go deep in understanding my tools and do a lot of thinking and experimenting myself so I really enjoy your insightful analysis. I do have one comment and that is on the subject of loss of IQ due to optical quality loss when cropping (from using a smaller portion of the image circle) rather than simply having fewer megapixels. From tests I have run, I found the former to be far more significant than the latter. Using the same lens and same settings on a 20 MP D5 and filling the frame versus a… Read more »
Excellent article Steve. Thank you.
Steve, like you said there isn’t just one answer to it all. Ideally fill the frame as much as possible, but sometimes that just doesn’t happen. Longer glass is better if it’s good glass. Still waiting on my 500mm F5.6 PF so some day. Using a D810 and 300mm PF now and it’s been working well, but that 500mm PF will be better defiantly once it gets here. I have gotten good results cropping images from the D810 as long as they aren’t too much. So I can’t complain really.
Steve , i am like the others just can’t quite can’t get any closer so you take the shot and they come out like you say on the fence. your information has been a great help thru all your e-book . I am was going back read about something . THanks Dale
I cropped a lot. Now when I’m out with my camera I have this saying repeating in my brain. Fill the frame, fill the frame. I have the D500 and the Tamron 150-600 Im very happy with it. When I cant get close enough I now sit back and watch. I have deleted so many tiny shots That I was on the fence about keeping. I have all your E books and the only one I have to watch more than once is noise reduction. Its a tuffy to get into my head. You have helped me tremendously. Thank you.… Read more »
Hi Steve, I’m fully with you that a frame filling shot is always desirable (under the condition that one is able to get close enough) But what if you need to make the choice between a crop (from a high resolution camera like the D850) or use of a teleconverter (1.4x or 1.7x) on the same camera to fill the frame better and the desired output result is less than the native resolution of the cropped area? E.g. if the desired output size is meant to be shown in the web: Let’s say that the image should be less than… Read more »
I did an article on that topic – more or less (not specific to web size)
https://backcountrygallery.com/use-teleconverter-crop-image/
In short, it depends 🙂
I kind of guessed that there is no definite answer 🙂
I think that one needs to be aware of the drawbacks of the different solutions [at a specific situation]…. (besides from the ISO, AF-Speed…questions:
also how quickly a TC could be added before the scene is gone, if one remembered to pack the TC :-o, etc.)
A great article Steve, thanks. What is the best approach though if you are trying to photograph something small and fast like kingfishers in flight. I was in a hide today with my newly aquired second hand 500mm f4. It was nearly impossible to track the birds as they were so close to me, and did fill the frame. In that instance, is it really about keeping going and practicing to track the frame filling bird, or is it better (as everyone else in the hide seemed to do) and use something less magnified, therefore making it easier to pick… Read more »
There are always exceptions and this may be one of them. While it’s always better to fill the frame, there are times it’s just not possible – usually due to distance, but sometimes you run into other circumstances where being back a bit can help. Still, keep in mind that the physics of the situation don’t care about the difficulty of the shot – everything in the article is still in effect. So) keep the shutter speed high and ISO low :O
Thanks very much for that Steve. I went out today photographing kingfishers again, and followed your articles advice. I put a 1.4x on the 500mm and really tried to fill the frame as much as possible. I think i got much better results. Really sharp and detailed images. The flight shots were hard, but i captured some hovering shots, and with practice i think they will improve. I can now see the appeal of a 600mm, but the 500mm will have to last me a while 🙂 . I’m now wondering if its good at times to put the D850… Read more »
It´s “just” GREAT!!! Well, I have just a 70-300 if vr nikon on my D5300… Yes, I am in the wrong place. A small fish swimming with big sharks (and yours 600 f4). I’ve already read 2 of your ebooks. And now i’m reading the 3rd (SECRETS TO EXPOSURE AND METERING FOR NIKON). I really liked very very much your way to write, it’s funny, ease to learn, and extremely professional! Steve, I was anxious to ask exactly the question that you introduce this article, about the same image (babe iguana). And it’s incredible! I’ve already learned very much, and… Read more »
I know I’m guilty of over cropping. Many times I’ve seen things that were just impossible to get closer to but want a picture because it’s something new to me, just had this happen with a caracara in the Everglades last week.
Steve I love reading your articles and have your ebooks on nikon focusing and wildlife photography. You are one of very few internet writers who even mention heat haze, that’s what made me buy your ebooks – real practical stuff! I generally try not to crop much except for adjusting framing but often its hard to get very close to some subjects. I can see that my subject is just too far away but i have a go anyway … but of course often not a great result., especially with heat. I should just try to get out in the… Read more »
Excellent article as usual Steve! I’ve noticed in the past that I had some ISO 6,000 shots that were pretty good, while other shots at ISO 800 were poor. I noticed that the ISO 6,000 shots were frame filling shots, so I suspected the extra data was the reason for the better quality. After a lot of experimentation, I’ve been able to get pretty good images at ISO 4000 on my D500, if I fill the frame and shoot to the right. Your article confirmed a lot of things I have suspected for some time. Thanks!
Well written and thoughtful article. I too try to limit my on land shot crops to the “edges” and find many shots ending up at 4×5 or 16×9. I wish I had a body that offered different crops in camera. I would use them! I do find myyself cropping too much on “first of a kind” wildlife shots, like eagles fishing, then replacing those shots over time as I get better versions. The first shot is to put one in the catalog, then I work to impove. Since I have only ever seen one grizzly w/ cub, that cropped shot… Read more »
Steve: I am one of those who almost always crops. Why?: 1: I usually can’t get close enough to the wildlife to fill the frame 2: I always want to leave extra pixels around the subject to be able to properly compose/position the main subject of photo in post. 3: Subject matter is at the top of my list as that is usually what captures the attention of the viewers of my photos. 4: I can’t afford a 600mm prime lens.:):) My goal is getting the best pose of the subject as possible. The rest I take care of in… Read more »
Robert Capa’s comment “If your photographs aren’t good enough, you’re not close enough” under a new light! 😉
Great article and very true! Unfortunately, here in the UK and specialising in birds in flight, I often find myself some considerable distance away from my subjects (centuries of birds being shot by man makes them understandably cautious). All this despite good fieldwork technique and 30+ years of birding knowledge. So, I have to crop on many occasions, using a high res camera (D810, D850) for my agency submission work, which cannot be upsized. PS Steve – I bought the D850 grip in the end!!
My Dear Steve Perry…great article. very important details. I am always reading your extra ordinary writings and referring to your books with immense happiness and in great motivation. Thank you very much for all your email and updates. I want to buy the Exposure Metering Book too. Will reach your website as soon as possible. Blessings and Warm Regards. Yours Sincerely,
Nikon Wildlife Photographer
SUMANGALA RAJAPAKSE
From
Colombo 05 – SRI LANKA.
Great article and fundamental to any great looking photograph
One of the best article on this subject! Thanks!!
Can you explain briefly the concepts of up- and downsampling?
It’s simply adding or subtracting pixels to change the image dimensions. For example, if you have a 6000 x 4000 pixels image and make it a 3000 x 2000 pixel image, you’ve downsampled. If you were to make it a 12,000 x 8000 pixel, you’ve up sampled.
If you have to change the size, it’s always better to downsample since upsampling has to “create” parts of the image (pixels) that weren’t there.
Thanks for another very informative article, I have all your E-books. I love your teaching style, I try to catch all your videos also which is always very informative and entertaining. Thank you for what you do!
Bill
Could newer generations of Artificial Intelligence software make cropping more palatable?
https://topazlabs.com/ai-gigapixel/
I’ve no skin in game with Topaz other than as customer of their B&W conversion plug-in.
I’ve started looking into it. I did test the toucan example above with the Topaz AI software and it was still no contest – with a heavy crop, the closer shot easily won. However, I am planning to field test the idea of using the AI Gigapixel software vs a 1.4TC. Since you end up with one stop of extra noise and lose a touch of image quality, I’m curious to see if there’s a meaningful difference between using the software and a TC. My feeling is that it’ll probably be close with the TC still edging it out, but… Read more »
Good Afternoon Steve, Great article it helps to understand what happens when we crop.
Steve, great article as always, but it makes me feel like I’m missing something very fundamental. By shooting with a DX body (D7500 in my case), are we handicapping ourselves at the outset by starting with a cropped image?
Not necessarily. First, if you can fill the frame the way you want with both cameras, the full frame will show better performance, especially with ISO. (Although, a 24MP crop camera can capture more detail than a 12MP full frame). So, from an equivalent ISO (and usually dynamic range) standpoint, a full frame camera is always better given the same framing. However… If I have to crop my FX camera to DX proportions, that goes out the window. I’d MUCH rather use my D500 than the crop my D5 to FX size – it’s always better. See this article: https://backcountrygallery.com/cropping-full-frame-vs-shooting-a-crop-camera/… Read more »
Thank you, Steve. I had missed the video on the topic, which nicely explains the issues involved. I have full-frame friends who actually say that they can they can “ just crop” to get a decent birding image. Now I can discuss the issues with some knowledge.
I run into that a LOT – the thing is, most people never test it, they just assume full frame is always better, even cropped. Of course, it’s more about pixel density than format when it comes to retaining detail.
Excellent advice but not a very practical one. We usually crop because we have to: 300 mm, not 600 lens available, the bird is too far, we like to cut some terrible brunches from the picture. Second not practical advice would be: use always the low ISO 100 or 200, you will have better details, less noise and so on. Never use ISO 3200.
Question: what makes more damage to the pictures cropping or high ISO?
Wildlife photography isn’t always easy or practical – I’m just pointing out the consequences of cropping. Our feelings about the practicality of it have little influence over the physics of the situation. It’s one of those “it is what it is” situations.
As for cropping vs ISO – it depends on the crop and ISO 🙂 As you saw in the shadow pull example, cropping had a far grater impact in that situation than ISO did. With a lesser crop, ISO would come into play more.
agree, thanks
TC 14E III ordered!
Excellent advice as always. I must confess to being an abuser of the crop tool. While you are of course providing advice for critical work product, sometimes even a less than perfectly detailed image is better than none at all if that’s your only choice. Like vacation photo’s.
Keep the advice stream flowing.
The new book is great by the way, i have all of your books and they are brilliant.
Thanks Chris 🙂 I agree – sometimes you just want a shot or memory, nothing wrong with that if the photo fulfills your purpose.
As usual, down to earth and understandable advice. In the search for a great shot, we often forget that patience can pay off big time. Give the subject some time and they may come closer and give you an opportunity at a better shot. Just be prepared, be still and wait for it.
Hi Steve, great article as always. Could you explain why you would need to downsizing images with different resolutio to make fair comparisons if you won’t be doing that in your normal workflow?
Thanks
It’s really the only way to compare and see the effect cropping has. The main point though is no matter what the output – print or web – you’re always better off with more information (less cropping).
Great article Steve, As a newly avid birder, I have found that sometimes I cannot get close enough,shooting across a pond or into the ocean for flying birds(sometimes, to just try and figure out what I am seeing), but in any case, have to crop in those situations. I am now torn after reading this article and your video on 180-400 sharpness vs 600 prime. As you said in the video, they each have some limitations. If you had to choose one, which would be your advice. I also have the Tamron 150-600, but without the TC for it, and… Read more »
Although the 180-400 is impressive, for me, the 600 F/4 will still get the call most of the time. That said, it also depends on how often you need the zoom. If you’re frequently in situations where a zoom is critical to get the shot, then the 180-400 makes more sense.
I am a fill the frame fanatic. I shoot with a d500 or d750. But I also carry a p900 along as a secondary camera. If a bird is to far away for my d500/d750 I will try a shot with the p900. For still sitting birds it works ok. And is better than trying to crop a small dot in the image that I would get with my d500/d750.
Brilliant as usual. Love the style, the information the insights! I too plead guilty, one reason especially while birding, it’s not about the photo but more about the bird itself. One needs a record shot and if it has noise or is just as small as the focus point in the camera so be it. I have D500 with an 80-400 and a 500 f/4 I do have a 1.4 TC as well and have started using that more. Love all your books which I buy the moment they come out. I am missing the video that you made since… Read more »
Thanks for the kind words and the book purchases 🙂
Hi Steve, I’m addict to your posts, videos and books. I’m only missing now ‘Secrets To Stunning Wildlife Photography’, but I’ll fix it in the moment 😉 What a great inexpensive content you do for all of us! I’m big fan of your photography. I have to admit – I just fully recognized myself in this article. I recently got 200-500 f5.6 to my loved D750, but still I would like to get closer. From that reason I just got 2nd hand d500 but for fantastic deal. Can you just tell me, how should I explain to my wife, that… Read more »
Thankfully since I do this for a living, my wife is understanding – she’s even shooting with me now from time to time, so I’m lucky – ZERO problems when I need new gear 🙂
I haven’t used the Kenko, so I really don’t know.
Thank you Steve for having time to answer, much appreciated. Than I would ask one more thing – could you still use d500 + 200-500 combo with Nikon TC 1.4 III for birds in flight in good light scenario?
The 1.4 + 200-500 is sharp enough, but AF really suffers. While you could technically use it, it wouldn’t be my first choice for birds in flight.
Thanks for another insightful article. You are, by far, my most valued photography resource. Now that you have the 180-400mm lens, I’m wondering if there’s a plan/schedule for an article about it?
Eventually I’ll probably post an article. I haven’t had much time to use it with finishing up the book and trying to get new posts out, but I’m taking a trip soon where I think it’ll get some love.
I know that switching to DX mode on my D750 results in a significant loss of resolution but, all other factors being equal, which do you think would give better results: Dx mode with no cropping or FX mode with cropping. I do not own a teleconverter so I am stuck with these two options.
The results are the same for the same crop – see this post:
https://backcountrygallery.com/all-about-your-cameras-crop-modes/
Then there are tight crops in the field – lots of detail, not so much composition and next to no ‘moment’.
In my experience, proper framing in the field and capturing compelling moments are not mutually exclusive.
Another exceptional informative post
So true…………..I need longer glass
………..Gary
Amen brother…
Good reminder and KITA to use the “foot zoom”. My question; shooting birds and small,wildlife with a d500, I feel like I can get closer with my small but sharp 55-300 than with my 200-500, which seems a lot more intimidating especially with the hood in place. But the 200-500 has more reach…
Maybe I should be springing for the 300pf+tc?
I belong to a facebook bird group and can usually tell if a posted image has been cropped. I can admit to occasional cropping and some of those heavy cropping. I don’t consider the heavily cropped images to be good. Just do it to show people what I saw out there.. Have to admit I don’t really use the TC1.4 as much as I should. More of a problem with me finding a BIF in the viewfinder with that very narrow field of view. I know, I know, more practice 🙂
I got my first DSLR (Nikon D750) nearly three years ago, but some infected person must have been handling the camera before me because I quickly fell victim to the cropping epidemic. I cropped ’til I dropped. The final images were so disappointing that I thought I’d never get well. Then I stumbled upon a simple cure – Dr. Perry’s e-books and blog. The treatment’s taking some time, but is inexpensive and not painful, and gradually, through some weird kind of osmotic process, my condition is slowly improving. The medicine’s working, and I think I’m absorbing the goodness from what… Read more »
Wow – thanks so much!
Yes, the 1.4TC works well with the 200-500 (at least mine does), but I wouldn’t use the 1.7X or 2X. Also, when I say “works well” I mean from a sharpness standpoint – AF takes a hit and not all of your AF points will work – only 11 of them if I recall (center ones) in the D750. So, it’s do-able, just not ideal.
Thank you Steve, the TC is around AUD$650 so it seems to be a reasonable compromise. I’ll seriously look into it. Also, I’ve been thinking… would you consider running a training scheme where people send you a RAW file and their attempt at Lightroom post production, and then you work your magic on the same RAW file. That way we could compare our efforts against your professional eye? It wouldn’t have to be an ongoing commitment, maybe just one photograph per customer to help them see how Lightroom could have been used more efficiently to get a better result. (I… Read more »
Great article, thanks for slapping us back to reality. We all know this, but forget in our day to day shooting, Thanks again!!
Great article Steve. All your work is much appreciated.
Another excellent article and clear explanation Steve. As someone without the ‘high end’ gear, this sort of advice helps a lot.
A real reality checker, explained very well with examples. It really has sunk home now how important getting the correct lens for the job and get as close as possible without compromising yourself and keep the cropping to a minimum. I intend to purchase all the books Steve once I get my new iPad with better memory and space! I’m a big fan of your work. Please keep it up!
Thanks!
Great article and makes perfect sense…one burning question though: how were you able to maintain the sharpness with the ISO so high? 3200, 4000, etc? I have the d850 as well, but anything over 1600 is a real challenge for noise. It doesn’t appear that your examples were in bright sunlight (especially the monkey–or whatever that is). So how did you do that? Your speeds were 1/850th and faster at times—bad combination for me!!!
Part of it is that I shoot the D5 a lot – it’s about 2/3rds to a full stop better. So, my ISO 3200 looks like most people’s ISO 1600. In addition, if you have a truly sharp, frame-filling image, higher ISOs aren’t a huge problem – they shouldn’t soften detail that much. Where you get into trouble is if the detail is “small” (often due to cropping) and the “grain” from the noise is about the same size – it overwhelms the fine detail and kills sharpness. Filling the frame properly is really a huge step in the right… Read more »
In addition to filling the frame I also find that it is the quality of light that makes or breaks a high ISO image. If you are shooting a bird in complete shadow at dusk and need high ISO then it isn’t going to be the best. If you are shooting at the same time of day but are lucky enough to not be in the shadows and get some good quality light (but still need the ISO to get the shutter speed) your image will be much better.
I think this article is a terrific reminder. Thank you.
Fantastic as always Steve! Thanks for the great tips and helping to improve my photography!
Great article with illustrations that really help make the points. Thank you!
Hello from Vienna!
Really an eye opener! Thanks Steve! And you made me remember that I have a 2x converter on my shelf, I never used because it because my old camera didn’t havehi ISOs. But the camera changed and now it will probabably be a lot easier, better and sharper! And I also appreciate a tripod now… Ciao
Just be careful – some of the 2X converters aren’t really any better than cropping 🙂 I’d highly recommend testing both ways.