
Psst…Wanna know the secret to getting consistently sharp eyeballs and better compositions with your wildlife photos? Use your AF points in conjunction with your composition.
One photographic faux pas I see regularly – even from more experienced pixel pushers – is improper AF positioning technique.
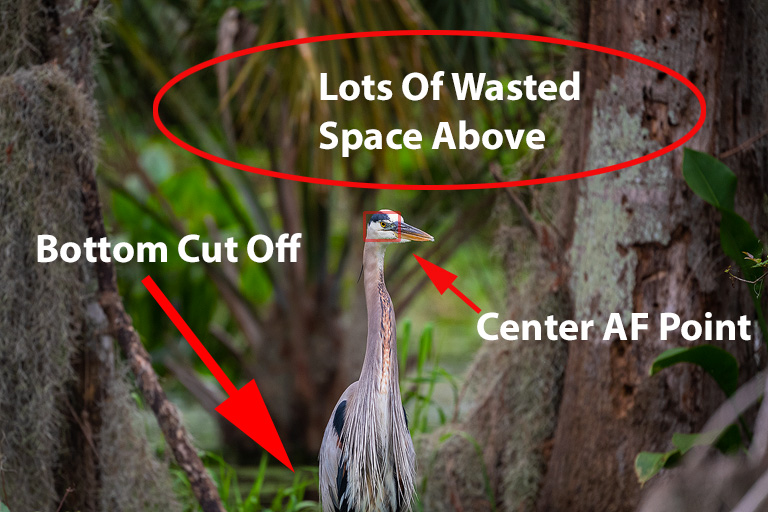
What the heck am I talking about? I think this discussion is best illustrated with an example using the regrettable photo below. I think we’ve all shot images like this before:
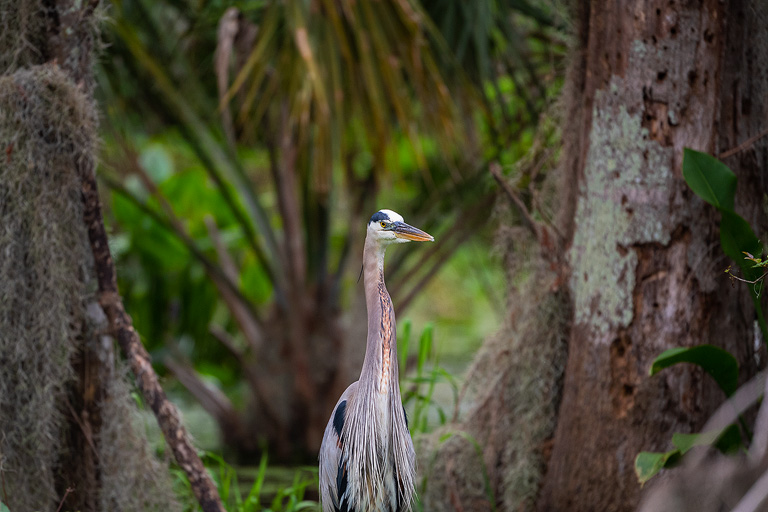
What the heck happened?
Simple – I employed the center AF point and since I was placing it on the eye, I ended up with a LOT of useless space above and cutting the body off at the bottom! The thing is, I see photos like this ALL THE TIME – sometimes with an attempt to “fix” it with corrective cropping. This situation often rears its head because, while the user fully understands the importance of keeping focus on the eye for a wildlife photo, they haven’t taken the next step – moving AF points as needed.
Of course, this results in the unfortunate situation where you focus on the eye, fire away, and end up with an incredibly poor composition with critical parts cut off. (And you never want your critical parts cut off!)
After all, there’s a reason you have so many selectable AF points in the viewfinder – so you can move them around as needed!
AF Point Technique – Static Subjects
My technique is to, whenever possible, compose first and then move the AF point to the eye – or as close as I can so I minimize the amount of focus / recomposition that goes on. Over the years, I’ve discovered this technique results in two key benefits that wildlife photographers love.
The first is that it prevents the scenario with the sample image above – you don’t end up hacking off part of the animal like you’re starring in a Friday The 13th movie. You create the perfect composition first, and then you make the AF point position work for YOU instead of the other way around.
The second benefit is that it minimizes focus and recompose scenarios. Focus and recompose works well for some subjects, but for most of my wildlife, I prefer to have an AF point right on the eye when I can get it. (You’ll see why in the examples that follow.)
Let’s talk technique and bring this all together.
First, I find this method works better with back button AF than shutter release AF. Since I’m using BBAF, I’m always in AF-C (as you should be if you’re using BBAF – if not, you’re not using the setup to its fullest potential and need to read this free guide.) If you’re using shutter release AF, you’ll want to switch to AF-C. As for AF area, let’s start with a couple of examples for relatively stationary animals, so we’ll use single point AF.
(Note – using larger AF or “auto” type areas for static subjects often results in photos where the camera does not always focus on the eye – single point is always the best choice for static subjects since you can pinpoint the eye.)
Assuming your settings are the same as mine (i.e. AF-C, single point AF), the next step is to create the composition you want in your viewfinder – and quickly (it’s wildlife after all – if you obsess over the composition for too long, the critter laughs and moves on). Once you have your masterpiece composed, move your AF point to the eye.
Now, at this point, most photographers focus on the eye and release the AF-On button, assuming everything is set. After all, why keep focusing once you get the lock? Right?
However, it’s a trap!
Here’s my approach:
With my AF point solidly on the eye, I focus and I keep pressing the AF-On button as I fire away in short bursts. Since the camera is in AF-C, this effectively compensates for any minor changes in subject distance and keeps critical focus consistently on the eye.
Why all the paranoia about distance changes with a static subject? The thing is, we tend to use long glass with wildlife, and our depth of field is incredibly shallow. So, it doesn’t take much distance change at all to knock an eye out of critical focus – especially with a frame-filling subject!
I also assume there a few readers who are no doubt whipping out their Depth of Field calculators at this point. I’m sure they have noted that with a 600mm lens at 50 feet (15M) at F/4, Depth of Field is nearly 1/2 foot (15CM). So, it would seem even if the subject moved an inch or two, you’d still be fine.
However, you have to remember there is a difference between the “acceptable” sharpness you get within your Depth Of Field range and the critical, biting sharpness you want for the eye. Images that don’t show critical sharpness at the eye get introduced to my delete key (and I often examine them at 200% magnification). With a frame-filling subject, I want eyeballs so sharp I can make out the little capillaries upon magnification; I don’t settle for “OK” sharpness – and neither should you.
There are all sorts of ways minor distance changes are introduced while you shoot. A few quick examples include:
- You move a little back or forth while hand holding.
- An animal moves its head a bit.
- The critter taking a small step or making a minor body adjustment.
- The animal isn’t on a stable platform (i.e. if it’s in a tree, on the water, etc).
- You’re not on a stable platform (i.e. shooting from a kayak or boat).
Additionally, the camera’s PDAF system isn’t perfect. Most of the time it does a good job, but at times you’ll discover that while it has a good lock, it doesn’t always have a great lock. If the camera isn’t quite getting a perfect lock, at least if you keep AF engaged it may continue to adjust as you shoot – and you’ll likely grab some images in the series that are bitingly sharp. (By the way, this is tricky to determine without stopping to chimp, so I just assume the worst and shoot with the technique described.)
I find this method yields a higher percentage of images that have crucially sharp focus right where I want it – on the eye. However, becoming comfortable with moving AF points from shot to shot can take a bit of practice, so I recommend a few practice days at the park with easy animals.
What If You Can’t Reach The Eye?
Unfortunately, keeping the AF point on the eye isn’t always an option – sometimes your ideal composition places the eye above the AF field, especially with full frame DSLRs. (Note – DX / APC-C bodies tend to have better AF coverage – and of course the full-frame coverage of the AF system in a mirrorless camera often means you’ll never have to focus and recompose.)
So, what happens when the AF point won’t quite reach the eye? In that case, I still move the AF point as close as I can to the eye, but then I focus and recompose. However, I don’t just take a shot and assume I have it either.
When I am forced into a focus and recompose scenario, my typical technique goes like this. First, focus on the eye (and release the AF-On button with BBAF once I have a lock), recompose, shoot a short burst (usually 2-3 frames on a static subject) – and then go back to the eye, refocus, and repeat it a few times. My hit rate with this, while not as high as the first method, still puts a stupid grin on my face most of the time when I check sharpness.
(Note – the example above is why I prefer BBAF. With shutter release AF, you’d have to switch back to AF-S and add another step to the process or you’d need to use AF-Lock. No biggie, but I think BBAF is still quicker to execute.)
AF Point Technique – Action
I know, that’s fine for stationary targets, but what about something on the wing?
Pretty much the same thing applies, although you may be using a wider AF area than single point (I prefer Group and D9 myself for my Nikons). The only real difference is that you need to anticipate a bit more.
The thing is, while it’s possible to adjust your AF point position with a bird zipping through your viewfinder, it’s far simpler to anticipate where you need to have it instead.
Also, I’m not nearly as picky about super-precise AF placement or composition when doing bird-in-flight shots. I shoot flight shots with the idea of getting things in the ballpark in the field and then refining it with a small crop back home. (Note – this is NOT permission to crop heavily – the less you crop, the better off you are – see this article for examples.)
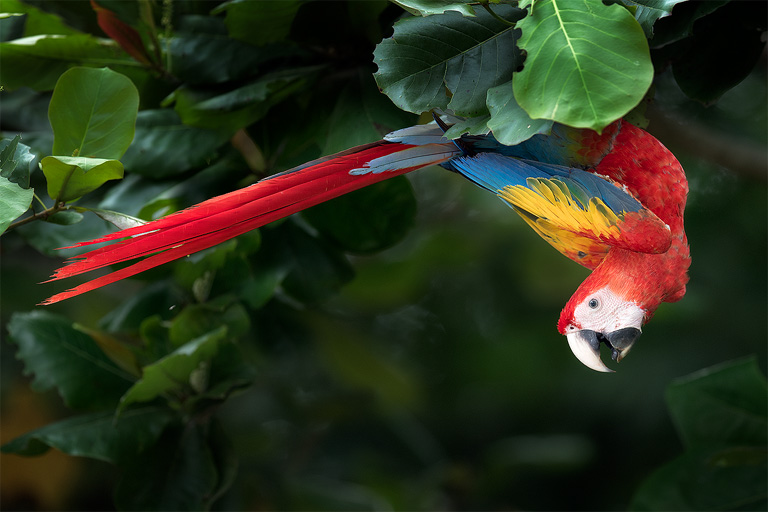
So, my “moving critter” technique is to move the AF point where I think the head is going to be and try my best to stay on that area of the bird / animal as it flies through the frame. Most of the time, this simply means I have the AF area a bit off-center (and often up a notch, depending on the species) so the bird’s head isn’t smack-dab in the middle of the frame (you risk cutting off feet / tails when you use the center area). Also, keep in mind that if the bird is parallel to you and has a long neck, you can also focus anywhere on the neck and get a sharp eye as well.
(Note – one of these days, I’ll give you a thorough “how-to” for Birds-In-Flight, but complete coverage of that topic goes beyond the scope of this article.)
Exceptions
Of course, there are exceptions to every rule and this one is not immune.
The thing is, there are times when the light / contrast is low or you’re using a slower maximum F/stop (like between F/5.6 ~ F/8) – or maybe all of the above are working against you. There may be other times where the subject is of such low contrast that the outer AF points struggle to get a decisive lock.
When that happens, you’re generally better off with the center AF points and recomposition as needed. The AF points in the middle of the viewfinder tend towards greater sensitivity and work better in low light / small max aperture / low contrast situations than the outer points do.
So, the advice goes like this – whenever you can, compose the image and move the AF point to where the eye is. If AF proves unreliable when you do, then head back to the center and focus / recompose instead.
Happy shooting!
~Steve
PS – If you enjoyed this post, I think you’ll REALLY like my e-books and video workshops! Thousands of pages and hours of videos filled with tips, tricks, and techniques – all my best content! Check ’em out – click here (hey, it’s free to look).


This is sooo helpful. I always struggled with the fact that the depth of field mathematically being large (a foot or larger), but the eye of my subject still not being in sharp focus. Your explanation that everything in the mathematically calculated depth of field is not necessarily in super sharp focus helps me so much! Until now I thought my camera was off or I wasn’t doing something properly. Thank you Steve!!!
Thank you again for your great eBoooks. I have been refining and practicing the techniques in order to improve the sharpness on the eyes of wildlife.
I have be working on it and you are right takes practice . thanks Steve .
Cant wait to try some of these tips, I just need to get a longer lens for wildlife.
I use BBF based on your video, and I love it. However, this technique you’ve described here is interesting for stationary animals or birds, and I will try it even though I’ve never played around with moving the focus point. Previously, I’ve just focused on the eye iof possible and released the button and then recomposed slightly. I’m also wondering about what to choose to move the focus point…for my D7500 would I choose d9 so I can move the focus point faster across the screen, or d21 to be more precise, or d51? I just never quite know which… Read more »
Hi Steve…Yes, PLEASE do a birds in flight video!!!! Love everything you do, so I know that would be great.
Thanks Steve, another great article. I leave the focus point locked at the centre, because I find I catch the sub selector button with my thumb and if it isn’t locked I end up moving the FP all over the place! Do you have any advice please? Thanks
I know on the D500, you can set up the joystick so that when you press it, it will bring the focus point right back to center, making it easy to find if you lose track!
Thanks Suzanne. I have the centre button of the multi selector set to do that…..trouble is I don’t notice I’ve moved the focus point until a while later!! So I end up with weird positioning of subjects, because I’ve been focusing with an off centre point.
I thought one of the main benefits of AF-ON back button, with AF-C, is that you can place a single center focus point on the bird’s eye, press to focus then un-press (which locks the focus), then recompose. No need to fiddle with moving the focus point…focus hasn’t changed…just the composition.
Am I wrong?
You can do it that way – and I do when the eye is out of the AF field – but the way described in the article gets you even more sharp eyeballs. Each technique is just a tool that you use as appropriate for the situation at hand.
My Dear Steve Perry…once again I am receiving a very great article in Wildlife Photography. I am highly interested in going through your valuable articles and I am learning a Lot. In my possession I have a very good collection of your Nikon videos and a collection of Books that are written by your good self for the Wildlife Photographers and the Nikon Lovers. I am wishing you and blessing you to do more fruitful works like these in the future. Thank you very much for sending me all the updates. Blessings and Warm Regards.
Thanks for another great article, Steve.
I really enjoyed shooting and hanging out with you in Costa Rica.
I’m still wading through images!
Great tip, thanks!!!
Very helpful and informative as usual Steve. I just started using the “compose and move the AF points” technique recently but as stated above it takes practice. For the Birds in flight I’ve just started using the technique you mention but that takes even more practice, more often than not I’m just lucky if I can keep them in the frame much less with the focus point in the right place. It’s good to know I’m on the right track at least.
One tip l like to pass along for people struggling with BIF is to practice (in bad light of course) at just tracking the subject – and don’t shoot. Just get used to panning and maintaining focus on the subject. Once the light gets good and you’re all practiced, then start shooting 🙂
Your tips are on point!
Another great set of tips, Steve. I don’t know how many times I have to be reminded to “get it right in the the frame and then shoot”, before it sinks deep. Sometimes I get too excited, and then I come back with cut off ears, legs or tails.
Hi Cookie –
LOL – I have the same problem sometimes 🙂
Thanks Steve for the article. This will me on my trip to Katmai NP to photography the bears feeding. Would love to fine out if you are going to be doing any work shops in Fla. soon. Again Thanks
Makes a whole lotta sence…I do as you do and find it works very well. Great tutorial Stave as usual. Also some fine shots. Thanks.
Hi Steve, Loving your articles mate. Would seriously love to read your BIF techniques, so many ‘mentors’ on the web that should hang up their pencils and typewriters because I don’t think that they’ve ever held a camera. Again, I thank you for your constant input into my bird photography and I look forward to your BIF article.
Kindest regards,
Bruce,
Australia.
Hi Steve, thanks heaps for this and other articles you have offered for us to get better and think about how we approach our shots. I really enjoy reading them and also glad they are not a novel. I have several of your e-books and love them. I HAVE A QUESTION ABOUT SHUTTER SPEEDS! Please excuse any ignorance. I own a Nikon D7100 and notice that your shutter speeds for some of your shots are quite fast. I have setup BBAF and Auto-ISO on mine, and therefore thinking about a general point of difference between the cameras you are using… Read more »
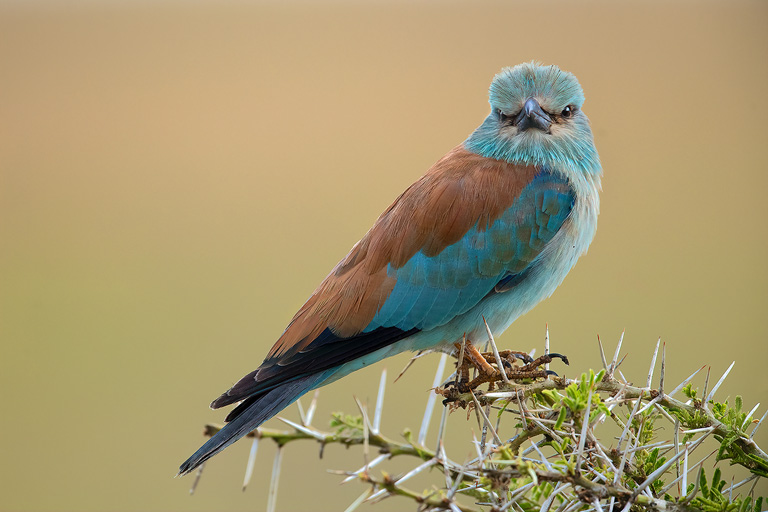
The shutter speed I use generally depends on the situation (the 1/2000th second for European roller was a mistake – they happen LOL). The photos in the article were all either hand-held or taken from a. vehicle and resting on the edge of something – so I needed more speed. However, I do see a lot of soft images from people not willing to go fast enough with their shutter speed. In my opinion, if the photo isn’t sharp, it’s a throwaway – no matter how low the ISO. So, I’d rather have a sharp image and deal with some… Read more »
Cool. Thanks. Have a good day.
Shaun, in case this applies to your situation: I found with the D7100 buffer limitation I had to upgrade to an SD card that could be written to faster. I believe it’s a 95Mbps write speed. No more lags between shot sequences.
Hi Suzanne, thanks for your message. I forget what my cards are, however I do remember purchasing them as fast writing cards. I will check. Thanks heaps. Have a great day. Shaunie
Great article Steve, small things can make a big difference as you pointed out in your writing Really looking forward to your “how-to” for Birds-in-Flight future article, since I am passionate about the area of photography. The challenges are enormous as I have discovered. Your body of work enviable as well as startling! I own all your e-books and often return to them for brush up. Thanks so much!!!
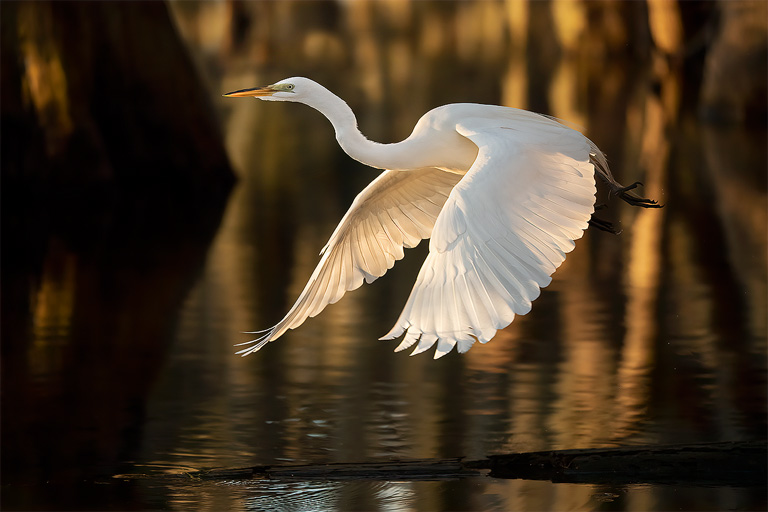
Excellent article though what is most important is practice, practice, practice. I also question the DOF from a calculator as compared to the usable DOF when taking a picture of a subject as with the first picture of the heron. While the 600mm at 50 feet and f/4 will have a total DOF of half a foot, the DOF in front of the point of focus is half that amount or 3 inches. The eyes may be sharp but not the beak. In my own experience with the new cameras the Group AF works exceptionally well with a single hummers… Read more »
Hi Bruce! Yes, I agree with practice – in fact, I was thinking about an article addressing it 🙂 So many people just want a short cut, but there’s just no substitute for experience. As for the DoF calculator, I only use them for examples in articles and videos – I don’t think I’ve ever looked at one in the field. I agree that you have to be careful if you want all of a beak or body in focus, but that has to be balanced with subject isolation too (another article LOL). The only reason I mentioned it was… Read more »
Good info Steve. Regarding Nikon center AF points sensitivity, etc. In April/May Nikon released new camera firmware for the D850 and D500 (maybe others?) that is supposed to help.
Nikon sez – “Fixed the following issues:
– The camera sometimes had trouble focusing on subjects in the focus points at the edges of the frame.”
Curious if you/anyone has noticed any AF improvement with the new firmware?
Haven’t used it enough to know. My initial impression so far is that it’s not much better. I was shooting a video of a lens in sunlight yesterday and focusing on the lettering near the distance scale. The Z6 actually struggled to get a lock…sad…
Thank you for this article it was sorely needed!
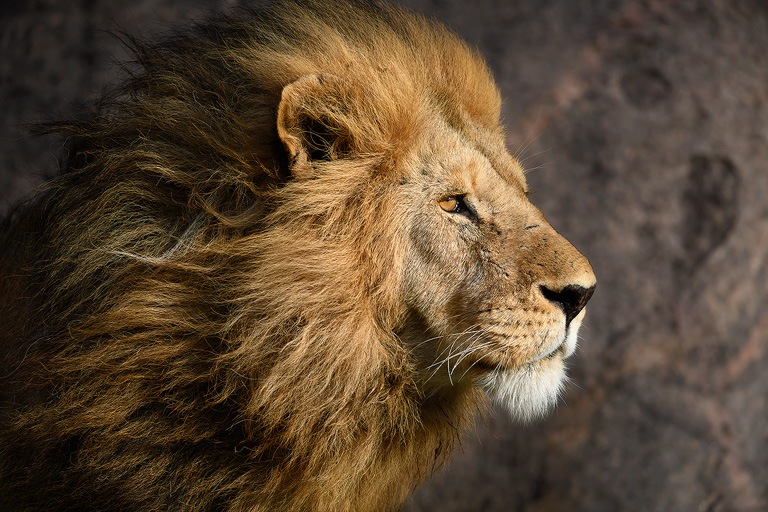
Steve, I have your e-books and love each of them. I noticed you took the lion photo with a Z7 and made me wonder if you have used the new eye detection capability in the last software update and whether or not it works with wild life. I take mostly people shots and sounds like a great feature.
Nope, not yet. It’s only designed for humans, so I haven’t tried it for animals.
The new Fuji FinePix 140 P&S includes face detection and will distinguish pick the face nearest the camera. It also is supposed to work with animals as well as people. No reason why this could not be provided as a firmware update by Nikon with its dedicated AF processor.
Does the new update bring auto eye focus to D850 or just to mirrorless bodies. Have you heard if Nikon will bring any type of Procapture to future models like the Olympus? This would be a wonderful feature for Nikon wildlife photographers
It’s just for mirrorless and it’s just for people at this point. Hopefully Nikon will update to add animal eyes 🙂
Re-assigning the Depth of field button to single point focus while leaving the AF-Lock button to BBAF (multi segment focus) allows the latitude to switch back and forth with out camera adjustments.
This is a trick I learned from you, Steve but I almost never see it emphasized in your posts about BBAF.
Good point – I still use that trick. The only problem is, it’s only available on a handful of Nikons, so I don’t tend to talk about it as much as I maybe should.
I use the AF store by orientation (a tip from Steve) so when the camera is in portrait orientation it is Single Point and in horizontal or landscape orientation it is set for continuous AF with my chosen AF mode.
Steve wrote;
“… with a 600mm lens at 50 feet (15M) at F/4, Depth of Field is nearly 1/2 foot (15CM).”
I did not know there was an actual formula for calculating DOF. Could you elaborate on or pass along the formula?
Great article, Steve!
Not sure what the formula is, I just use a DoF calculator. Photo Pills makes a nice one.
Probably the main reason I don’t use BBF is that I prefer to keep my thumb on the joystick. In conjunction with continuous focus on the shutter release you get the best of both worlds. I keep the back button set to focus lock.
That works too – lots of good ways to go. I’ve tried a similar setup before but just couldn’t quite get my muscle memory to take hold LOL.
Great info! Thanks Steve!
I am a fairly serious amateur. However, MY wildlife does not give me this option 95+% of the time. Nice to know about for when I run across a drugged bear or tanager.
Michael, I’m not quite sure what YOUR wildlife you are shooting is that over 95% of the creatures don’t give you an opportunity to compose and shoot? I suspect if most of your wildlife is moving at high speed you may be stomping along trying to catch animals on the fly. If you are doing that they have probably already seen you long before you see them and are taking off (which means no time to compose or set your AF point). As Steve mentions there are techniques for birds in the air that he can cover in this article… Read more »
Hi Michael – I was going to say pretty much what Richard says in his post 🙂
However, I’d add that it does take practice. It’s not easy at first but probably in the vast majority of the cases, I can compose my shot and move my AF point to the eye – and I do a lot of action too.
Thanks Steve ! Might I also suggest: if you are using shutter AF or BB and can’t get the perfect composition at the same time as a focus point on the eye, then keep the closest focus point right on the eye, and maybe zoom out slightly (with lens or feet), so you can correct the composition with some minor cropping afterwards.
I’ve done that – as long as it’s minimal crop, I can live with it 😀
On composition
Could I do this with a d 7100 and a 70-300 vr if ed lens ,I notice you work with all top notch gear that I can not afford.This is about the article you e mailed me on composition.Thanks Jim Bianco
Hi Jim –
The D7100 actually has really good AF coverage since it’s a DX camera – in fact, that’s one huge advantage to DX – the AF field covers much more of the frame than FX. So, no need for top notch gear. BTW – before the D500 came out, my go-to DX camera was the D7200 – got a lot of great (and published) images with it. Knowing how to leverage the gear you have is far more important than getting the “best” gear out there. Having better gear simply allows you to “push” things a bit farther.
I only do underwater photography. Every subject is moving. BBAF of shutter release AF?
I’ve done underwater photography for about 10 minutes once while snorkeling – so I really don’t have enough experience to say. I think the D7000 that we were using was set to BBAF if I recall though. AF-C for sure.
Chuck My wife and I both now exclusively use BBAF underwater (D850 and D7500 bodies, Nauticam housings). We are not pros but in our experience we find this affords all the same advantages underwater as topside and no disadvantages. Sharp eyes (and pleasing composition) are always difficult to attain on small fast-moving fish. I think of it as similar to shooting birds in flight except within a few feet and using a macro lens and flash/strobe. Switching from single point to another focus mode (Group, 3D or AF multi-point) may sometimes benefit. It is a matter of keeping the BBAF… Read more »
Dave,
Thank you very much. I’m diving a Little Cayman next month and will give your advice a try. It certainly makes sense.
That’s great with the Nikon, but the Sony is different.
How so? I’ve played with Sonys and they allow you to move the AF points around – in fact,t it’s even better than a DSLR in that respect since the AF area covers the entire imaging area – you never need to focus and recompose.
Well, I guess the big thing they have now is automatic focus on animal eyes. I believe its there on the A6400 and A7R3, with some restrictions (dogs and cats only right now, if I recall right),… but they are expanding to birds, I hear. I’m told it works reasonable well.
Another fantastic and practices set of tips! I am an avid reader of your blog and take your tips and recommendations very seriously and apply them to my photography. I recently got the opportunity to visit the Everglades National Park and wanted to share some of the pictures with you. Here’s the link to a select few.
https://photos.app.goo.gl/SBTWN2E6pQK71W4x6
I dedicate this experience and pictures to you!
Thanks! Looks like you had a good time 🙂 Lots of cool subjects.
Thanks, Steve!
One challenge I face is deciding (and constantly toggling) between group AF and D9/15 on my Nikon D500 (bought it based on your fabulous review, BTW :)). I know you love to use group AF and rarely I am able to get good in-focus shots especially of bird-in-flight or anything on the move. Same is the case with D9/15. I use AF-C of course. Maybe an issue with my technique – compose and then BBAF continuously while tracking the subject, and taking continuous-high shots of 3 in every burst.
Thought?
The very first place I always look when a question like this comes across is shutter speed. Most of the time it’s not an AF problem, but rather a shutter speed problem. My favorite BIF speed is 1/3200th!
Another great article, Steve. I have read all your e-books. Several tips from your books (BBAF, Manual with auto-iso) helped me take good pictures.
Thanks!
Same here – I bought both your e-books and have read the entire Autofocus one, but haven’t had time to finish the 2nd one. I discovered the idea of putting the camera in Manual mode and letting auto-ISO adjust exposure about 3 days before I read that in your e-book! I’ve been shooting for 45 years and with the D800 I never thought of or read about doing this. It was with the D500 while taking Track & Field pics that I stumbled on it. Absolutely brilliant!!!!!!!!!!!!!!!!!!!!!!!!! So, thank you very much for your informative books and keep up the… Read more »
Thanks for the kind words 🙂