
(Note, this was published a few years back, but I decided to update it for the upcoming fall season)
So, ready to photograph some fall color are ya? Not so sure where to start? Well, take a gander at the 10 tips below and you’ll be well on your way to snagging yourself some wall hangers!
1. Timing is EVERYTHING!
I’ve said it before, but it’s even more important for fall color – shoot when your subject looks best! A quick Google search for “Fall Color Report” will provide an avalanche of links with helpful information. I personally like both the Weather Channel’s fall color reports and the Foliage Network website (sadly, the Foliage network no longer has enough spotters to do their maps, BUT they do have links to resources that can help with foliage conditions) .
For this shot, I had to keep checking for over a week before the trees were “ripe”!
One word of caution – strong winds and rainstorms are not your friends. If you have a place in mind and you’re waiting for the right moment to pounce with your camera, it’s always a good idea to watch the weather for the area you’re planning to photograph. I’ve timed trips for perfect fall color – only to have all the leaves scattered before I arrive.
2. Use a Polarizing filter.
This is my secret weapon for getting great fall color (and great color in general). A lot of people think of a polarizer as a filter that makes blue skies bluer (LOL – the only thing I don’t use it for), but its main purpose it to take away reflections.
Even though you normally don’t notice it, vegetation – leaves in particular – tend to reflect a lot of light. When you photograph this reflection, it “masks” the color of the object under it. By removing the reflection, you allow the true color to show through – you know, like all those brilliant reds, yellows, and oranges.
To see a real world example, you needn’t go any further than a pair of polarized sunglasses. We’ve all been driving along in the car and did the whole “with and without” sunglasses thing. Polarized sunglasses always seem to make the colors pop – and it’s all because they eliminate the little reflections present on leaves (and rocks, vegetation, etc).
Oh, and no – there really isn’t a photoshop way to duplicate the effect no matter what you may have read on the internet. If you photograph the reflection instead of removing it with a polarizer, you never captured the underlying color information to begin with, so no way to recover it.
3. The color isn’t (usually) the subject.
A big mistake people make when shooting fall color is getting all caught up in the color and forgoing everything else.
Hey, I’ve been there and done that myself – only to be disappointed when I reviewed the images on the computer. So, nowadays I tend to treat color more as an added element of the photo instead of the end all and be all.
So, my #1 job when seeking out fall color shots is to find a really great scene first – and then try to set up a composition that uses the colorful vegetation to enhance what would have been a great photo even without the color.
Had I been there in summer, I would have done the same composition – autumn just added some color:
4. Wet leaves are AMAZING!
Sure, shooting on a nice, sunny day can be fun, but you’re far more likely to find me trudging through the woods looking for fall landscapes in wet, foggy, or drizzly conditions.
Why?
No, no, it’s not because I’m a bad weather masochist or anything. Ever pick up a colorful rock from a beach that’s been in the water? Ever notice it doesn’t look so hot after it’s dried off? Same thing applies to leaves. Shoot ’em when they’re wet, add a polarizer, and you’ll find yourself cranking the saturation slider DOWN in photoshop!
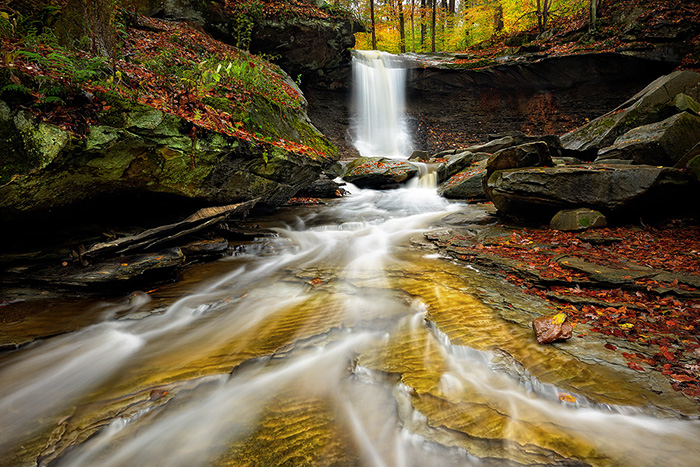
5. Shoot under cloud cover.
I know, another blow to sunny days, but the soft diffused light that an overcast sky provides can really give you some incredible colors. A bright sunny day can easily overcome the punchy colors you’re trying so hard to capture (and even a polarizer can be hard pressed to save you), whereas an overcast day allows for a larger palette of subtle colors to come through.
You know, more of a moody photo than one that smacks you across the face and yells “SUNNY DAY!!!”
This, like many of the shots in this article, is under soft cloud cover:

6. Get great sunlight.
Of course, there’s always room for some sunlight – you just need to leverage it to your advantage.
First, start off when the sun is low – the “golden hour” that’s often mentioned in photographic circles. We’re talking one hour after sunrise and one hour before sunset. The angle of the light is much better, rendering textures that a high sun conceals. The light is also much warmer in color, augmenting those warm colors in the foliage and causing ’em to pop even more.

Look for compositions where you can showcase the light. In conditions like this, I’m usually looking for side light options or even backlight opportunities. (Backlight can really make the colors of the leaves pop!)
Keep in mind that no matter what you’re trying to photograph, I very seldom (read: almost never) come across a scene that looks better at mid-day – those first and last hours of light will, 99% of the time, make your subjects look better than mid-day light ever could.
7. Look for color contrasts.
Another great piece of advice is to keep an eye out for color contrasts. A patch of yellow trees in a sea of evergreens, a single red leaf on a mossy log, or even a green tree in a batch of red ones.
The yellow leaves stand out against the deep greens in this photo:
8. Remember to try different focal lengths!
When it comes to fall colors, it’s tempting to try to include everything you see. However, wide angle isn’t the only tool in your arsenal.
Try all the focal lengths at your disposal – as well as varying distances from your subjects. Maybe a closeup of a red leaf is more compelling than the entire tree. Perhaps a wide angle of a stream is just right. Or maybe zooming in on a group of trees on a hillside makes the best photo.
Although, sometimes ultra-wide is just what you need:
My advice it to use your lens to include everything that adds to your photo and crop out everything that doesn’t. Look at every part of your composition and decide if that area is adding to the shot – or taking away from it. Let the landscape dictate your focal length.
9. Try adding water
OK, I’m a waterholic and I freely admit it. I love flowing water in my shots and I happily use it with fall color every chance I get.
From flowing streams, to lakesides, to waterfalls, I’m game. In most cases, I’m still taking the exact same shot I would have otherwise captured, I’m just using fall color to enhance the scene.
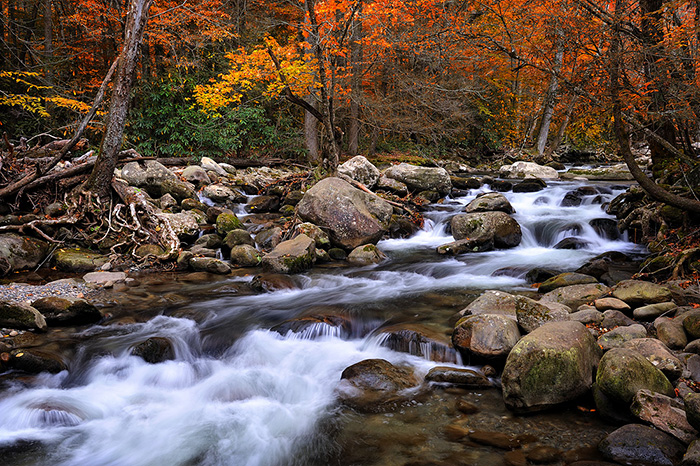
This stream in the Smokies just begged for a photo!
Also, keep an eye out for fall color reflected in the water. Sometimes the reflection combined with a good subject can be pretty magical.
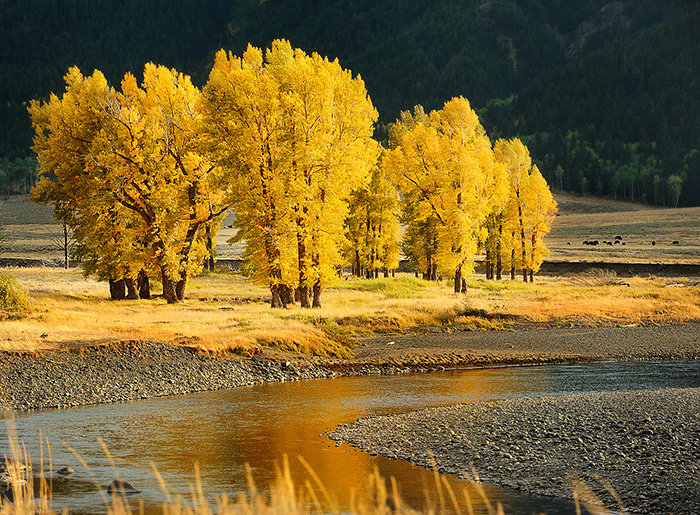
10. Don’t forget the critters!
Most mammals are looking their best in fall, so make sure you take advantage of it. Naturally, you don’t have total control of where you’re going to find an animal, but I promise you, they do sometimes find themselves surrounded by fall colors.
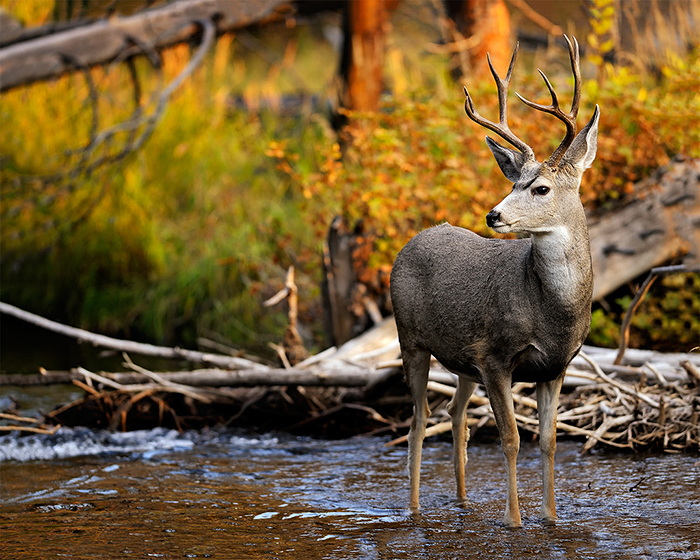
So, in addition to your wide angle, grab that telephoto and see if you can get a critter in the colors!
Sometimes, they do cooperate!
There ya go – happy shooting and maybe I’ll see you out there!
~Steve
PS…
If you enjoyed this article, I think you’ll REALLY like my e-books, Secrets To Stunning Wildlife Photography and Secrets To The Nikon Autofocus System. They’re filled with hundreds of pages of information just like this. Check it out – click here (hey, it’s free to look 🙂 )


Great photos. lots of leading lines, great color, and super compositions.
Thanks, Steve. I used your tips last weekend and the leaf color was so intense. I posted some pics on social media and Georgia State Parks wants to use them! Again, thanks.
Thanks Steve. Great tips. I’ll be using your tips in the next week or so when the leaves start showing color in my area(approx 40 miles north of Phila.) Question, is a nd filter best for softening flowing water and what settings are best?
Thanks again, Al C.
It depends. Most of the time I shoot in overcast or early morning and don’t really end up with enough light sometimes! However, in brighter conditions an ND can help. Also, keep in mind they can usually be used with a polarizer (careful not to get them too tight or it may be tough to separate ’em). Also, a polarizer eats two stops of light, so sometimes that’s all you need. I like 1/4 second as a starting point for flowing water.
As usual, simple, but very informative and helpful.
Thank you Steve. Going to Bodie Ca. and traveling the Eastern Sierra’s going for Fall Colors and Photographing from inside some of the building at Bodie. Always wanted to go for the Fall colors. Thank you for your tips
how does lightroom c/c and lightroom cloud differ………i am taking your lightroom class and would like to clarify if it is ok to use lightroom cloud…….can i get anything but lightroom cloud???? what is your opinion????
Cloud and classic are really different. Cloud is more for tablets and things of that nature. For most users, I recommend Classic and that’s what the Lightroom class is meant for.
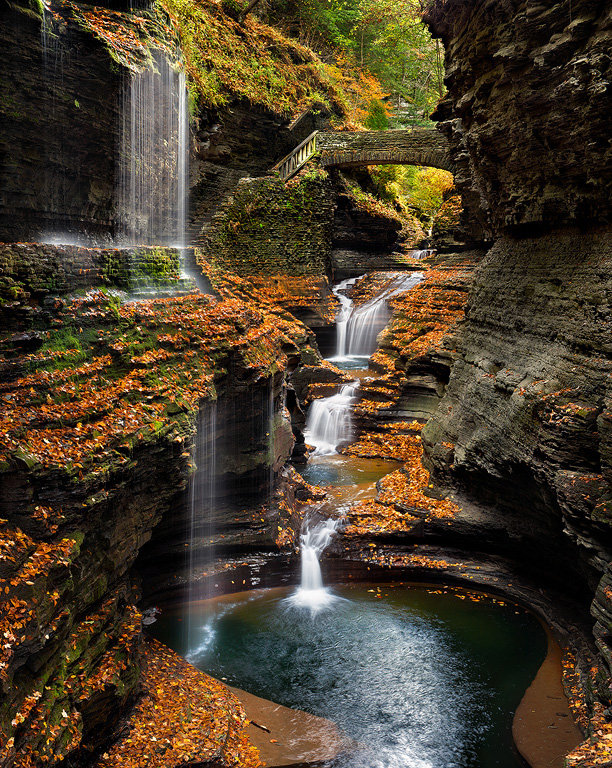
Amazing photography and tips are always appreciated …look forward to someday if you decided to waterfalls photography in upper New York Watkins Glen would be great
Joyce, if you’re anywhere near Syracuse NY area, its a short drive to Chittenango. There is a state park there with a beautiful waterfall. I’ve never been to Watkins Glen so I can’t compare. But I have hiked the trail to the bottom of the falls. They have a bridge across the creek so you can setup your tripod and camera for long exposures to get that silky or smoky water look. Google Chittenango falls for directions . I’ve attached the shot I took from the bridge. It was midday summer sun. I needed 2 neutral density filters to make… Read more »
Thanks again for your generosity in sharing insights into the techniques and skills to get these images. Being in the Southern Hemisphere I have to wait 6 months before trying them out. There’s nothing to say I can’t use them in spring.
This is the most comprehensive guide to shooting fall color I’ve read. Well done and thanks!
Where did you shoot the photo for #4? Looks like upstate New York. I love the falls there (Buttermilk is a favorite).
Thanks – Watkins Glen State Park for that one.
Thanks, Steve! Great advice. Anxious for the leaves to turn. Something fun to do before I have to start raking them!
LOL, true!!
Great stuff here. Thanks for the reminder of a polarizing filter. I have one in my photo backpack but often forget it’s there. Just got back from Alaska. The colors were spectacular. Now, I wish I had used the polarizer. I’m sure it would have made a difference.
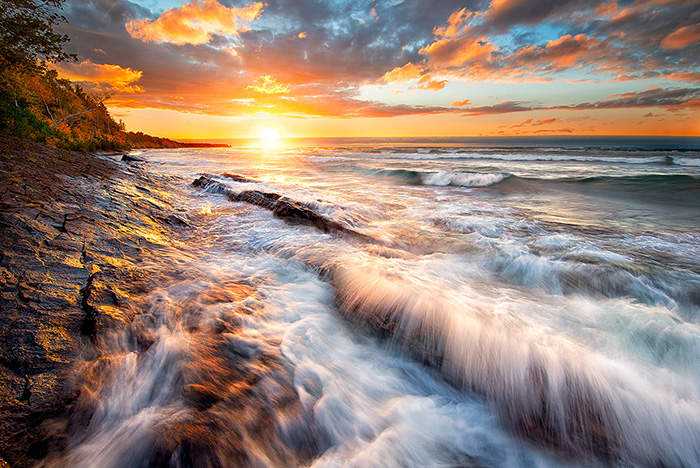
Very helpful article. What about polarizers on wide-angle lenses? I have a 17-70 Sigma. Would a polarizer be useful? Since I’m still in the learning stages (does that ever end?), I research everything. I was trying to figure out which filter. Most articles say no polarizer. Still some say it’s perfectly OK. This makes me nuts. Advice?
It would be helpful for sure. The key is to keep clear, blue skies out of the shot since they won’t look “even”. However, for wide shots with just leaves, tress, etc, go for it. The waterfall shot (2nd photo) was like 14mm with a polarizer.
Thx, I will. Your captures are beautiful.
Heh Steve what a timely reminder, just excellent so thank you so much for sharing.
Thank you so much!
Hey Steve! You are Great Photographer
The images are spectacular! Are you planning a fall, on location, workshop in the future?
Thank you Steve, good reminder 😉
Hi Steve, th,ak you for the advice ! One question : is there any loss of light using a polarizing filter ?
Well… it’s about 1 stop or so.
Typically 2 stops
Fantastic primer/refresher!
Thanks Steve, I have 2 eBooks from you (AF systems) and the latest on Metering. I read both often depending on the situation I find myself in, or just wanting to get better at what I do. All of your youtube videos are to me like going to school and having the best professor on the subject. I wish I could spend an entire week with you to be taught by the best. Keep up the good work.
Ron
Thank you!
Very well done Steve. Depending upon the location and nearby water or the latitude the “golden hour” can last 2 hours as can the nautical twilight period. With a digital camera I can shoot long after the sun has set.
What were your camera settings on the water pictures. Especially picture #8
If I were a clipboard where would I be to see some camera settings?
Consigli sempre utili e da non dimenticare mai. Grazie Steve!
Thank you very much, Steve,for your precious advices updated and your stunning pictures!
Thanks!
Thanks for updating these great tips.
I visited Hocking Hills State Park, OH, last year
– did you take some of these images down there?
Sadly, Hocking Hills isn’t one of my favorite locations for fall. Most of the waterfalls are surrounded by conifers, so no color.
Much appreciated Steve
Your tips are always welcome,
Stay safe
Gary
……………AU
Thanks!
A very interesting article. All your tips will certainly help planning a beautiful fall colour photo. Loved those example photos. Those were stunning!!
We should now demand from you a post processing tutorial on fall colours and of course one more on long exposure focus stacking since you love water!
Thanks Steve for sharing your knowledge!!
LOL – too much work!!
I watched wolves take down an Elk on that point in the Lamar Valley. They chased it for what seemed like an hour up and down the valley. I think the elk was making a run for all the spotting scopes (wolves do NOT like people) but got caught in those trees. It was exciting, to say the least!
Steve, what shutter speeds are you usually using to get the soft silky flowing water?
My favorite is 1/4 second, but faster water can get the look with slightly faster speeds and slower water requires slower speeds. Plus, it depends on light levels and F/stops as well – sometimes I’ll go a little faster or slower if needed to make an exposure work. Still, 1/4 is my favorite.
Steve, I have been shooting for years now but one of my favorite things about your posts is that I am constantly being reminded to do the things that are really the basics. No matter what techniques we learn over our photography lives, the core lessons are always important!
Compose. Look. Frame. The Basics. And my photos are better because of these reminders. Thanks!
Thanks Jim 🙂
Another great blog of great tips and beautiful examples. I save all your blogs for reference. Still working my way through your Nikon Auto-Focus book. So much helpful information. Thanks.
Thanks so much!
Great information Steve!! Thanks
Thank you!
Great information and I was just at the Mill Cabin in the article in NC!!
Very cool!!
Thank you for a wonderful, as usual, article! Beautiful photos!! I would love to know where the waterfall photo was taken that you have under the tip about shooting on cloudy/overcast days. Again, thank for sharing your knowledge!
Thanks – that’s whitewater falls in NC.
Oooooooo! Thank you, Steve! That is VERY do-able for me!! AWESOME!!
“What they said” Amen!!
Thanks!
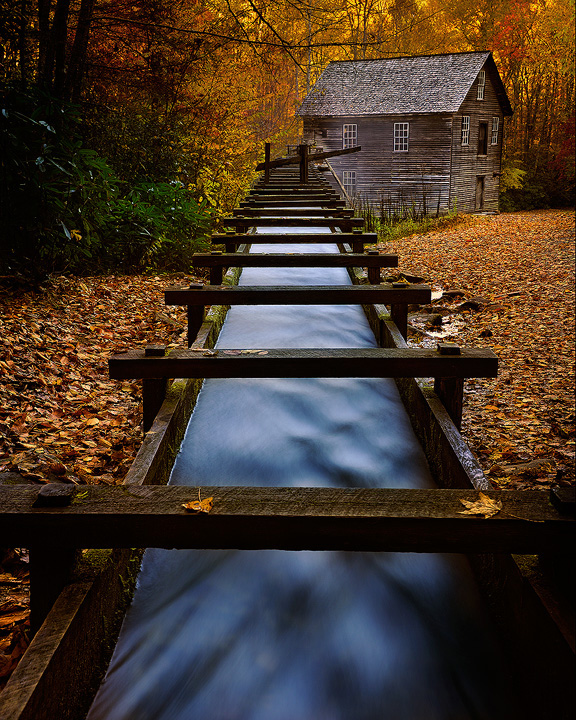
Beautiful shot of Mingus Mill. I was there yesterday picking up my winter supply of cornmeal. The leaves are just starting to show yellow, probably next weekend will be peak in that area of the Smoky’s.
Thanks – yup, it’s getting close to prime time!
As always, a great bunch of tips, Steve. Thanks so much, especially for the reminder on the polarizer.
Here’s another website that predicts color peaks, with a slider to set the date for your intended photo shoot and a color coded map of the US. I don’t know how accurate it has been over the years, but seems like a very useful tool. https://www.cnn.com/travel/article/fall-foliage-map-2020-us-trnd/index.html
Thanks – that’s really cool! I’ve updated the article to include your link.
Thanks for sharing! I never miss any of your articles and have you at the top of my list of best photographers and instructors!
Thanks so much!
Thank you – I’ve not used a Polarizer in years, but I have a couple. I’ll give it a go.
It makes a huge difference. I know I haven’t shot fall foliage without it for decades now.
Decades? Did they have cameras then?
#11 – Be someplace where beautiful fall foliage can be found 🙂
LOL – Yup, for sure!
Really appreciate how you have made this article so accessible for all of us Steve.
Thanks!
Grate tips, Steve- as always, very thoughtful. One thing I found that corrects reflected color reasonably well in post-processing is the “Pro Contrast” color correction function in Nik software (the original).
I’ve used it before and it can help. However, the trick with reflections is that without a polarizer, you don’t capture all the color information under those reflections. So, software can’t completely replace the polarizer since it can’t faithfully adjust information that was never captured.
Nice article as always – really enjoy your site and content.
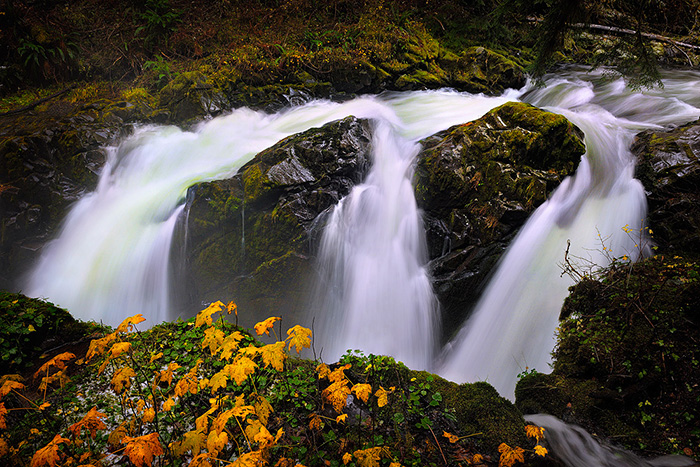
I just gotta ask, were two of the locations Blue Hen Falls in CVNP and Sol Duc Falls in Olympic?
Thanks – and yes, exactly.
Thanks, Silly me. I did not realize the file name popped up when you click on the image.
Hi Steve
I have enjoyed your Videos on photography tips and techniques it is really Helpful . Thanks !
Your photos are wonderful . I wish to have your books to learn more techniques & will be handy for reading.
Thanks,Ajit
Beautiful pictures! Love the way you explain tho go, is so down to earth and easy to understand, thanks!
Very succinct article. The pictures are incredulous at first glance, that must have meant loads of hours in the editing room
GREAT Tips Steve,
Definitely gonna dig up my polarizer and see what I can find out there… 🙂
You’re so much fun – I enjoy your videos and your articles both. I’m working on using fall colors in central Kansas, we have a little and they’re lovely. This morning was particularly fun – I actually had time to shoot during golden hour (that’s the good side of a toddler getting you up at 6 am, right?). Now to find some mammals…
Steve you are an expert with both your ability and as a teacher, thank you for sharing
What a sensational article, Steve. I always marvel at the images you create. Absolutely wonderful. I don’t have a polarizer filter for my Nikon 18-200 mm and am wondering if you have a suggestion on one to purchase. As you know, they can get a little pricey and I always wonder if it still makes the most sense to be sure to “get what you pay for.” Any thoughts you have will be appreciated. Love the new website.
Thanks for the kind words. Most of the images are with a Nikon polarizer and I’ve always been happy with them. 🙂