
For a LONG time now, I’ve had people asking if I was ever going to do a post-processing guide of some sort. I have gone back and forth on it, waffling between e-books and videos, and finally decided to do a video series. (I just think that for post processing, video is the best way to learn, always has been for me.)
I’ve also decided to create this series in independent parts. That way, I can release them as I have time and you can purchase only the topics that apply to you.
So, today we’re launching the first video in the series, Noise Reduction Using Lightroom And Photoshop. Noise reduction is easily the most common post-processing question I get, so I figured it was the perfect place to start. Assuming people like it, I’ll be covering other post-processing topics as time goes on, probably one every few months.
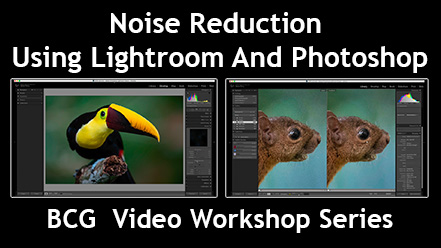
Format : 4 part video download (Standard MP4 format, 1.5 hours)
Delivery: Instant download
Includes : 4 videos and web sharpen actions
Price: $14.97 (USD)
Click Here To Purchase (we have a new cart)
Also, check out our other books and videos – Click here
Prerequisites And Requirements:
- Lightroom (5 or newer) and Photoshop (CS3 or newer) OR just Photoshop and Adobe Camera RAW.
- Your own RAW files (this works better with RAW than Jpeg)
- At least basic familiarity with Lightroom (like, you know where the Develop module is)
- Beginning Photoshop Skills
- You will need to download the video files (6.5 GB total) to your computer (they are not streaming files)
- Finally, this is designed for everyone, so it goes into detail that may be review for more advanced users
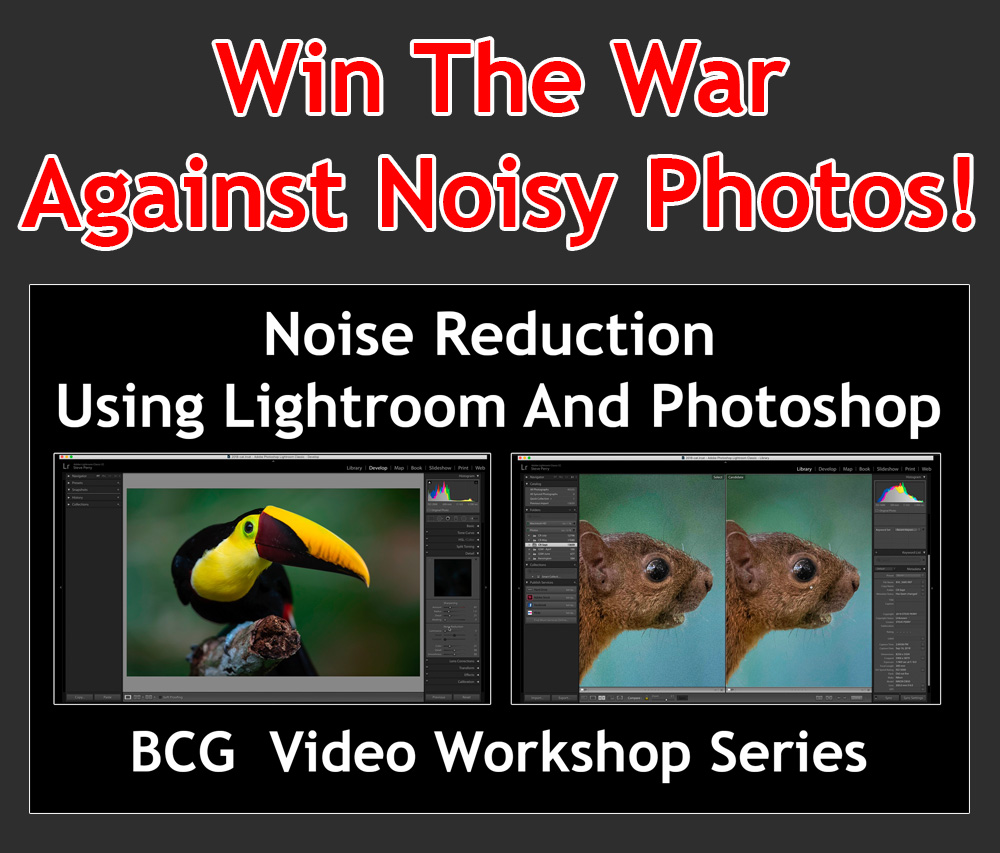

Win The War Against Noisy Photos!
Let’s face it – if you’re a low light photographer, you’re constantly battling noise. In fact, the most common post-processing questions I get – by far – all relate to noise reduction. For years I’ve had people asking how my high ISO shots (ISO 1600-12,800) look so clean. They often look for a special plug-in or piece of software that’ll magically do the trick, but that’s not necessary. If you have Lightroom and Photoshop, you already have the tools I use for nearly all my noise reduction (BONUS – you can also just use Photoshop and Camera RAW too – there’s a supplement included in the video that shows you the minor differences).
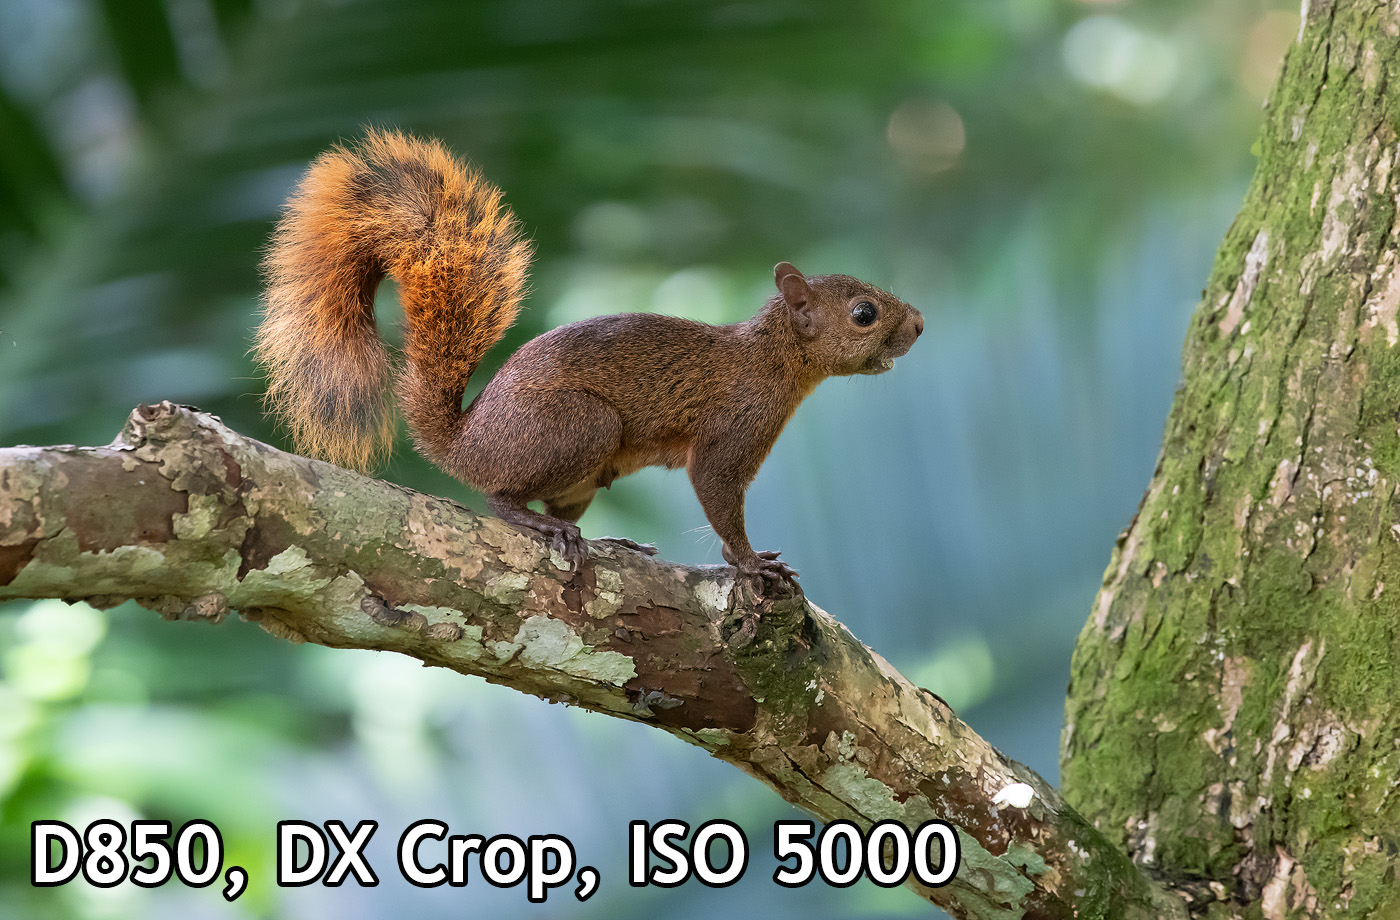
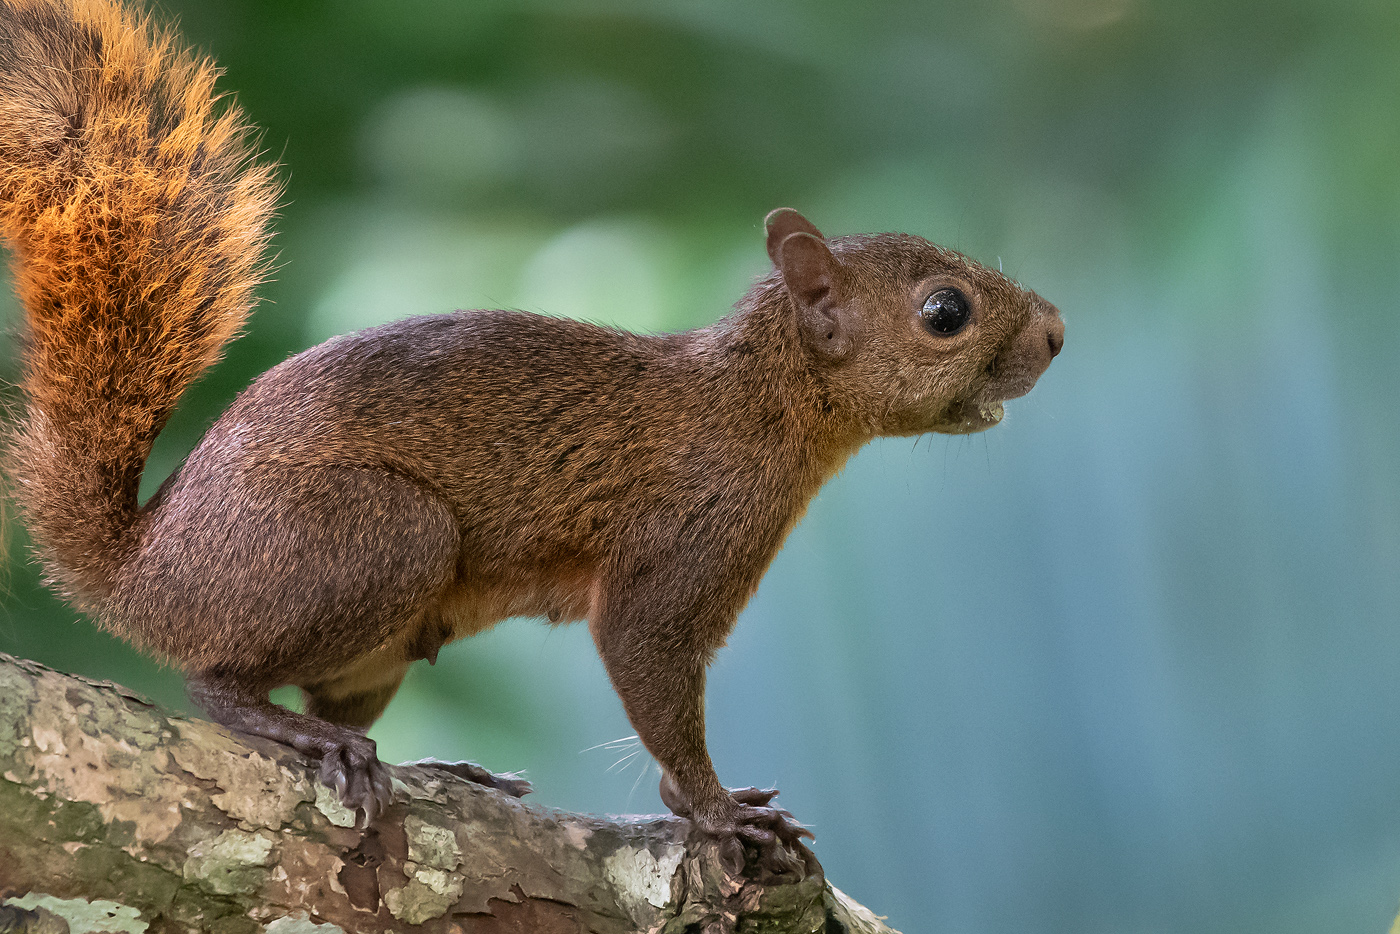
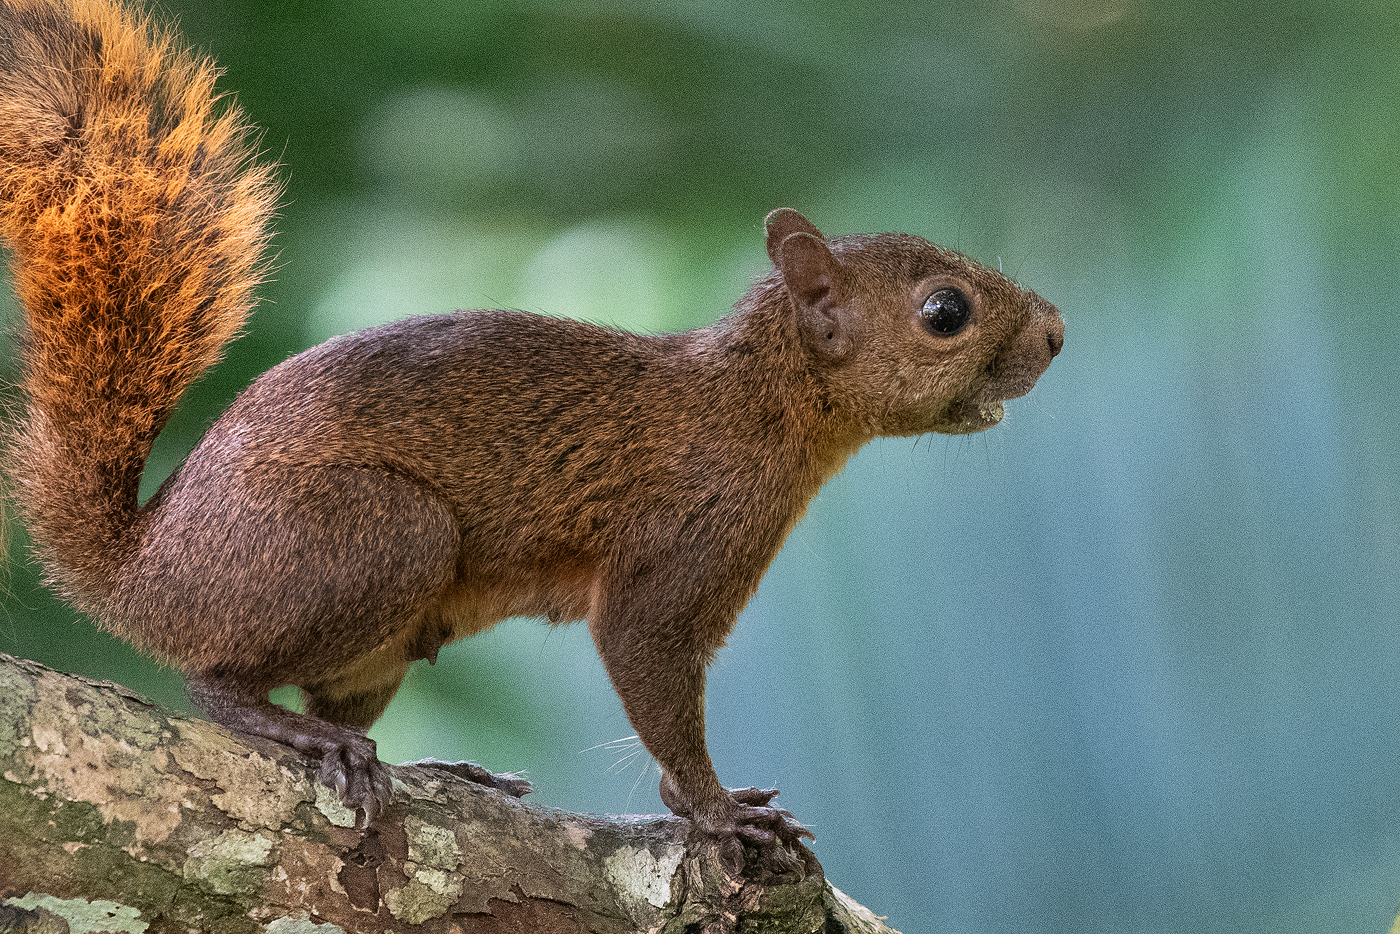
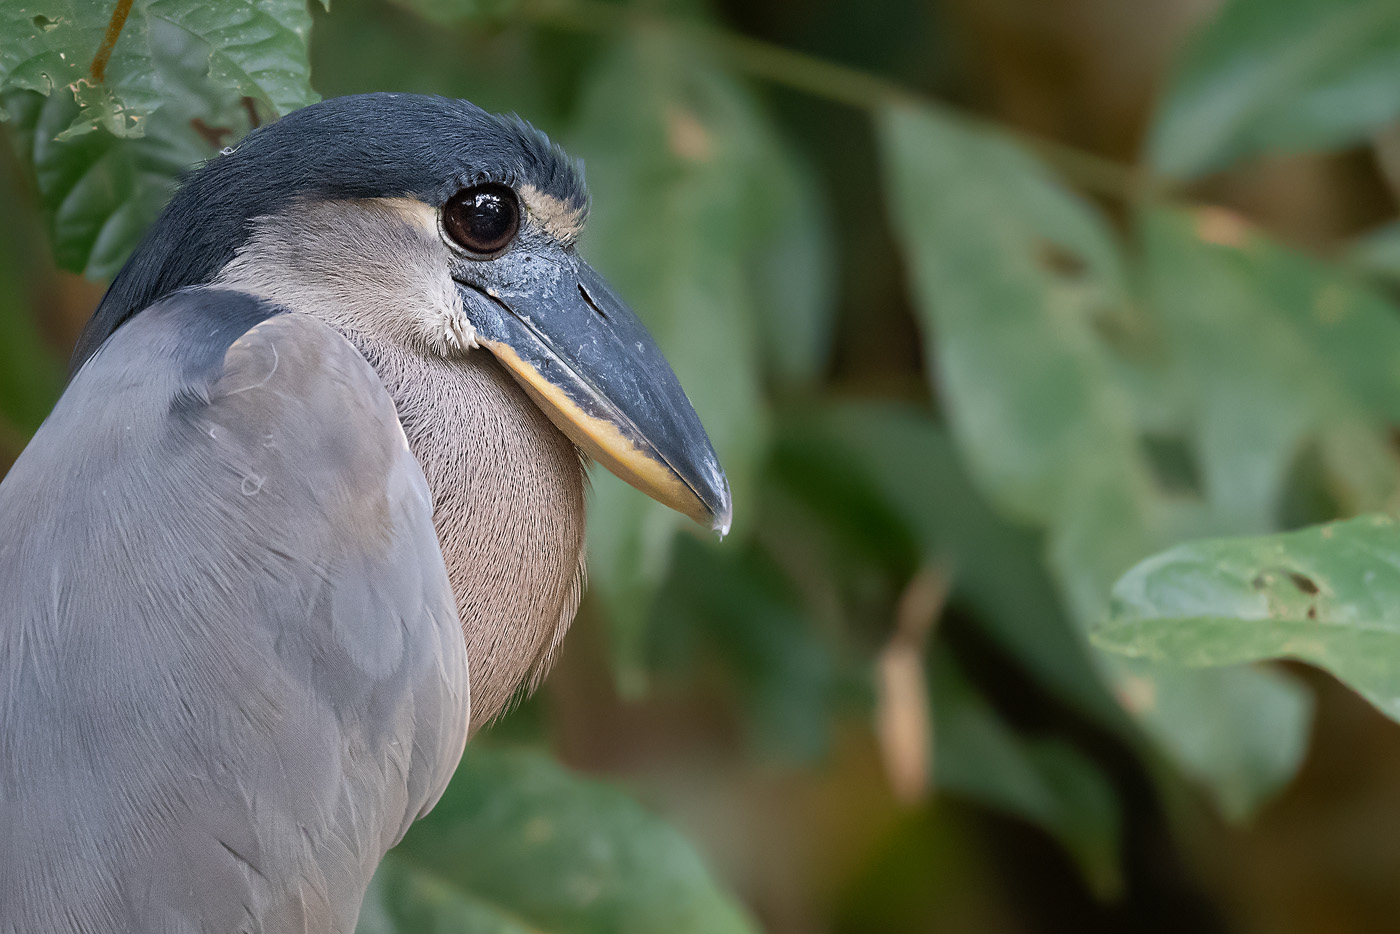
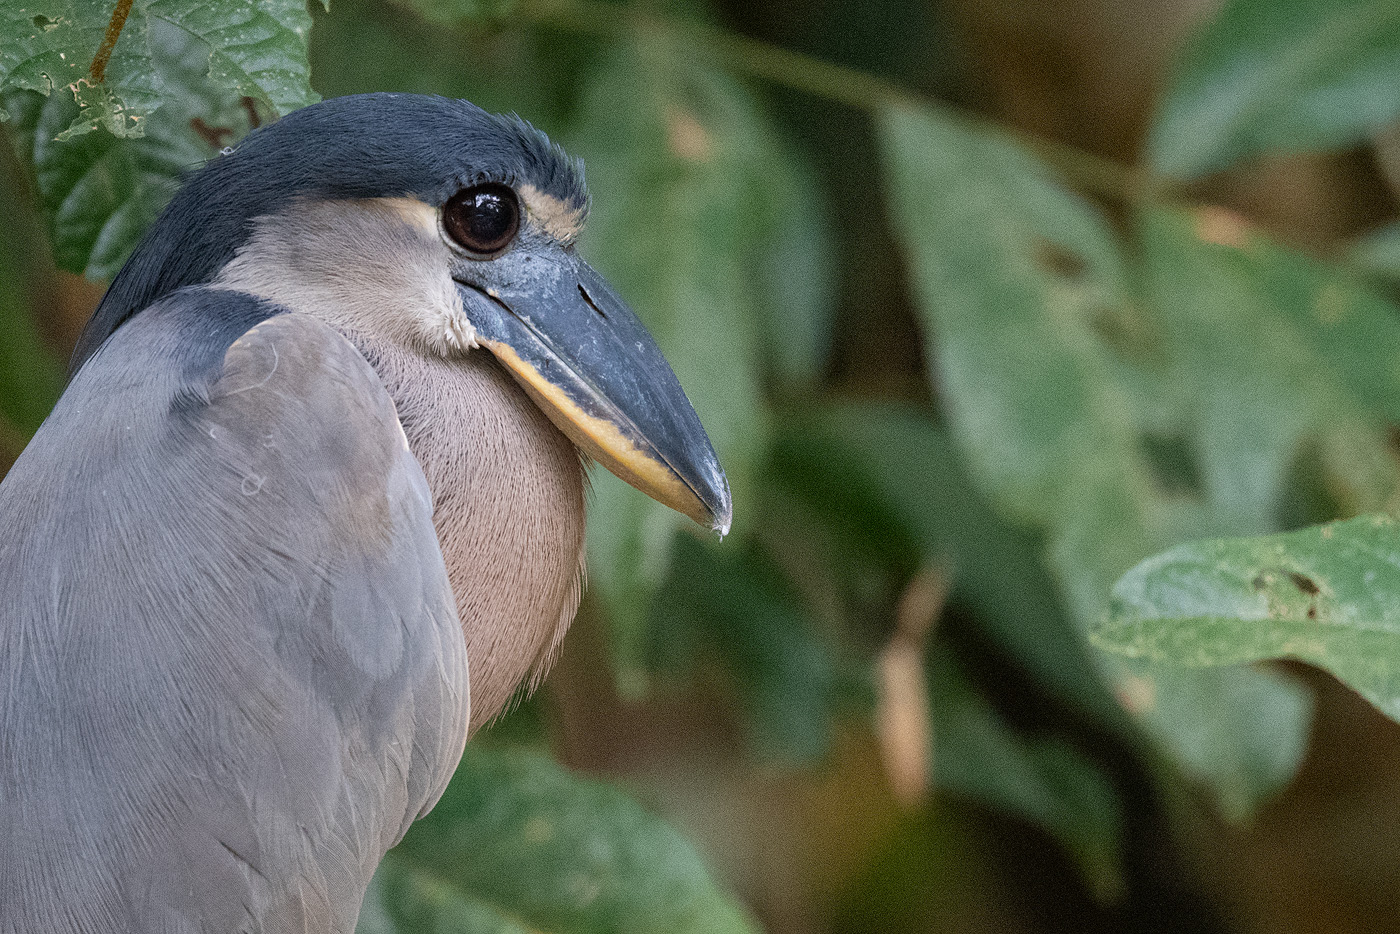
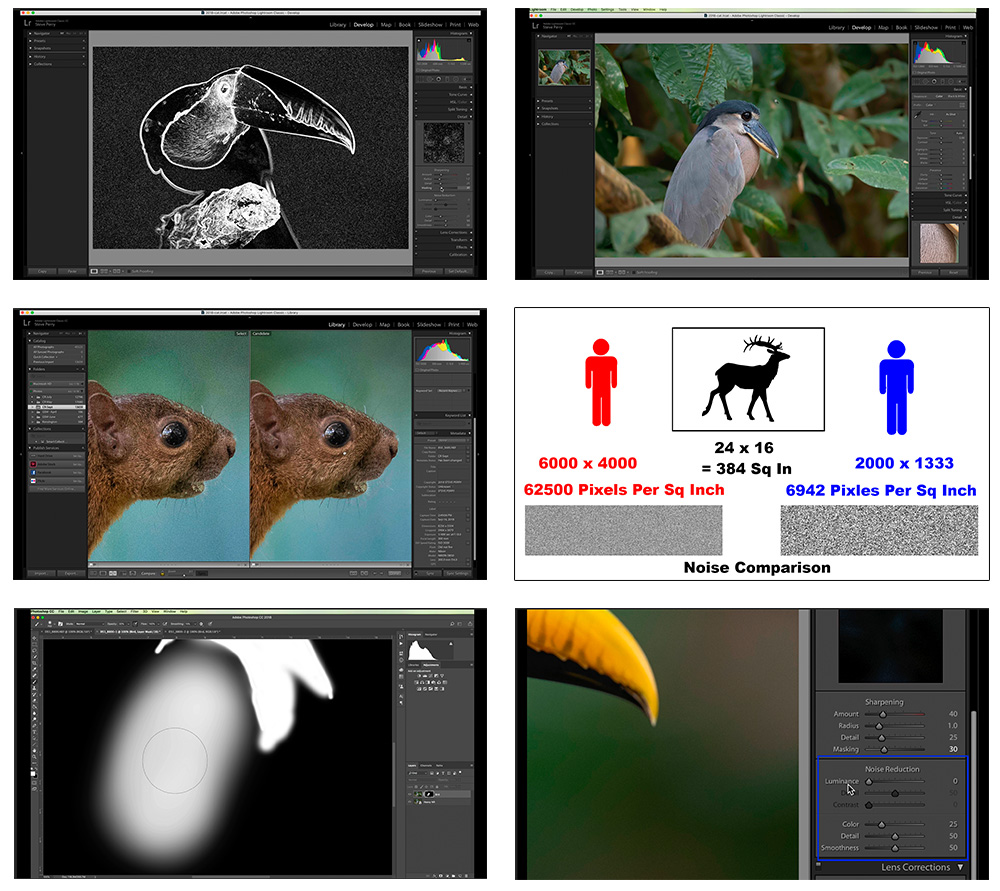
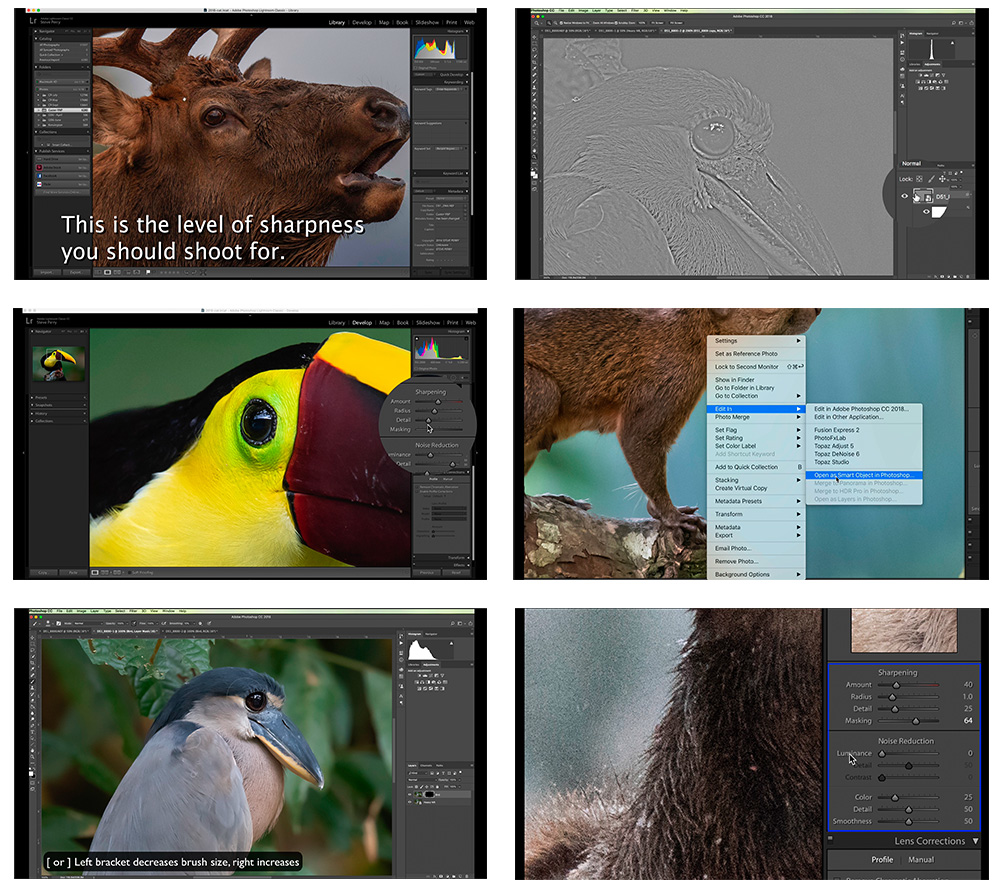
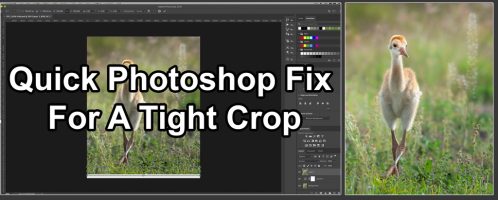
Below is one of the sample images we use in the video workshop (just a snapshot, but it makes a really good example). Although this was shot at nearly 1 stop higher ISO than I’d want to use with the D850 in crop mode, the techniques I describe kept the noise in check and allowed me to retain detail. (Note – you can click any of the images below for a much larger version – you may even have to click the larger version one more time to see it full size.)
In this 1.5 hour video course, I’m going to show you everything you need to know to win the war on noise. From better capture in the field to knocking out the noise during post processing, it’s all covered. Pretty much everything I know about noise reduction is in this series.
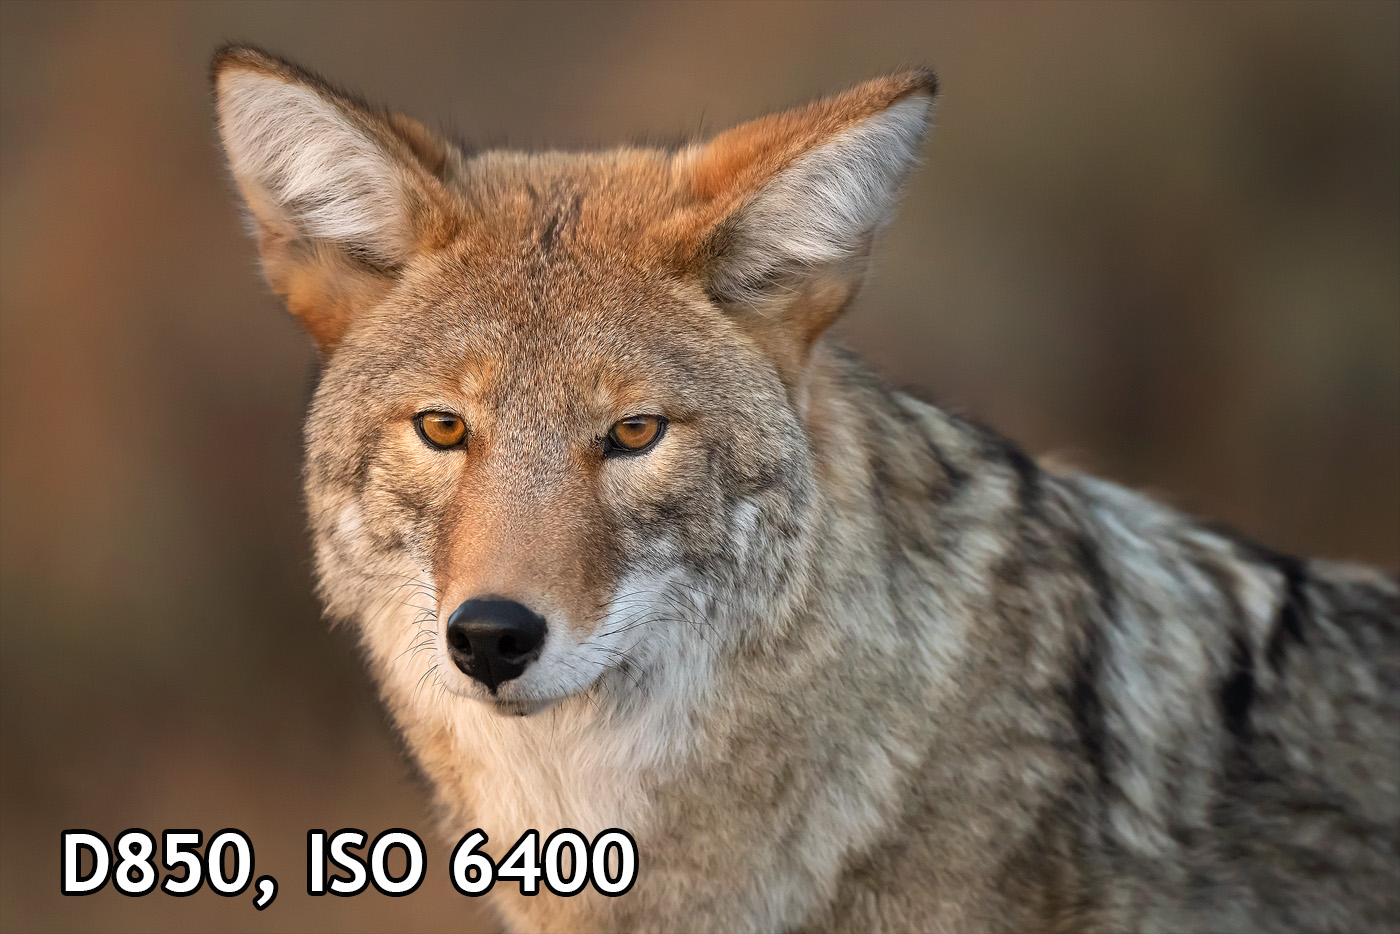
The techniques I use have worked for hundreds of my own images and can work for you as well. In fact, this coyote shot was with a D850 at ISO 6400, but with just a little work I was able to make it look like a much lower ISO.
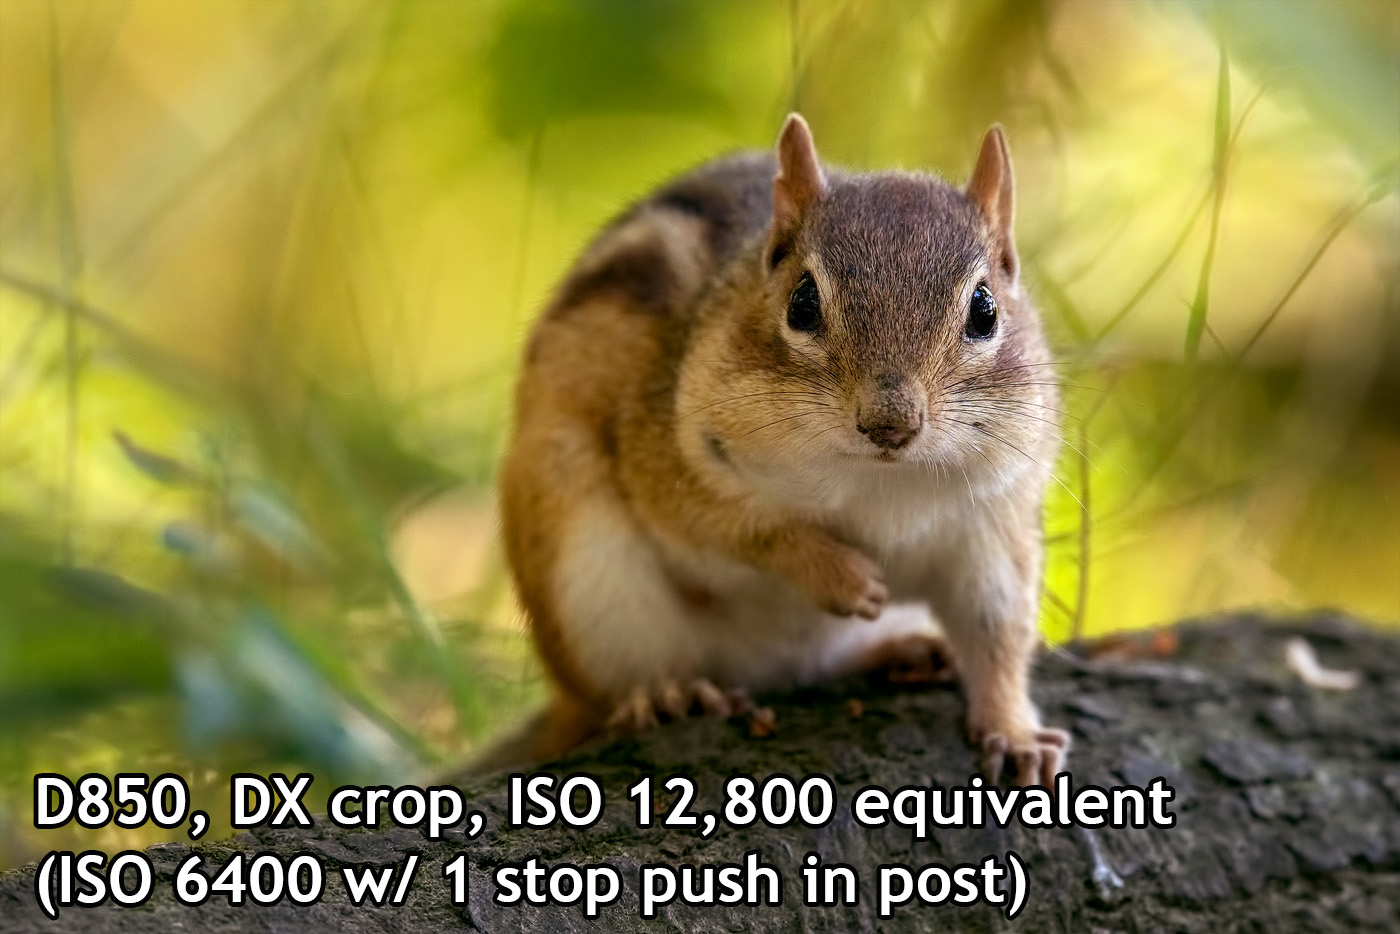
This chipmunk image was shot at ISO 6400 on my D850 in DX crop mode – however, I was capped out on Auto ISO and ended up underexposing it a stop! This required +1 stop to be added with the exposure slider in Lightroom, giving me an equivalent / effective ISO of 12,800. In a matter of minutes, I went from crazy noisy to what you see below.
The good news is that getting results like this really isn’t that difficult once you know how.
This video series will take you step by step, explaining everything you need to know for successful noise reduction using just Lightroom and Photoshop. The course is highly detailed and is designed for everyone, not just gurus. You just don’t need much Lightroom or Photoshop experience to leverage the techniques in this course. Plus, since it’s a video workshop, you’ll get to watch each step of the process and hear me explain the reasons for everything I do. Plus, I always try to pass along other hints and tips along the way. So, even if you’ve only had very little experience with Lightroom or Photoshop, this course can teach you the techniques you need to quickly get rid of noise.
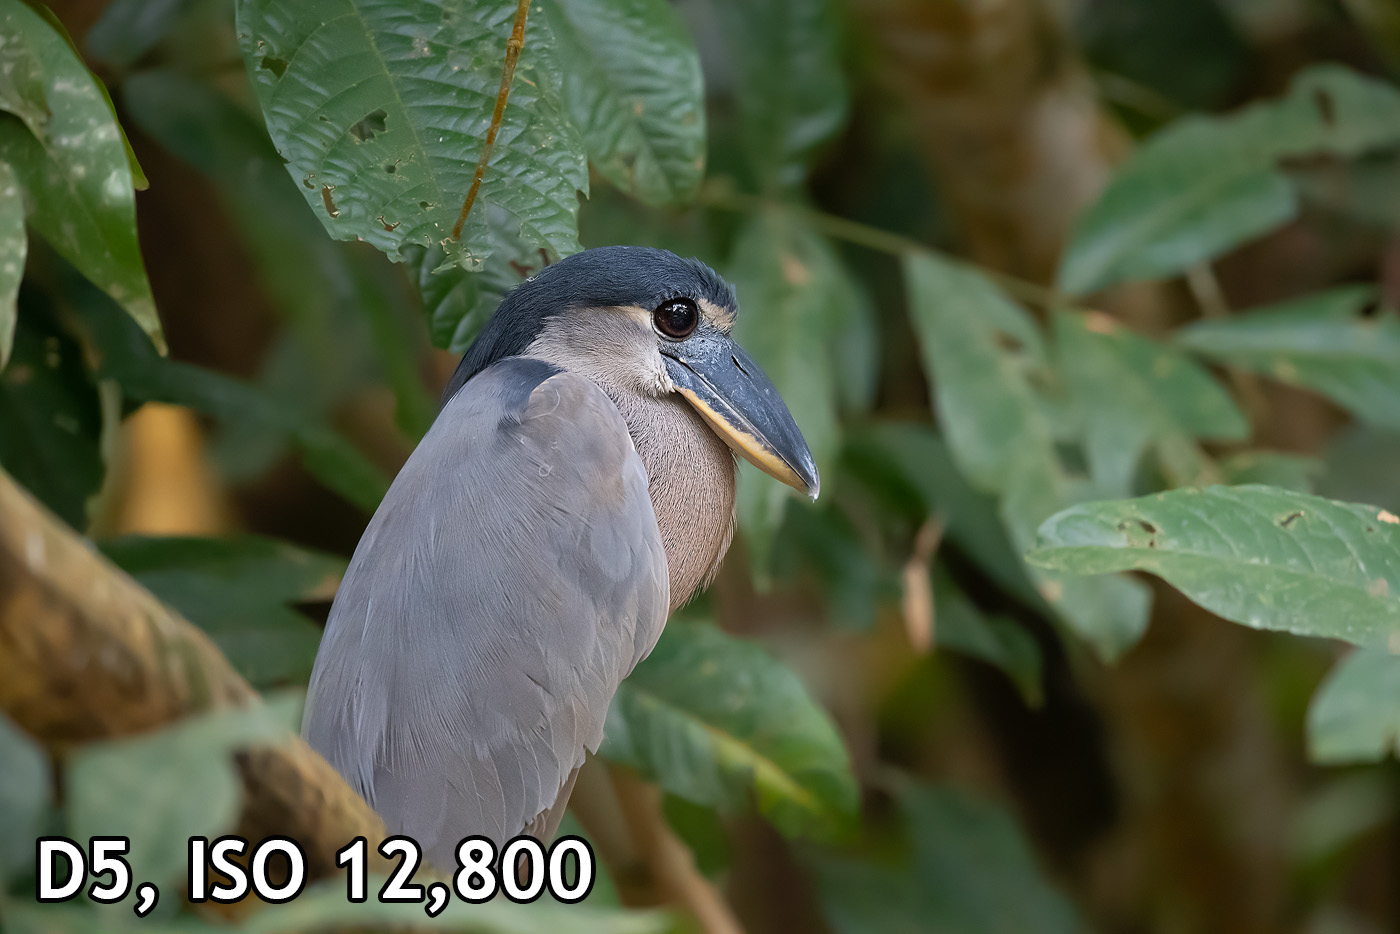
The image below was taken in the jungles of Costa Rica – at ISO 11,400. Although the D5 is good, it’s not that good – but in a matter of minutes I had killed off the distracting noise using just Lightroom and Photoshop as described in the videos.

Here’s another sample from the video workshop with the before and after. This was taken at ISO 12,800! For this image, I used a technique that sharpens the image without adding noise, so I was able to strike a balance between pulling the noise levels down and pulling out and retaining as much detail as possible. (Note, again this is just a quick snap, but made a good example – no further processing was performed beyond noise reduction and sharpening.)
Oh, and it’s not just about killing noise either. You’ll notice as you check out the bullet points below that in addition to noise reduction, I’m also all about keeping detail and sharpness in the photo and I’m going to show you that as well. The key is to achieve the level of noise reduction you want without losing critical detail. It’s a balancing act for sure, and I have multiple techniques achieving it – and I’m going to share ’em all with you!
The course includes four different videos, each one getting more advanced than the next. Let’s take a look.
Video #1 – Intro And Field Techniques
- Four field techniques that help keep noise in check
- The importance of shooting RAW for the best results
- The BIG ISO mistake I see all the time – and how to prevent it
- How ISO accidents happen – and what to watch out for
- What I tell my workshop participants to do before every shot
- Why properly filling the frame is critical
- A dramatic demonstration showing how cropping works against noise reduction
- The detrimental way cropping impacts noise for image output
- Why tack sharp images are super-critical for high ISO shots
- What a tack-sharp image should really look like
- Why marginal sharpness is a disaster for noise reduction
- Why pulling shadow detail is a dangerous game with high ISO shots
- How to recognize shadow issues in the field – and what to do about them
Video # 2 – Basic Lightroom Noise Reduction Techniques
- How to fix a moderately noisy image using just Lightroom
- Why the sharpening and noise reduction panels are next to each other
- How sharpening impacts noise
- Secrets to using the Masking slider to avoid making noise worse
- Basics for how a mask works in any program
- How to determine the correct amount of sharpness masking
- The difference between color and luminance noise
- How the Luminance slider works
- How to use the Detail slider and how it works with the Luminance slider
- What the Contrast slider does and how it interacts with the Luminance slider
- How to use sharpening to bring back detail to the image
- Exactly how the Radius slider works and how to use it with higher ISO shots
- How the Detail slider works – and how it can make or break a noisy image
- How to use all of the sliders at your disposal to get the best balance between noise reduction and detail
- Why it’s critical to leave a little noise behind
Video # 3 – Using Lightroom And Photoshop For Noise Reduction
- More application of the techniques from the first video
- What to do when Lightroom can’t quite get rid of the noise and keep the detail you want
- How to keep maximum detail without compromising noise reduction
- The secret to leveraging sharp areas of the image for noise reduction
- How multiple versions of the image can help optimize noise reduction
- How to prep an image for heavy noise reduction
- How to prep an image to keep maximum detail in the subject
- How to use Photoshop to blend images for the best noise to detail ratio
- Layer mask basics (note – this isn’t a course on layers / masks, but we go over what you need for the NR techniques)
- Smart Object basics – using them to tweak our previous adjustments
- Basics for using the Brush tool
- How we blend two layers to get the best noise reduction
Video #4 – LR & PS – Advanced Blending And Sharpening Techniques
- More application of the techniques in the first two videos
- How to handle a more complex image with multiple problems
- Why sharpening a photo without sharpening noise is critical for saving high ISO images
- How Lightroom sometimes can’t quite get sharpening right without making things too noisy
- High-pass sharpening basics
- Amazing technique for sharpening a photo without sharpening noise (high-pass trick)
- How to achieve various levels of sharpness in your image – all without sharpening noise
- Using blend modes for sharpening
- Deciding how much sharpening is enough
- Image blending for optimum noise reduction and detail in sharp, moderately sharp, and blurry areas
- Making an ISO 12,800 image look like an ISO 400 (or less) image
- How contrast, clarity, and other Lightroom controls can increase noise exponentially
- How to use those same tools without putting noise through the roof
And that’s just the overview!
The videos total an hour and a half and are completely packed with hints, tips, and advice – as well as thoroughly explaining every detail of the techniques I use to combat noise.
The techniques in this video are my go-to for all of my high ISO shots and have served me exceedingly well over the years. By the time you’re done with the video, you’ll have skipped all the learning curve that I went through and be well on your way to rescuing those high ISO shots!
What about plugins?
Yup, I know there are a lot of noise-reduction plug-ins out there as well and I’m often asked which are my favorites. The truth is, I’ve used pretty much all of them at one time or another, and while every technique / plug-in has its strengths and weaknesses, in the end I almost always use the techniques described in this video workshop. I simply like the end results better, and I think you will too. Oh, and by the way, many of the tips and techniques in this video can be applied and used with plug-ins too 🙂
Finally, if you’re still on the fence, think of it this way…
So many times we spend countless hundreds or even thousands of dollars purchasing gear that we hope will help us create more powerful images.
The truth is, gear is only a small part of the equation. Amazing imagery comes from YOU – the person standing a few inches behind the viewfinder. Once captured, it’s then time to take what the camera puts out and process that RAW file so it matches your vision – and isn’t some noisy mess.
However, when offered an opportunity to improve their photographs in a way that could make in incredible impact, people often hesitate. I know for a fact that my best images were due to hundreds, even thousands of hours spent studying educational materials, not because of the gear or Photoshop plug-ins.
So, that brings us to price. I’ve tried to make this completely affordable for any photographer – just $14.97 and it’s an instant download.
That’s basically less than lunch money for a product that could improve your photographs exponentially. Heck, even if you only discover ONE new noise reduction trick or technique that helps you output an amazing image, wouldn’t it be worth it?
Check it out, you could be enjoying this new video series in just a few minutes.
PS – I’m 100% confident you’ll love this video workshop. If you’re not satisfied, let me know and I’ll give you your money back – nothing to lose by giving it a try!

Hey Steve! Many thanks for the tricks but above all for THE EXPLANATION about the tricks. We are always shown how to use tools or how to get a result, but never why and how. You are the one to do it and that is what make your videos so brilliant!
I thought I knew how to use LR and PS… After reading your videos (especially #4) I now really do.
Thanks again and glad to have met you 😉
OMG, I’ve been struggling with some underwater photos from a recent dive trip and although noise and sharpening were not the number one concern, what Steve taught in this video was simply fantastic. My photos went from good to excellent. Just quadrupled the price……just kidding.
So far, everything I’ve received from Steve is a game changer.
Thanks, Steve
Any hope for those of us using Affinity Photo on iPad Pro?
Hey,Steve. I have bought your episodes. I especially like the fourth video about high pass filter which I have never tried before. I still want to know why images on my cell phone appear to be sharper and noiser compared to on a PC screen when magnified to the same size?
Steve, in Video 4 what is the difference in the Noise Reduction you applied to the background using Camera Raw on the Bird Detail Layer vs the Heavy Background NR Layer processed in LR. Wondered if the Heavy NR layer was essential or not. What’s the practical downside of not unsaturating. Also thought you could create a Virtual Copy in LR and bring both the Subject and Background copies over together into PS as smart object layers to save a few steps. New to PS so had to look up rasterize. I have written down the steps and will be… Read more »
Hi,
Any chance you do some videos on Color Grading?
I really like your video and would love to see you explain about it.
Lately I have seen many tools out there (Infinity Color, NBP ColourmapX, etc…) and having your opinion on them would be great.
Thank You.
Steve: Purchased your course. Great info; learning a lot. Thank you. Question: I noted when you had right clicked on an LR image to open it in PS as a Smart Object one of the “Edit In” menu items one could see was Topaz Denoise 6. I have used it a lot albeit it’s a detail killer. That said wonder if it would be useful for treating just the background layer where detail is not your primary concern. Or, do you no longer use it for anything. Not advocating its use, just trying to determine the best workflow.
Just noticed another post about my question from a month ago. Disregard my inquiry.
Hi Steve,
Really enjoyed your course and trying to apply the techniques. Is it possible to include the raw files of the photos you used in the course that way I can follow along step by step?
Thanks,
Stelios
Hi Steve, Thanks for the great videos have used the techniques on a couple of my shots and certainly makes a big improvement. I wonder if you have a crib sheet for the process just as a 1 page highlighting each step and the keyboard shortcuts for each? Apologies if this has been asked before but at present I keep having the video open on one screen and PS/LR on the other and keep skipping through each section to remind myself of the step and the keyboard sequence. If you had a single sheet with it all written on as… Read more »
Hi Steve As one of those who asked if the videos were applicable if I wasn’t using Lightroom/PS, I think you may have undersold yourself when you said a blanket ‘No’ . I took the plunge and purchased, and while I can’t use a lot of the material, I reckon it was still worthwhile for your usual superb explanations. I finally understand a lot about noise that was previously a mystery. I also like the way you explain WHY you do things rather than just the how – it is a rarity among photographic commentators. The only problems I had… Read more »
Hi Graeme – Thanks for the kind words 🙂 I do have to be careful with recommending it to people who aren’t using PS /LR simply because many would be very upset if they discovered they couldn’t use all the techniques in the video. So, I err on the side of caution. Also, I’ll send you an e-mail with a download solution so you can get all the videos – and if anyone else is reading this with a similar issue, just use the Contact Us link at the top of the page and let us know – we’ll make… Read more »
Hi some great tips on these vids here, hope it makes my workflow faster now.Only problem is cannot use smart objects..got LR6 now to open 850/500 NEF’s, but cannot import into PS CS6 🙁 I can export as Tiff & then layer, but then maybe easier to DNG convert them 1st. Unless you know a way to trick CS6 into opening files from LR6. Thanks
Can you possibly use Camera RAW instead? The video had instructions for using it, might be a good work around.
Hi CS6 camera raw won’t update for d500/850 nefs, that’s the problem..& PS CC is too $ for my use now..I can mail if a workaround is there. Really like the smart object idea & raw edits in PS..time saver
I downloaded this last weekend and ran through the entire series. WOW, this is fabulous information. I immediately put the techniques to work with really nice results. Thanks for making the steps so clear. I took a major jump in post processing thanks to you. I truly appreciate the hard work you put in on these videos!
Steve, Youtube recently auto-played one of your older reviews (maybe the D500?) after another nature or photography clip. I noticed you mentioned using Topaz Denoise at that time. Are you getting similar or better noise reduction with the Adobe software that you’ve chosen to use that instead? Better workflow perhaps?
I actually like the way LR does noise reduction better than Topaz. Topaz its easier to recommend because it’s a more automated process (and I don’t have to try to explain the process over and over when someone asks), but I tend to like the results better with this method. Of course, you can use this method with Topaz as well – and I do that from time to time too if I don’t like the results I get from LR. Still, in almost every case now I use the method in the video series, I just like the results… Read more »
Hi Steve,
I’ve bought and watched the videos which are really great, as are your books.
However i regret not having the three pictures to follow along and tweek them with LR and PS.
The compression of the mp4 video, as watched on my tablet, erase some fine details and some of the noise ;-))
Could you put the three dng files with the videos in an update ?
Thank you
Hey Steve. I have purchased the video workshop and I like it. I learn some more tricks to remove the noise in LR and PS. Good workshop for me!
Hey steve, this video seems really interesting. I wonder if you ever tried the dxo photolab module to eliminate the noise, I find it really good but maybe I’m wrong and your methods is far better. Thanks for the work anyway, I’ve always been interested by your processing that I found really amazing!
Have a nice day!
Hi Albert –
Sorry for the delay. I have tried DxO and just don’t like how it handles backgrounds. I know a lot of people do, and if I did the video series would have been about DxO 🙂
Steve, thank you for this workshop. I’ve been looking for a good way for dealing with noise for a long time and this definitely seems to be the one. Video 1 already gave so much useful information on noise alone that it was worth the workshop fee. The best $14.97 I’ve spent (well a little more in South African Rand 🙂 ). Realised I’ll have to switch to PS CC at some point as I’m still using CS5 and could not find the “Camera RAW filter” mentioned in Video 4 but did get a script that offered a work around.… Read more »
Hi what script did you use? I use CS6 & LR cannot import 850 nefs of course..so no smart objects..
Hi Shanti. You can Google “dr. brown’s edit layers in acr”. It’s on a Russel Brown’s site. There is a script specific to CS6. I got decent results but I’ve now switched to Photoshop CC and following Steve’s workshop notes are getting even better results.
Hi Francois thanks..will try it
The script will give a way to sort of handle the part where Steve applies the “Camera Raw Filter”. CS5 could also not open the RAW files for my Canon 7D mk2 which meant I had to convert all the RAW files to DNG before bringing them into Camera Raw.
I just save as Tif or Jpeg ,then can open in CS6 as smart objects..pain the DNG convert. Have been using DXO Photolab with Prime NR,which is good..leave most of DXO settings off ,then back to PS..
Have you tried to use Adobe’s free DNG converter. CS6 & LR can both import the DNGs produced by the converter.
Hello Steve, just to let you know your new video on Noise Reduction was very helpful. I have been several times in the Ugandan rainforests to photograph chimpanzees, mountain gorillas and small primates and the light conditions were not always ideal and did I have to work with high ISO. Especially video 4 on the small heron with the high pass filter and masking techniques was great and did improve my photos. And as you said, at the moment you get the ‘picture’ about the whole process, editing the photos works really fast. Thanks again and I am looking forward… Read more »
Will the instructions work with Photoshop Elements 18 with the Camera Raw plug-in?
Sadly, nto really. We looked into it and they just don’t apply well.
Hi Steve. I’ve just bought your last video “Noise Reduction Workshop”, which I found very educational, but I have a complaint: you speak too fast and sounds like somebody is pushing you in a hurry, (sorry I’m probably the only one that disagree in these comments). We are many photographers from overseas that follow you that have not English as our mother language, so we have to go back again and again in the video to try to understand the indications, even so, with no very successful results; but I believe that even some Americans could have the same difficulty… Read more »
Thanks for the purchase and the feedback. I’ll try to slow down a bit in the future – although I think I talk slower in this series than I do on Youtube! Hard habit to break.
Many video players have controls let you slow down or speed up the video/audio.
I am really glad i bough the Video.Keep more of them coming asap.Thx Perry for the amount of hard work that you much have put in this series
Thanks for the kind words 🙂
Hi Steve
This is absolutely wonderful information ! thanks so much for sharing your expertise and techniques. Im really looking forward to many more of these great videos that you’ll produce in the future.
Best wishes
Thanks Greg 🙂
Steve, I love this video. You have a great teaching approach that works for visual learners like me. I also want to compliment you in understanding that not everyone understands Photoshop. I have only used it for cloning, but could never understand the whole layers thing. You made it easy to understand and I finally get it. Thank you for taking the time to go over all the steps. Is there a place we can post a before and after using the technique we learned from your video?
Thanks Adi 🙂
At this time, I idon’thave anywhere to post them, but that’s not a bad idea. We may put in some kind of forum down the road to accommodate things like that.
I am an avid Steve fan and all his books and videos but the real reason is you are just so easy to understand. I am a bit older and sometimes with others it takes me a while to get it but usually I get on the first take with Steve. The videos are excellent and so intuitive. Thanks again Steve. I will come back with comments/questions when I have gotten through all four. David S, Glasgow formerly Aberdeen, Scotland
Thanks for the kind words – glad you are enjoying the videos 🙂
Hi Steve. Your new video workshop looks very tempting but I have just one basic question: Do your tips and advices also work with Photoshop Elements ? Thanks in advance for your feedback!
Thanks for the interest – I’m not overly familiar with elements, but I’m inclined to say that, no, it’s not compatible. I don’t believe it supports smart objects, and that’s one of the features we use in the class.
Many thanks Steve for your quick feedback! I will inquire further and let you know if it proves compatible. Meanwhile thank you very much for all the useful information and source of inspiration from your work!
Big thank you for all your work. Most of what I know about wildlife photography and advanced use of my photography gear I know from your books and Youtube videos. I’ve been using your Web and Orton Photoshop actions for a long time now. Noise reduction and especially sharpening noisy images has always been what I struggle with the most. I have already added the steps from your Workshop to my editing workflow. So once more, big thank you, looking forward to your next workshops.
Thanks for the kind words – and of course, the purchase too 🙂
Hi Steve,
I know you”re primarily a nature shooter . . . wondering if these noise reduction techniques would work for news/sports shooters (i.e. shooting high ISO under the Friday Night Lights) and how speedy your process is. Thanks.
Hi Nick –
I’ll admit I haven’t used it on anything but wildlife, but it should translate to other types of photography as well. As for speed, it is a process, but even rough photos can usually be done in 5 minutes or so once you get the hang of it. However, if you had to use it for 100 shots from a shoot that you needed the next day, it would be a bear!
Hi Steve – thanks for the great Noise Reduction Workshop! For me video 4 was the most interesting, showing new opportunities to fight against high ISO noise. For sure I will use these tipps and tricks on some of my Costa Rica pics. I’m really impressed about the results applying just these few and simple development steps. I have one question. In video 4 you mention the NIK RAW Input/Output Sharpener. I do have it, but I do not used it anymore, as I never got a satisfying result. Maybe I used it in a wrong way. As you already… Read more »
Hi Claudia! Great to hear from you!
I use the output sharpener’s Print Output settings, matching them to my printer resolution. I do it as a layer of course so I can then tweak the sharpness if needed. For printing, you want it to look a little overly sharpened.
Hi Steve- really enjoy the videos but havea question on Video 3. At the start you mention you are going to process one layer for the squirrel and one for the background. At the end, unless I missed it, you never mention how you merge the two layers. Do you go Layer>Merge Down or what?
Thanks for the purchase and kind words 🙂 Actually, you don’t have to merge them if you don’t want to – you an just finish them up right on the spot. If you do want everything on one layer, I recommend making a “composite” later instead. This allows you to keep the first two if you ever want to go back and make a chance. I talk about it more in the 4th video, but the quick version is just click on the topmost layer then for Mac press CMD + OPTION + SHIFT + E or for windows CTRL… Read more »
Bought it and am very impressed after an initial run through. Yet another winner by Steve. Looking forward to more in the series. I have one question Steve, what is the .atn file for and what does it do?
That the web sharpen actions I mention in video 4. Check out the Getting Started guide for more info, or this link:
https://backcountrygallery.com/sharpen-and-resize-photos-for-the-web/
They are what I use for all my web output. Enjoy 🙂
Can you post lens info and exposure info for pictures used in videos ?
The lens was the 600 F/4 for each pic – the 600 F/4 + TC for the boat bill heron. I think the rest of the exposure info is in the videos though – for sure the ISO.
Excellent discussion about practical methods to reduce noise while maintaining/increasing sharpness. I have seen techniques using masking for focus stacking and exposure blending but never for this – great idea! I’m looking forward to the rest of the series.
I have your other learning materials (Nikon AF System and Wildlife Photography) also. Any idea when your ebook about Nikon exposure will be ready?
Thanks!
Probably mid-Jan. It’s pretty much written and about half illustrated. It just takes an amazingly large chunk of time to get that stuff done.
Excellent teaching with clear examples and useful advice. All four videos on noise reduction are available right now (Nov. 2018). I believe Steve’s comment above about intending to release the series as independent parts over time refers to plans for other topics to be developed in the future as part of a series on post processing. Five star recommendation.
Thanks so much! Yup, I have other topics in mind for future videos. We have had a really great response, so I’ll be working on the next one after I finish the exposure book (mid-jan release – I hope!)
Just made a first pass on the videos and its great to have such thorough and detailed explanations of the basics as well as some techniques that I can use on high ISO images that I used to simply discard. I’ll be going through it all again and trying things out as I go along. This will be very useful here in the coming dark, overcast northwest winter. Thanks!
I’m also anxious to see your 500mm review. I pre-ordered one, but nothing in hand.
Thanks! The review should be out late next week. I’ve already shot it, now just getting the B-roll in and examples stuff (that takes forever!).
Steve, very smart of you to release videos now…No more free advice! Seriously, thinking about buying this as you are just so helpful generally. Need to support the good guys!
Thanks! Although I promise there will be a LOT more free advice too! My 500PF review is coming out next week, 30 minute video, tons of info, 100% free 🙂 Gotta keep everything balanced 🙂
And you deserve to be paid for providing what you provide to us!
Hi Looks interesting, but i use mostly DXO Photolab for Raw & NR (Prime) on my D850 & D500 & finish In CS6, as not into rip off Adobe subscriptions..will this be any use on converted files (Jpegs,Tiff) .Got your Wildlife book..good stuff in there…Thanks
Thanks for your interest 🙂 This series really does need PS & LR though.
So PS CS6 is not enough? have old LR but no open Nef files..if I dng convert can your vid help..Thanks Steve
Oops, sorry, yes PS 6 can do it. I suppose a DNG conversion would do the trick. Come to think of it, you may be able to take similar steps in DxO as what we do in the video with LR. If you want, go ahead and purchase and if it’s too incompatible, let me know and I’ll issue a refund (super easy on my end, so no problem).
downloading now..& just found your web sharpen action..will save alot of time thanks..& like to support your work,your’re really good at explaining stuff 🙂
Just bought it. I am sure it will be the best money I ever spent.
I really appreciate your easy going, down-to-earth approach.
Looking forward to your 500 pf review, I don’t buy any new gear anymore without having watched your review first !
Marco
Thanks! Actually working on putting the review together right now, should have it out next week. Spoiler alert – it’s pretty sweet.
Hi Steve, already bought your Nikon’s Focus ebook and enjoyed it. Was thinking of this, too. Though, I don’t use LR nor PS, but could you method be applied to other editing software (like on1 PhotoRAW)?
Some of it can, but the vast majority of the series deals directly with PS and LR. IMO, it would probably not be worth it if you don’t have LR and PS.