
It was a dark and stormy night.
There I did it. I know it’s painfully cliché but I’ve always wanted to start an article with that old line. Although, in this case, it truly was a dark and stormy night. I remember it just like it was yesterday.
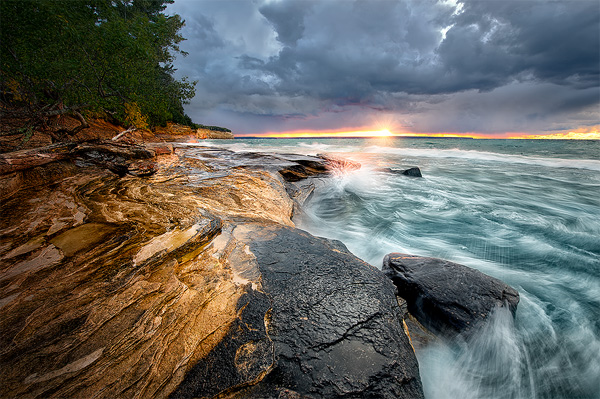
I had just captured the shot you see below and had beat tracks back to my new solo backpacking tent, arriving just as the first sloppy raindrops found their way through the cover of the considerable canopy above.
As I quickly slipped into my tent and sleeping bag, the gust front of the storm I had just photographed ripped through the forest along Lake Superior.
Darkness swooped in quickly, although it was becoming increasingly punctuated by brilliant blue flashes as the storm moved in and the rain began to fall in earnest. As the storm screamed by, I also tried to remember just how diligently I had checked for widow makers (dead branches) above my tent before setting it up earlier that day. It would be a shame to lose a nice new tent, and if the branch didn’t do me in, my wife certainly would.
To keep my mind off the storm just outside the thin layer of nylon that separated us, I decided to recall the day…
It started off stormy with gale force winds already tearing across the lake – one of the first real gales of the season. Although autumn was still just a bit over the horizon, the lake didn’t mind starting the show on a mid-September date.
I had already captured a few images that day, so this one was icing on the cake – or whitecaps on the lake may be a more apt description.
I had backpacked into Mosquito Beach along the Pictured Rocks National Lakeshore that afternoon, making a quick side trip to Mosquito Falls along the way. By the time I arrived at camp it was still well before nightfall, so I had plenty of time to scout around a bit.
I started with a few nearby areas, taking a westward track along the battered shoreline, scoping out potential locations for a good sunset image. Although, with the sky and clouds as unpredictable as a 2-year-old at a wedding, there was no telling if I’d have anything to shoot once the sun kissed the horizon.
Still, I was here for photos and I hadn’t shoved a bulky D3x, 24-70mm F/2.8 and 14-24mm into my pack because I enjoyed a relative lack of food and minimal extra clothing. So, despite the odds stacked firmly against me, I set off down the beach to locate a spot for that evening’s shoot. As I typically do on such excursions, I had my gear with me in an ancient little shoulder case so I could play with various ideas for compositions.
The truth is, I didn’t know exactly what I was looking for in a shot. I had my compass and with the help of The Photographer’s Ephemeris iPhone app, I also knew exactly where the sun would set. I also felt like a good shot would include the sun just as it kissed the horizon.
As I went along and explored the different options along the lakeshore, it seems obvious that I had picked a fantastic location. Call me old-fashioned (my kids do), but I’m a sucker for the classic landscape formula. I love shots with interesting stuff in the foreground, middle ground, and background – as long as all the component pieces are in a balanced harmony with the rest. I fiddled with more than a few compositions as the afternoon went on, but as soon as I rounded the corner and saw this sort of “S” shaped sandstone formation, I knew I had found my evening shot.
Once “on the scene” I experimented with a variety of different compositions using Live View – I like looking at the scene on the LCD rather than in the viewfinder, despite having started my photography career with celluloid and not sensors.
I messed with “perfect” spot a bit, always testing the composition with my compass for sunset location. It finally came down to several variations on what you see in the final image. When it comes to landscapes, I think it’s valuable to take your time and discover the best possible shot once you know you’ve found your location. I see far too many people photographically assault the landscape, just walking up, slapping down a tripod, and shooting away like they were getting paid by the frame. The funny thing is, they often miss the real opportunities in favor of the obvious ones.
In fact, extra time is one of the main reasons I scout in the afternoon – I can mess around for an hour or more if I like, obsessing over a few inches to the left or another forward or back. It does make a difference.
Once I finally had my shot decided – along with a few alternative compositions – I went back to camp, carefully timing my route back so I knew just when I had to leave. I didn’t want to spend any more time than was necessary to get the shot – and I’ll explain why shortly.
By the time I got back to camp, I had decided it was time for a small, quick dinner. My supper came in a bag, and I honestly can’t recall what it was – probably a pasta mix of some sort – you can never go wrong with freeze-dried pasta on the trail. The same claim is difficult to make for some of the other dishes I’ve experimented with over the years (my stomach shudders at the thought).
After dinner, I lingered around camp for a bit and decided it was time to change clothes and get down the beach. It was about a fifteen-minute walk and the temps were in the upper-40s.
So, naturally, I put on shorts and flip flops, along with an insulated raincoat. I’m sure I looked even more ridiculous than what you’re imagining, but I had my reasons.
Recall earlier that I had mentioned the considerable amount of bulky gear I had schlepped in. This necessitated keeping silly things like extra clothes, boots, and food to the absolute minimum. Just not enough room to make it all work.
So, I slipped into flip flops because I knew I was at risk of getting my boots soaked – and if that happened, I would have to hike out in the morning, effectively ending my trip. As for the shorts, I only had one change of pants with me and I still had the rest of the evening, plus another day and a half to go. If I were to soak my initial pair of pants, I’d again risk limiting my trip.
(As a side note, my legs / shorts did get wet that evening and the pants I was wearing did get soaked the next morning for a different shot. Had I not used the shorts, I would have been forced to hike out and miss one of my favorite shots of the trip. I’ll show you that sometime in a future post.)
Funny thing was, the brisk walk there and back kept me warm and the experience wasn’t nearly as uncomfortable as you might expect.
Upon arriving, it was time to set up the tripod and the camera. This was going to be tricky because the wind had shifted a little and the position where I was originally planning to set my gear was now getting pounded by the waves every few seconds or so. That’s why it’s so important to get to a spot and really examine it – and come away with both your “favorite” location as well as some backups. In this case, I was able to reposition my camera in such a way that it still gave me the composition I wanted with a minimal amout of camera splashing (although it still got a little wet).
As for composition, I wanted the tip of the “S” curve to lead the viewer’s eye right to where the sun would set. This is where The Photographer’s Ephemeris app came in handy. I used my compass (magnetic compass – the iPhone compass isn’t as good) to locate just where the sun would kiss the horizon and from there I built the rest of the composition around it.
In addition to the “S” curve pointing towards the sun, I also wanted to highlight the sweeping foreground sandstone, as well as include the cool-looking rock you see on the right. Turns out 14mm was perfect, so the 14-24 was the weapon of choice attached to the Nikon D3x. The “S” curves are highlighted in red below.
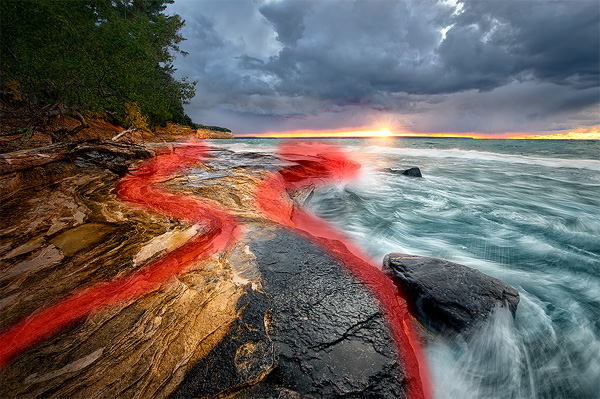
I also had to watch my height. Initially, I was going for a lower viewpoint, but it created a problem. When I lowered the camera, I lost the water at the base of the cliffs you see towards the background on the left. So, I moved the camera up just high enough so that the lake was visible in the shot. I ended up with the tripod somewhere around three feet high. Had I been lower, the area of the lake in the red highlighted area would have been hidden.
I ended up selecting F/11 for my aperture on this one. Normally, I’d use a wider F/stop and focus bracket to avoid diffraction, however, in this case, I knew things were going to happen quickly and I didn’t need another variable in play. I experimented with F/8, but it just wasn’t quite enough with the foreground so close to the front of the lens – even with 14mm.
As a side note, this is one of those times where I tend to part ways with many of the “armchair” photographers you find online. Many are so utterly obsessed with capturing an image that’s technically perfect that they aren’t willing to do what it takes to get the shot – like shooting F/11 even though there’s more diffraction than at F/8. Sometimes, you have to balance absolute technical perfection and sharpness to capture the image you want.
Since this is a lake shot, I also knew that the wave patterns were going to be critical to the composition. I would need to pop off quite a few as the sun set to get the right “look” in the final composition. In situations like this, I typically shoot dozens of shots when the time comes so I can pick out the perfect wave and water pattern back home on the computer. I wanted to shoot ISO 100 and that was giving me 1/5th of a second before bracketing. A few test shots later confirmed it was the look I was after.
Although, these slow shutter speeds caused another problem for me…
Remember that thing about the gale? Yeah, although I wasn’t in the direct line of fire from it at this location, there was still a heck of a breeze attacking those leaves and they were going to be a blurry mess at 1/5th of a second. So, I’d need a higher shutter speed and some blending back home in Photoshop to pull off the scene. Sometimes, you have to shoot around the limits of the camera – and photography in general – to make the image work.
Of course, this was all dependent on the sun making an appearance. The break you see along the western horizon in this shot was by no means a certainty even ten minutes before snapping this image. In fact, at one point I was starting to think I should have stayed back in my tent!
As you can see, the sun did make an appearance and what happened next happened very quickly. Who says landscape photography isn’t action photography?
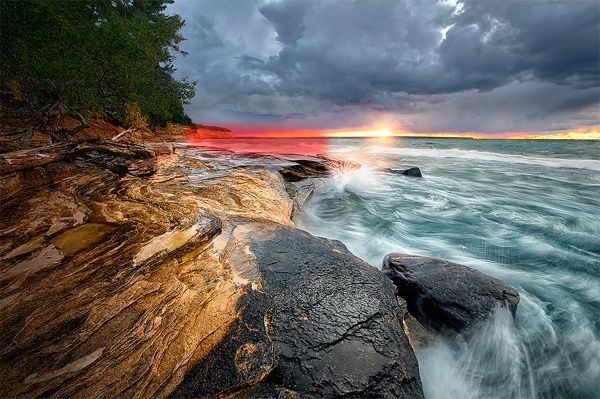
As the sun began to poke through, I wanted to get the trees out of the way first. So I started with an ISO of 1600 and a shutter speed of 1/80th. I would have liked something a little faster, but I was already pushing my luck with a D3X and ISO 1600. Thankfully, I knew coaxing away noise in blowing leaves wasn’t difficult – they didn’t need to be tack sharp, just reasonably sharp.
I waited for a small break in the gusts (perfectly still was never an option), and knocked off a few shots very quickly. I verified the exposure on the back of the camera and dropped the ISO to 100.
Next, I began shooting with 1/5th of a second being the proper exposure for the waves. As the sun approached the horizon, I knocked off quite a few of these 1/5th of a second shots, trying to time them with splashes on the rocks.
Finally, I wanted to make sure I was also getting a good exposure for the sunlit areas on the horizon. Using the camera’s highlight exposure warning (blinkies) I could see that the sun was just too bright. So, as it dropped to the optimum position, I quickly increased my shutter speeds 1/2 stop at a time (snapping off a photo each time) until the blinkies disappeared from my LCD display. I was able to go through this bracketing sequence twice before the sun dipped below the horizon.
Once the sun disappeared, I quickly packed it in and made my way back to the tent – right to the beginning of this story.
Tech Info:
Nikon D3x, Nikon 14-24 @ 14mm. Gitzo 3 series tripod, Really Right Stuff BH-55 head, Nikon cable release. Variable shutter speeds and ISOs, F/11.
~Steve
PS…
If you enjoyed this post, I think you’ll REALLY like my e-books, Secrets To Stunning Wildlife Photography and Secrets To The Nikon Autofocus System. They’re filled with hundreds of pages of information just like this. Check it out – click here (hey, it’s free to look 🙂 )


Gotta love your adventure at Picture Rock. I was at the same spot 20 years ago in early fall with an old film camera. Weather changes quickly in UP Michigan and you had encountered beautiful sunset while I got soaked with wet cold rain on that trip.
Wow these are some cool pics that you have captured
Check the Vigocart.com is a one of the best buying guide reviews site where you can visit and experience the top selling product guides in the market .
minimal extra clothing for this is the best choice. you should also keep shoes and capes with you.
Great shot and story…
Fun read, Steve! And so helpful. Thanks. Could you talk about where you put the focus point in an image like this. I’ve been experimenting with “double the distance” but am having only intermittent success. And any advice for zoom lens users? I’m not always able to carry an extra fixed lens with me.
I do have your books and I like them and the way you describe things, as in this history of your shot. Go ahead and I joint the recommendation of Joe T, and empower you to make a book about processing .
Gotta love your adventure at Picture Rock. I was at the same spot 20 years ago in early fall with an old film camera. Weather changes quickly in UP Michigan and you had encountered beautiful sunset while I got soaked with wet cold rain on that trip. Nevertheless I captured good fall color images and many afterward. After the first frost, the fall color peaks and there are ample photography opportunities. Thank you for the outstanding eBook on Nikon AF system. I am looking forward that you would publish a book on post-processing techniques.
The post processing book is still coming – just not sure when. It’s far more difficult than you might think.
I fully understand. The details on both of your eBook books are outstanding. So I will be patient. Thank you again.
Steve,
In addition to being a wonderful photographer, your a great short story writer:) Super shot plus an informative and entertaining read as well. Thanks a heap for sharing.
Another good article Steve. Keep ’em coming.
I’ll join a few others here in encouraging you to do a “Part 2” followup that describes the post processing steps and techniques you use.
The biggest trick there is the length. I use several advanced techniques (like Luminosity masks, exposure blending, double RAW processing) to get the photo to look like what I saw. The problem is, just telling what techniques I used wouldn’t be enough, I’d want to go into detail about what the techniques were first, then how I used them. This photo alone would take a small book with all the background info needed 🙂
Understood. The post processing posts/videos you’ve done in the past have been very helpful. For example, the video regarding resizing and sharpening for the web was excellent. I use that approach all the time.
More of that type would be welcome.
Every time I visit your site it costs me money. First I was looking at wildlife photography and stumbled across your site with that wonderful book on how to photograph wildlife. Bought it. As I was doing some research on how to make my Nikon D5500 work a little better, I found your book on the Nikon AF system. Bought it. I thought I wanted a Nikon D7500 but needed to know whether that was the camera I really should buy. Saw your review – and Jared Polin’s and Tony Northrup’s – and bought one. Now I read your story… Read more »
LOL – at least you got off cheap this time 🙂
Wow, $2.99 for the app! In Canada the cost is $11.99
Thanks as always for grear stories and even better tips.
Thanks Steve. Your story reads like a gripping adventure novel. Love it. And yes it passes on useful knowledge. Keep up the good work.
Good read, Steve, and some very amusing side comments. It’s also interesting that your final picture is actually a composite.
Great read as always! Thanks! Really enjoy your writing style. I have, and read twice, both your books, looking forward to what’s next.
You have an amazing ability of capturing what everybody sees ! They just don’t know it .
I have just started “ Birding “ , and both books have been a fantastic source of info ! Videos too .
Great writing and wit !
Keep sharing …. the new series is great !
PS . I grew up very near where this shot happened ! Cold , cold , cold but beautiful ! ( in a cold way ) .
Hmm, what are the four season up there again? Oh yeah – Almost Winter, Winter, Still Winter, and Construction 😀
have both of your books and totally love them!!, they are truly the best purchases in photography books that I have ever made!, and I have a ton of ebook and paper books on photography,!! now love this series you are doing as well!
Thanks 🙂
After watching and enjoying so many of your fine videos, I could hear you telling this story as I read it. Those who have missed your videos and Nikon Autofocus System secrets book don’t know what they’re missing. Thanks for sharing your adventure tales.
Thanks Bob 🙂
Thanks Steve, for a characteristically engrossing explanation of your photographic adventure.
You are the best among the best of teachers.
Mike
Qld Australia
Thanks Mike 🙂
Steve,
Thank You for this post it does help. I am interested in the steps you used in post processing to create the winning image. Where can I get this type on information. Thanks for All You Do!!!
I’m slowly working on a photoshop tutorial book / video class. It’s one of those things that I end up starting and stopping, I’ll get there eventually 🙂
My Dear Steve Perry..
Yes..went through the very nice Nature and Wildlife article with your experienced knowledge in NATURE & WILDLIFE PHOTOGRAPHY. Very nicely you had mention here in the ways and procedures that you had attempt and the techniques that you had used herein. You are always doing wonderful things and you give the best for us at all times. Highly appreciated. Blessings and Regards. Sincerely yours – SUMANGALA RAJAPAKSE
Nikon Wildlife Photographer / Wildlife Researcher
Wildlife Articles Writer
SRI LANKA.
Thanks so much for the kind words 🙂
How do you protect yourself from the biting flies and mosquitoes in that area?
There were none on that trip. Too cool and even if they were around, the high winds kept them in check. During the summer, bug spray – although horse files are the real nuisance when it’s warm.
Thank you Steve, I must say a most enjoyable read over a glass of fine Red. You are a gifted raconteur, and a storyteller of the old fashioned guild! A compliment 🙂 The foreground to medium really benefits from the curvature. Actually, to my eyes the darkest foreground is the ‘keystone’ to the topology – as the base of a ‘Y’ – or a ‘X’ with the right-hand bottom arm rooted along the 2 edge(s) of the darker felsic sandstone. Its position and tonal contrast of this foreground anchors the scene. Yours is one of the very few posts I’ve… Read more »
Thanks! Although words like Logarithmic make me sweat like I’m back in Algebra class 🙂 🙂
That is a beautiful shot as always Steve. One thing that would be great in these ‘How I Got the Shot’ posts would be to see what the original image looked like before post processing. That would give hope to us Steve Perry wannabees that we might attempt to achieve something similar ourselves with enough study and patience.
By the way, my D850 just arrived today and I am sitting down to watch your Youtube video on Unboxing and Setup. There seem to be quite a few differences in the controls from my D750.
I’ve thought about it, but it’s not of much use. I’m shooting flat-looking RAW files. The inevitable result would be a bunch of people looking at the flat files and comparing them to the finished file and deciding that I use too much Photoshop. Of course, in reality the flat RAW is the incorrect one.
I can understand that Steve. You do a great job in post-processing and I look forward to the Youtube video you mentioned previously on post-processing. I have a lot to learn there.
And thanks for the D850 setup video on Youtube. I finished it and got my camera set up. Two things I have learned so far. The D850 is SHARP and there are a LOT of settings to learn.
Great article Steve. I love your choice of shutter speed for the waves. Just right. Also that tip for keeping that little piece of the lake in view is great. I too shoot landscapes like this an tend to get down low, usually very low with a 14mm. I don’t usually worry about the trees, but think I will in the future. Your solution seems ideal to me. I would offer one tip from my workflow, with my D810, I set the picture control to “flat” and lower the contrast as far as it will go. Then I set the… Read more »
Thanks Larry 🙂
Actually, the way I shoot with the D810 and D850 are quite different than how I worked with the D3x. The D3x files didn’t have the dynamic range, so I would bracket a lot more. Now, I expose very much as you describe – in fact, I even mention using the Neutral or Flat profiles in my Histograms video 🙂
Wow, great
thanks for sharing