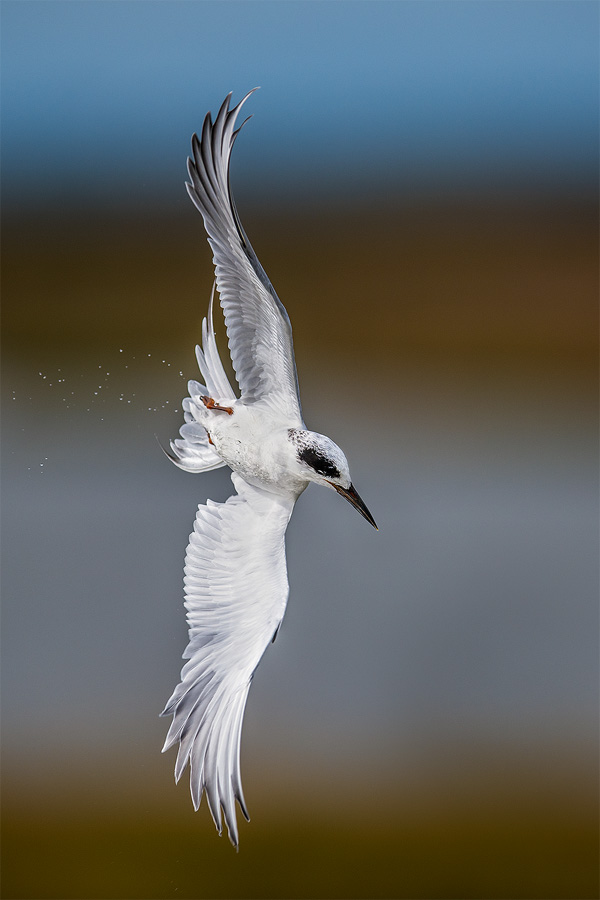
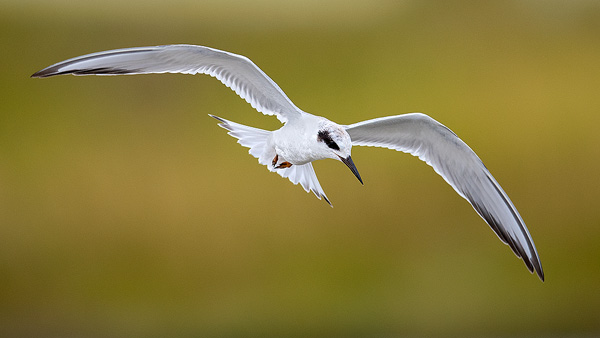
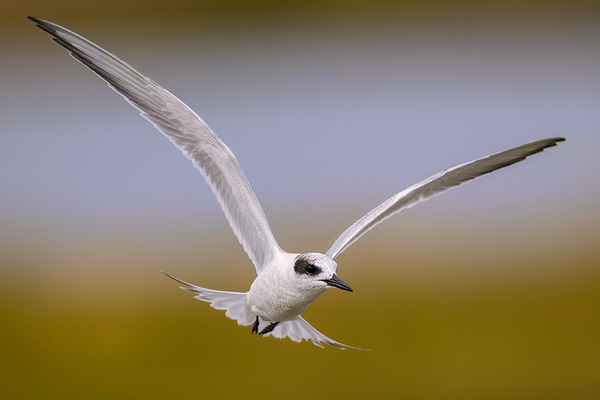
When my D850 review came out, I received more than a few nice comments about the tern photos in that video – frequently followed by questions asking how I captured them. So, I thought I’d try something new and put together a short article all about “how I got the shot.” In fact, after thinking about it I decided to take it one step further and make this a regular series on the site (as long as you seem to like it).
First, the location. I captured these at a new spot for me – the Edwin B. Forsythe NWR in New Jersey. It was one of those “just passing through” places, but I’m glad we stopped. This location is a keeper!
Our day started off windy and overcast without too much going on as we drove through the first mile or so of gravel road. We spotted a few gulls here and there as well as the requisite great blue herons and egrets, but everyone was hunkering down and not displaying much of a photographic spirit.
The road runs through the middle of a narrow strip of land that separates various pools and reservoirs from one another. Otherwise, it’s all wetland with small, scattered areas of thick grass growing from the shallow areas and islands.
As our tires crunched over the gravel, we happened upon a small bridge that sat over a water transfer system designed to shuffle water from one reservoir to the other. Today, this transfer system was busy at work pumping H2O from the right pond to the left one – and stirring up all the little fish in the area in the process.
Never a bird to pass up an easy meal, the terns were flocking to the area to scoop up the disoriented schools of seafood below (this lead to more than a few squabbles, but overall they got along better at the buffet than you might expect).
Well, there’s nothing like a slow day at the refuge to make flying terns look appealing, so I pulled myself from the truck and grabbed my gear (D850 and 600 F4 E). (Pffft – Who am I kidding? I’m a sucker for terns.)
As luck would have it, the thick dreary clouds had thinned by this time and were giving way to a nice, bright overcast. Meanwhile, I was setting up my 3-series Gitzo Tripod and Wimberely WH 200 gimbal head with visions of flying terns soaring through my imagination.
This situation offered a unique perspective. Normally, when you’re at the lake or oceanside with terns in the viewfinder, you have to look up toward them from the ground as they search and hover looking for a meal. The bridge allowed an eye-to-lens perspective that I knew I was going to enjoy.
As I mentioned, it was a windy day and the open nature of this refuge didn’t offer much in the way of windbreaks. So, the terns would swoop in, try to hover as the wind slung them around, and then dive for fish. This combination of elements conspired to make keeping the terns in the viewfinder about as easy as placing a panicky cat into a bucket of ice water. I knew that between the movement of the terns, my movement, and the wind tossing the birds around like scraps of paper in a hurricane that I had a challenge on my hands – and that shutter speed was the main priority.
So, the settings went down like this: I choose 1/3200th of a second as a shutter speed, although in looking back at some of the shots, I would have enjoyed a high keeper rate with 1/4000th or faster. Even at 1/3200th, I had more than a few images corrupted with a touch of motion blur.
Since the light was relatively consistent and the situation wasn’t too tricky, I went with my go-to autoexposure mode, Manual + Auto ISO. In this mode, I choose the shutter speed and F/stop and the camera floats the ISO for proper exposure. (More info here.) For the most part, my ISO was between 200 and 400.
For the most part, the camera did well with regular matrix metering, most of the time the exposure was within 1/3rd of a stop either way of correct. Had the camera been struggling, I would have simply gone to full manual, but the varying densities of cloud cover kept the light levels on the move, so this technique allowed me to focus on the birds while the camera monitored and adjusted for the brightness. Since I was shooting RAW, I could easily tweak the exposure back home if needed for an individual shot.
The background was also incredibly tricky. For the most part, it was gray clouds or gray water – not an ideal backdrop for a white bird. My only hope was a few narrow swaths of grass in the background. I ended up shooting at F4.5 with my 600 F4 (it would have been F4, but I inadvertently bumped the dial somewhere along the way) to turn the background as soft and blurry as possible. The birds were relatively close to the camera and the background relatively far, so the wide aperture gave the images a look that was even better than I had anticipated.
Frame rate was “only” 7FPS as I didn’t have the grip for my D850 yet. The truth is, a higher frame rate would have helped to capture more keepers, and I really wish I’d had 9FPS (or more) in this situation.
Still, one major advantage the D850 had that outweighed the slower frame rate is a massive amount of resolution. This allowed me to start shooting just as soon as the bird filled up the DX area (or so) of the frame and continue to fire away so as it came closer and occupied more of the viewfinder. This is not something I would typically try with my D5’s 21 megapixels as the crop would result in a small, 9MP file.
As a side note, the more I shoot with the D850, the more I find this crop-ability one of the major reasons I pull it out of the bag before any other body. I always fill the frame when I can, but when the action recedes (or isn’t quite there yet), the D850 still has enough resolution to save the shot.
However, the real trick here was the narrow strips of green/brown background. Although the birds were plentiful, over 90% of the time they had nothing but gray sky behind them. My technique was to lock on to them with Group AF (using AF-C and Back Button AF of course) and attempt to track them as they came in (no easy task under these conditions).
The reason for Group AF over one of the other modes (such as Dynamic) is simple – I find the Group AF is better at latching onto tricky subjects than any other mode. Since these birds were all over the place and I only had a second or so when the background looked good, I needed the AF mode that was the best at quickly locking on in a hectic situation – and that’s Group AF (at least for the way I shoot).
When the bird was in range and I had a nice amount of grass in the background, I’d knock out a burst until they left the grassy background – which never took more than a handful of frames (which is why I wish I had 9FPS). The majority of the time, I had to forgo any shot at all of an approaching tern, as the bird either never came close enough or never floated into the narrow notch of acceptable background.
(Side note – the grassy background is what allowed me to shoot without exposure compensation – had I been shooting the white birds against the clouds, I would have needed about 1.5 stops of extra exposure over what the camera calculated.)
Due to the conditions, this was one of those times where the hit rate just wasn’t going to be very high, and I knew it going in. First, the birds were incredibly tough to keep in the viewfinder, and when you did keep them in the viewfinder, they needed to be close enough AND floating in front of a proper background.
Next, I’m shooting at F4.5 with small birds at close range – and demanding tack sharp eyeballs. Most of the time, my depth of field was shallower than an Instagram celebrity, so I frequently had images where the beak, wing, or neck was sharp but not the eye. However, the thing is, sometimes you have to accept the idea that you’re doing something relatively tricky and that not every shot is going to be a keeper.
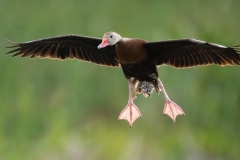
I spent nearly an hour with these guys before clouds finally surrendered to the sun and the light became too harsh. In that time, I was able to capture the images you see here, as well as quite a few I have yet to process. So, even with tough conditions, it’s usually possible to pull off some keepers with a little know-how, shot planning, and persistence.
PS…
If you enjoyed this post, I think you’ll REALLY like my e-books, Secrets To Stunning Wildlife Photography and Secrets To The Nikon Autofocus System. They’re filled with hundreds of pages of information just like this. Check it out – click here (hey, it’s free to look 🙂 )



[…] Close10 Tips For Photographing Local WildlifePhotographing Birds At The Beach – 10 Easy TipsTaking Terns8 Awesome Accessories For Nature PhotographersAF Help For Tricky, Low Contrast SubjectsAmazing High […]
These “How i got the shot” articles are excellent. I lean so much on each of them. I have already bought your books and wow what a lot to learn. Your style is what makes them so interesting. Please keep doing them.
Hi…
I am fan of your youtube videos. I love your wildlife photography. Your images and your tips….
Fantastick images of Terns…..
Steve! Electronic front curtain VS mechanical front curtain , which moves faster. Does electronic front curtain shutter has an obvious rolling shutter effect?
Mechanical is faster for sure. Not sure about the readout speed (no one likes to publish that kind of info), but it’s slower than the technical shutter for sure. I’ve not noticed any rolling shutter effects, but I’m not shooting fast action with it either (LV AF makes it pretty much impossible for my kind of action shots).
I watched your D850 setup video as the first point of order after unpacking my D850. I then read your Nikon AF book. I am new to the wildlife photography aspect. I love this blog! Thanks for all the teaching moments. I know Forsythe well. Great place.
“Most of the time, my depth of field was shallower than an Instagram celebrity” Crackup. Great images, Steve, and thanks for revealing your choice of settings. Excellent.
I photographed the common tern in the UK and it is certainly a challenge to get the birds in the viewfinder. I enjoyed reading your blog on terns. I just downloaded your Nikon AF book and I already have the other one. I seem to have problems with Nikon modes like Dynamic etc. Which one is best for flying shots.
I tend to use Group AF most of the time for them, although no mode is going to get you a 100% keeper rate with these guys!
As a birder and photobug, this is extremely fulfilling. Keep it up. Got both of your books and going along with you in BDG
Hi Steve, I just finished reading your Secrets to the Nikon Autofocus and this is the best material about the Nikon camera’s AF system, period. I love it.
Hi Steve. I read both of your books as well.
Hi Steve, really enjoyed your Wild Life bird photography advice and this article on Terns. I am trying to build up courage to covert to RAW. I use. Mac laptop. Is it’s new software good enough to show RAW or should I get lightroom or Serf Affinity photo 1.4. My new D500 camera is so fast especially having learnt to use the auto focus button and rapid change between group and single point focusing. Leslie
Hi Leslie –
Thanks for the kind words 🙂 Shooting RAW is more than just viewing the files, you also need to process them so I recommend Lightroom for that purpose. I have the new “classic” version and I’m really liking it a LOT. Faster than previous versions and works great on my Mac. It’s subscription-based (comes with Photoshop) but as long as that doesn’t bother you, it’s fantastic software.
Hi Steve, A friend pointed me to your article. Well written, informative, and enjoyable reading! Anyone who has attempted keeping birds in the viewfinder when using a telephoto knows how challenging that is. This very situation lead me to develop the PGD Tracker. It does not guarantee every shot is a keeper… for many of the reasons you noted in your article, but it increases your hit rate enormously…. and that leads to more keepers. I realize this comes off as a shameless plug, but I am a career engineer, (and a serious committed photographer), not a marketing guy. It… Read more »
Excellent article – very useful – thank you.
Hi Steve- As a retired (actually “SEMI”) photographer and a career Nikon user I appreciate the articles and now blog that you send out. It’s a definite “tern” for the better and I hope to “tern” to future works to keep my 77+ year eyes working OK with my D-810. Hope to upgrade to the 850 but it’s too great a financial whack at this time. Photographically I’ve been more involved with sports than birds through the years but plan to delve into “birdland” a lot more in 2018. Thanks for all you do equipment-wise and subject-wise. I feel like… Read more »
As a birder and photobug, this is really rewarding. Keep it up. Got both of your books and joining you in Costa Rica.
Love the new series Steve. It is so great to learn exactly how you go about getting a shot. Hope to see some similar posts with landscapes as well since that is my main interest. Might you consider also including both the original and processed shots for comparison? It would be very interesting to see how you change the raw image into the final result.
Always with food for thought! Keep them coming!
Steve –
Loved this! Hope to see more of the same in the future. Also love both of your eBooks and your YouTube videos.
Keep everything coming!
Frank
Steve,
I too have both your books, and I enjoyed them both. I love the idea of “how I got the shot” please do continue
Norm
Steve , as always enjoy your content. have both your books and looking forward to your exposure book. keep up the great work, and keep up the support of Nikon, as it seems so many are bashing it these days.
Very interesting approach. I can not be as nice as you to Nikon new d850 and suggest that “only“ 7 fps is a lot. For photographing birds I would prefer d500 with 10 fps or even d5 if someone loves full frame, more fps and not lazy to carry. I understand d850 is a hype at the moment but we have to be honest. This is not a camera for the bird photography. The speed with the grip is OK but you have different batteries and a different charger to carry. Not for me. I am very excited about your… Read more »
LOL, I didn’t say 7FPS was a lot – I said I wished I had the grip and 9FPS 🙂 In fact, I even said that I know my keeper rate would have been higher. However, I wholeheartedly disagree that the D850 is a poor bird camera – at least a gripped D850 is perfectly fine. I just came back from a three week bird shoot in FL and although I had my D5 with me, I never touched it. I had planned to use the D5 quite a bit, but the gripped D850 just brings more to the table… Read more »
Good start for the new series, which seems like a fresh, new approach. Please do more of these as you see fit. Thanks,
Great post and great idea for the series. I second the request from earlier for an in-depth ebook on exposure. I also shoot in Manual+autoISO, but still frequently have problems with highlight blowout, and I’m the first to admit I understand the Nikon exposure system about as well as I did the autofocus stuff before I read your ebook . While we wait on the exposure ebook, I’d love a short post on the use of exposure comp with the manual option.
Thanks for the help you so freely make available.
Sorry for the double post – didn’t see the first one and assumed it hadn’t worked.
Brilliant! this is a great idea and I do hope you continue it with some more shots. A great learning opportunity. I am amazed as to how you manage to get such low ISO despite being in “Auto ISO” mode. For some reason my D500 prefers to go for higher ISO values. May I suggest you also add the EXIF and Histogram to the post would make it even more interesting. And of course if you added an “After/Before” it would give us some insights into your post-processing workflow as well.
Good stuff!
Cheers…Kishore
—
Hi Steve, Excellent post! Please continue with these – as with all your posts, videos and books, they are so helpful. Just out of curiosity, you posted four absolutely stunning pictures – how many did you take in order to get these four? For challenging subjects such as there, what might be a typical keeper rate? Thanks again and keep up the great work!
Thanks for sharing Steve. It’s nice to read about the process you go through in your decision making and how you evaluate things before you press the shutter. Things like that will (hopefully!) help in the field regardless of what the subject happens to be. I look forward to more articles like this one!
Hi Steve,
The review was great and the photographs were excellent. I liked the story as well because it made the review more interesting. Check out Mark Smith if you don’t already follow him. He does an awesome narration with his videos. And yes, more of these would be great. Maybe videos as well like Mark does.
Keep up the great work. Cheers.
Hi Steve
Great post and great idea for the series. I second the earlier request for an in-depth exposure ebook. I shoot manual+auto ISO but have problems with highlight blowout, so while we are waiting on the ebook I’d love a quick tip or two on using exposure compensation with this shooting mode .
thanks
Hi Steve. Another excellent post. Thanks for the tips and the ebooks. I can definitely say that my skill have improved since I stated following you here and FM. What I found most interesting for a relative newbie to BIF shots is this statement…”The majority of the time, I had to forgo any shot at all of an approaching tern, as the bird either never came close enough or never floated into the narrow notch of acceptable background.” The hardest thing to do as a novice is to know when NOT to take the shot. I used to get so… Read more »
LOL – not popping off shots when that bird is perfectly composed in the viewfinder is even tough for us seasoned guys!
I really enjoyed this article. I will try this on my D850 now that I have finally received it.
Steve, I really enjoy your posts. You write in my language, not some highfalutin style that says “Look how smart I am.” Your books are written the same way and I keep going back to them to answer a question that has come up. Life is good.
Thank you, Robert
Great stuff even for a very experience semi-pro. After over 1K shots I came to the conclusion Group focus is best. I should have read you first
Hi Steve, thanks for your article I found it very helpful. Also both your eBooks are great and full of very helpful information and tips. One of the issues I struggle with is low light especially when trying to photograph some of our smaller parrots, our Rainbow Lorikeet for example, in flight. Their colours in flight are far more colourful than when perched, but the little buggers fly at the speed of light and dart all over the place. So initial lock on and tracking is like trying to lock onto and track a missile. I have both the D850… Read more »
Hi Paul – The brutal truth is that sometimes it’s tough to get the shot! You have a couple of challenges. First, since it’s a small bird I imagine it’s at close range – this is NOT something the 200-500 excels at with it’s slower AF speed. So, you’ll need to have focus preset fairly close to the distance the birds are going to be flying by so the lens doesn’t need to move the focus too far for a sharp image. The second challenge is the light – and there’s just not too much that can be done there.… Read more »
Hi again Steve Many thanks for your reply. What I have just done is swap out the 200-500 for my Nikon f2.8 70-200. The narrow angle of view of the 200-500 I just couldn’t lock onto the bird in time so missed many shots. Of course it’s relatively slow aperture doesn’t help with light. The 70-200 at 200mm gives me both a wider angle of view so I have a better chance of initial lock on and much better light. And yep the bird is generally only 3-4 metres (10 -12 feet) away from me. If I could I would… Read more »
Steve, another useful offering by you. I’m trying to work in the use of a gimbal head for my wildlife/bif shooting. A video from you on technique for photographing BIF handheld, monopod, tripod w/ ball head and tripod with gimbal head would be helpful to many of us I expect. Not that you aren’t busy enough with your own creative projects. Happy Holidays!
Tom
Hi Tom –
I do have this for tripod use:
https://backcountrygallery.com/long-lens-tripod-technique/
Hi Steve thanks for the article! I enjoyed it very much since I was spending many hours beside a pond for common terns last summer. I used exactly the same settings on a D5 like you did with the D8500. Most of the time ISOs were between 400 and 1200, sometimes more. The main problem were the swimmers at the pond who made a lot of splashing and sometimes the bird came along and went off suddenly. The birds are breeding not far away on floating platforms at a bigger lake. The chance to get pictures when they go fo… Read more »
Excellent Steve. Just the right length, to keep my wandering attention, but full of important and useful information. Keep them coming, I’ll keep checking back (or clicking your email notification) to ensure I don’t miss anything.
Thanks for this feature. It is exactly the reason I never miss anything posted by you.
I enjoyed the e-books and found them very helpful with my own gear and wildlife technique.
Long may you continue. The best nature photography site on u-tube…by some considerable margin.
Always enjoy your publications, and always learn form there content. Thank you!
Great idea for a post, glad to hear you are going to start doing them on an ongoing basis, it was interesting to hear your thought process for these shots.
Hi Steve,
I am enjoying and learning from both of your books! Love that you are open to sharing your knowledge with everyone. Going to try the auto ISO next time I’m out. This post was great, keep em’ coming!
Dear Steve.. Very nice wildlife article from the fields. Must appreciate greatly for sharing these type of very valuable wildlife photography articles with real pictures. I am always following your website related articles and videos released in the you tube. I am carefully learning a lot from your back country gallery articles and videos. I am too a good Nikon Man like you and highly interested in Bird life and Wildlife Photography. Since you are too a very good Nikon shooter and I am very happy to follow your works when ever I am on the Internet. By the way… Read more »
Thanks for the kind words 🙂 I don’t want to spoil any gifts, but yeah, check your e-mail Wednesday 🙂
BIG help,love the idea of you sharing how you got the shots.Thank you Steve.
Steve, Thank you. I have your e-books and have studied them carefully, tried the techniques and have had a greater percentage of keepers. I enjoyed the blog and
it helped me better understand how to apply the Nikon autofocus system options to capturing flying subjects. I look forward to future blogs.
Thank you Steve, very valuable and educational. Still a little too brave for me yet trying to come to terms where to switch on what at the time of wanting a quick shot.
Please do keep sharing, it is so very important to folk like me. Many thanks; Mike. In the UK
Great blog packed full of information that is really encouraging. Lovely images (as always) and thanks for sharing. Please do keep posting things like this. So helpful. Thanks!
Thanks for the post! Love your writing style and as always informative. I’ve read (twice) your eBook on Nikon focus and look forward to your Stunning Wildlife Photography book. Keep the post coming.
Thanks for sharing–very helpful for a newbie
Great idea, I always learn something from seeing how other shoot. I’d like to know a little more about your settings for AF? Same as your standard? I’m guessing you’re using single point AF.
Got my grip a few weeks ago, makes a big difference in the D850 performance.
I used Group AF for these – I just added this to the article:
The reason for Group AF over one of the other modes (such as Dynamic) is simple – I find the Group AF is better at latching onto tricky subjects than any other mode. Since these birds were all over the place and I only had a second or so when the background looked good, I needed the AF mode that was the best at quickly locking on in a hectic situation – and that’s Group AF (at least for the way I shoot).
Thanks for the notes. Just got my D850 last week after a three month wait. Also waiting for the battery grip. Did a birthday party of my five year old granddaughter and was impressed by the sharpness of the images. Cannot wait to tackle birds!
Enjoy your blog. Again, the notes area super idea! Thanks,
Hi Steve, Yes, I really enjoyed reading this. Pls, keep up writing these articles.This kind of backgroud info is not typically available in great shots we can see. It´s hard to learn technical side from those shots without e.g. settings info. I have placed an order for D850, but not yet receved the package.So I have excited time now. The idea of using DX was one thing I had in my mind. So, do I get you right, do you change the image area from DX to FX when the target comes close enough? If yes, you probably have some… Read more »
For these, no. Since the situation was changing rapidly, I left the crop at full frame (like you say, too many quick button changes). However, I “know” about how large the DX area is so that was my guide for when to start shooting.
Great perspective and ‘thought process’ exposure. Very helpful stuff and beautiful captures. I too would appreciate the lowdown on the lens used here.
600 F4 E – my favorite 🙂
Ha! Unintentional, I’m sure, but your typo of 600mm f$E is spot on!