Welcome to the supplement page for my Nikon D500 video review. Before you read this page, I highly recommend that you watch the video first since it has information not mentioned below. I know it’s a long clip, but hey, what’s 25 minutes when you get to spend it with a nice guy like me? (Or, you know, what’s 25 minutes when you’re about to drop 2 grand on a camera? 🙂 )
As time goes on, I’ll be updating this page, so bookmark it and keep an eye out. You never know what I’ll post!
Also, if you would like to purchase the D500 or any of the other items mentioned in my video / writeup, please consider doing so via the Amazon links below. It won’t cost you anything extra, but it will help support this site and these types of articles.
Nikon D500 DX-Format Digital SLR (Body Only)
Nikon AF-S FX NIKKOR 300MM f/4E PF ED VR
Nikon MB-D17 Multi Battery Power Pack
Nikon AF-S FX NIKKOR 600mm f/4E FL ED VR
My Settings
When I asked for topics people wanted to see in this review (via my newsletter), I had an overwhelming number of requests for a list of my D500 settings – and I do cover some of them in the video. However, I didn’t want to drone on and on in front of the camera (anymore than I already do), so I decided that I’d elaborate on my settings in a more complete way here on the site. Since most of my action shots thus far involve our avian friends, most of the settings below are tested with birds in flight – although those settings should work for a wide variety of different action scenarios.
WARNING: All that said, before you go copying my settings like a desperate middle schooler during an exam, keep in mind I’ve set my camera up specifically for action and for my style of shooting. Many of these settings would be different for landscapes, macros, etc. However, since you asked… 🙂
Birds In Flight Settings For The D500 / D5
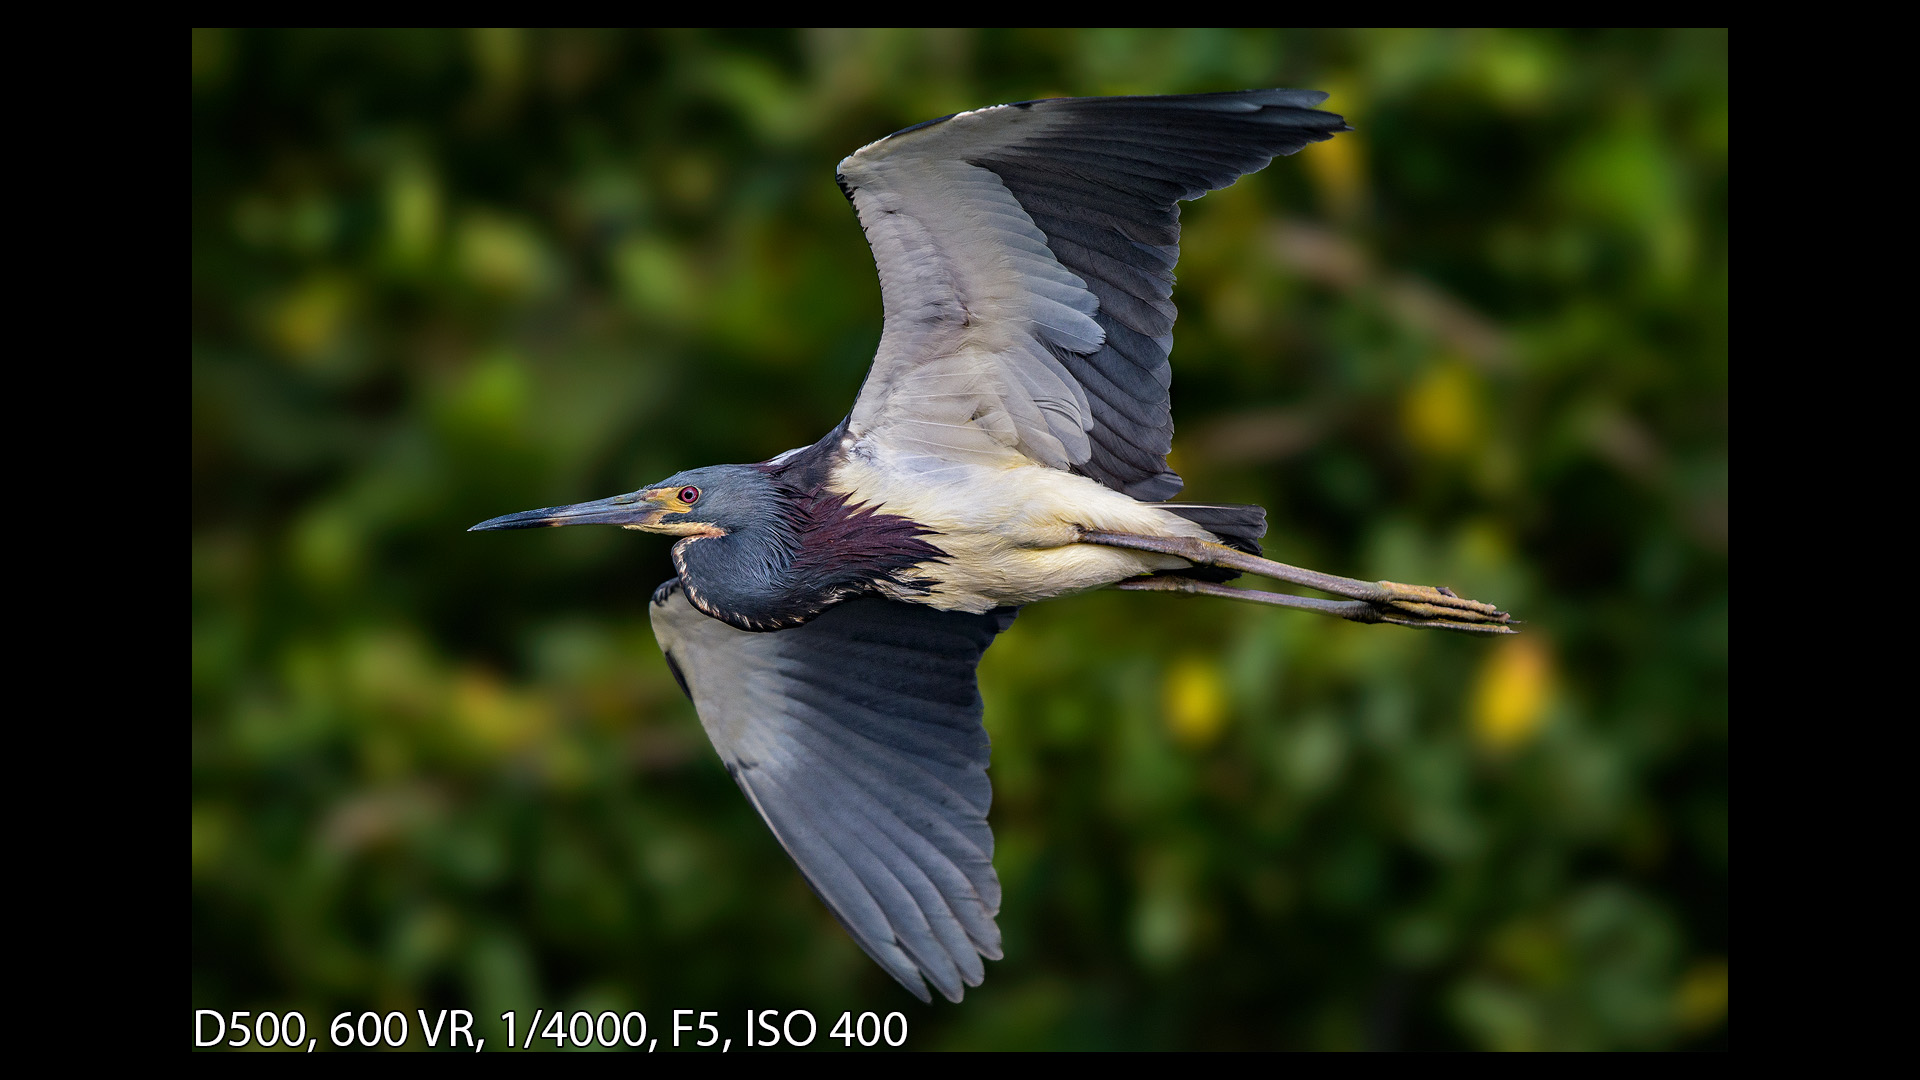
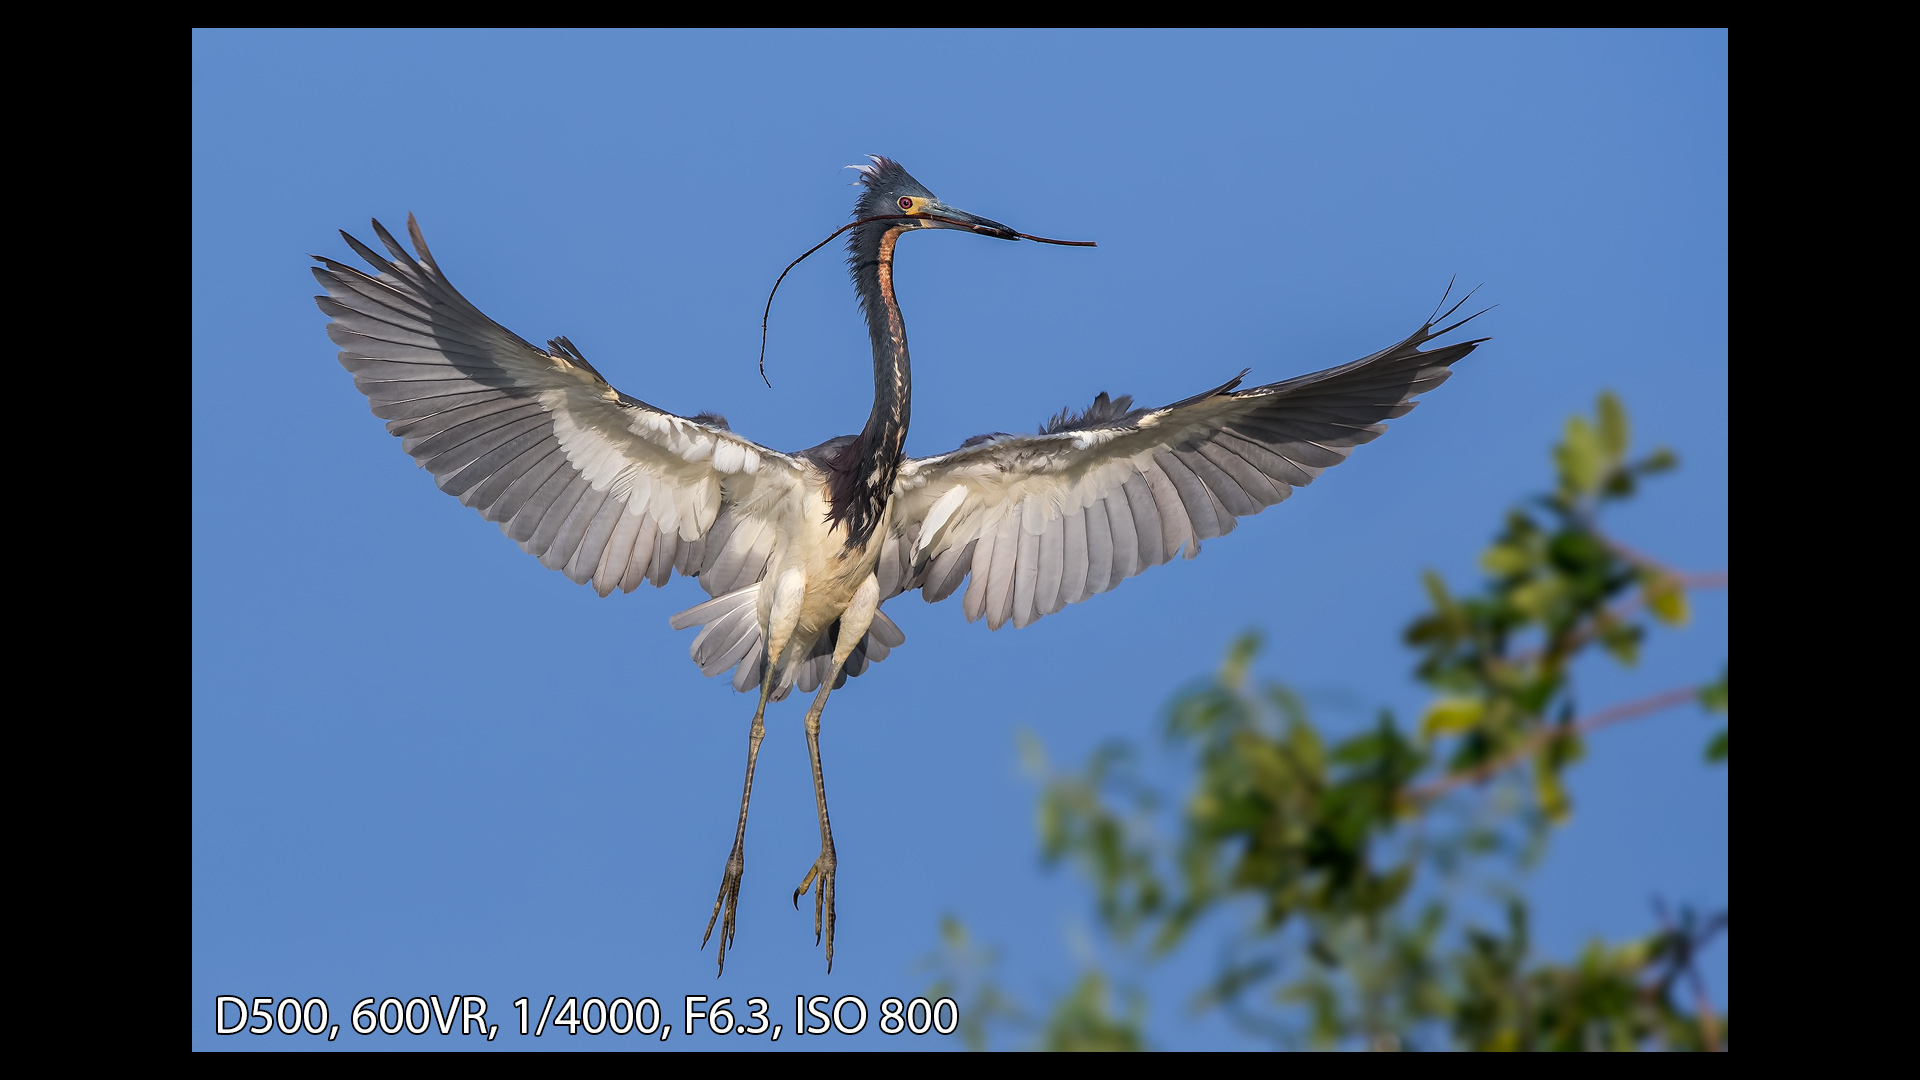
I think the most common question I’m getting on the D500 is, “What are your settings for birds in flight?” Well, as luck would have it, I’ve been feeding my D500 a very regular diet of flying birds since I received the camera. So, below is a quick overview of what I use and, more importantly, why I use it.
AF Mode – This is set to AF-C of course. Always make sure your camera is set to AF-C (Continuous AF) for any kind of action. When in doubt, just do the math: AF-S + Birds In Flight = one unhappy photographer.
AF Style – Back Button AF. As many of my readers and YouTube viewers know, I’m a fan of Back Button AF, and have my camera setup that way. For the hows and whys of it all, check out this video:
AF Area – This is set to Group (most of the time) – For the D500, I have to say I’ve really been enjoying Group AF for flying birds (still rockin’ single point for the stationary ones). I have used D25 and D72 as well, but my overall keeper rate has been highest with Group AF. However, a word of caution. If you’re dealing with larger birds, you need to be careful with Group AF. It likes to latch on to whatever is closest to the camera so sometimes you’ll get a sharp wingtip and soft head instead of the other way around.
If it becomes a problem, I’ll switch to D25 or D72 since those modes allow me to position a single AF point where I want it (like the head) and the system only steps in if I lose tracking – usually jumping to an adjacent point. So, the Dynamic Areas are sometimes better when you need a more precise AF location. Experiment with both and see what works best for your style of shooting and your subjects.
Focus Tracking With Lock On (custom function A3) – I mention this in the video, but I’d like to go into more detail here since Nikon has made some changes with the D500. The first part of this setting is, “Blocked Shot AF Response” and I’m at a setting of “2”. The idea here is that if something comes between you and your subject for an instant, the camera won’t jump to the obstacle but instead hesitate just a bit and stay with your target until the obstacle is past. Very handy if you’re tracking a bird flying by and a tree jumps between you and your subject as you pan.
However, in older cameras I sometimes found this setting more trouble than it was worth and I would generally turn it way down or shut it off altogether unless I was actually having an issue with obstacles between the subject and myself.
The problem was, the camera would sometimes lose tracking and wait too long to reacquire the lock (the camera thought the tracking loss was due to an obstacle or something). When that happened, there would be too much hesitation in regaining the lock, the opportunity would pass, and there would be no keepers on the card.
Well, the tracking has improved with the D500 and it doesn’t tend to lose tracking like that nearly as often. Sure, it can still happen (which is why I still keep it set low), but it’s infrequent to say the least. In fact, there are times that I wander off target and having this set at “2” gives me just a split second to regain tracking before the camera switches to a new target. For me, setting the delay higher seems to cause too much hesitation in the system (like on the rare occasion it grabs the wrong initial subject or has focus set to the wrong part of the critter), so for now a setting of “2” seems to work well for me.
The other part of this setting is “Subject Motion.” This new setting is a way for you to let the camera know how erratic or steady your subject is. For the types of wading birds I’ve been doing, it seems like right in the middle works fine on the D500 and D5. If you’re faced with something more erratic (like a bat grabbing mosquitoes) or steady (like a plane flying by), then certainly try the more appropriate setting.
For more on how Nikon’s AF modes work, see this video. Note that this was done prior to the D500 / D5, but the way the modes (Group, Dynamic etc) work is exactly the same.
Custom Controls (F1)- The D500 also has some exciting new options for the preview button, sub-selector, function button, and AF-On button. For now, I have been experimenting with a few of the customization options available with the Preview button and Sub Selector ( AKA the joystick).
For the PV (preview) button, I have selected the “AF area mode” option, “Single Point AF.” This setting allows you to press the PV button on the front of the camera and regardless of what AF area mode you’re currently in, it will switch you back to single point as long as the button is held in (demo in the video). This is really handy when you’re in Group AF and your subject gets into a tight area (since Group AF loves to focus on the vegetation around the critter instead of on the critter itself).
As for the Sub Selector, I’m playing with something new there. There’s an interesting option that allows you to set it up for AF-On and it occurred to me that this potentially solves one of the biggest problems with back button AF (BBAF).
If you have used BBAF for any amount of time, you know it has one annoying drawback – you have to take your finger off the AF-On button in order to switch AF points. Well, it occurred to me that if I set my joystick for AF-On when I press it in, I solve that problem. And it works – sort of…
With this setup, when you press in the joystick, it will focus, but when it’s pressed in, it won’t move the AF points. So, you can move them around and focus with the same button, but not at the same time. Personally, I’m not sure if this is any better than the way I’ve been doing it up to this point, but I’ll never know if I don’t try it for awhile.
Frame Rate – This is set to 10FPS. Keep it at maximum for the best variety of wingbeats / expressions and shoot in short, controlled bursts.
Shutter Speed – I’ve been keeping my shutter speed at 1/3200 or higher for most of my birds in flight and that seems to keep my success rate pretty high. I have gone with lower speeds, but my keeper rate gets progressively more disappointing as my shutter speed drops.
F/Stop – This really depends on how much light I have at my disposal. When it’s brighter, I go F5.6 or F6.3 for a little added fudge factor (Depth-Of-Field) in case I miss critical focus by a smidgen. As the light drops I’ll open up until I reach F4.
ISO – This varies depending on the light of course, but I tend to cap out around ISO 4000. Beyond that, I feel like I’m losing too much detail in the fur and feathers of my favorite subjects. About the only exception to that would be if something extraordinary was happening, but if I can get basically the same shot the next day in better light, I’ll wait.
Personally, I really like to keep the D500 under ISO 1600. Very little effort is needed to clean up those shots. Beyond that, ISO 1600 – 3200 is still good, but it will need a slightly more aggressive approach when it comes to noise reduction later. Beyond ISO 4000, I’m definitely breaking out the heavy guns to get rid of that noise.
Other Custom Settings:
Here are a few other custom settings you might be interested in for the D500…
Custom function A1, Release Priority – I keep this one at the default of “Release.” Sure, you can use one of the “Focus + Release” settings (don’t use just “Focus” or you’ll miss a ton of shots), but I find my keeper rate is just fine with “Release”. The thing is, the “Focus + Release” settings attempt to verify focus before letting the shutter fly and it can slow things down if the camera doesn’t think it has a solid AF lock.
The problem is, sometimes the AF point isn’t on a sharp area, but the area you want sharp actually is in focus. For instance, maybe I’m photographing a bird gliding by and focus is on the head / neck. The camera is ready to fire but a wing flaps by the AF point and the camera no longer thinks the subject is in focus. Of course, focus is right where I want it, but in this case the camera hesitated until the wing went past and fired when it was able to get a better confirmation of the lock. So, in many cases, your focus is perfectly fine, but the camera is hesitating (note – it will still fire eventually, even if it can’t confirm a lock in one of the “Focus + Release” modes). Setting this to “Release” keeps that hesitation at bay and I actually seem to get MORE sharp images with this technique.
 A6 Number Of Focus Points – This one is a bit confusing, so although I don’t switch it I thought it was worth a quick mention. This doesn’t select the number of AF points available for tracking, this setting is for how many points YOU can select with the joystick. So, if you find it’s taking too long to jog from one side of the screen to the other as you bounce around a field of 55 AF points, you can set it down to a more reasonable 15. I have mine at 55 and haven’t had any disappointment in the AF point position department.
A7 – Store by orientation – This one is actually pretty cool so I have it turned on. Basically, this will remember where you had the AF point the last time your camera was in a vertical orientation and then where it was when the camera was horizontal. Why is this handy?
Think of this scenario. Let’s say you were out photographing the feathers off of a beautiful egret that was standing in the marsh and you have your D500 vertical with the sensor point right on his eye. However, in the mean time there are a few birds occasionally flying by and you want to use the middle AF point with the camera in a horizontal format to capture those. Normally, you’d have to move those AF points around each time you switched orientations and probably miss shots. With this turned on, you can turn the camera horizontal when the flyers sweep by and your AF point will jump back to the middle. Once they pass, you can turn the camera back to vertical and the AF point jump back to where you left it.
Oh, and you can choose between just remembering the AF position or the position and AF area! So, that means you can shoot the standing bird with single point and the flyers with Group – and the camera will switch back and forth when you rotate. Sweet.
The next one I change is for BBAF – and that’s A8. Under this, I select AF-ON only, since I don’t want to focus with my shutter release. See my back button AF video above for more info.
 Next we have A9 – Limit AF Area Mode Selection. The more I use the camera, the more I know which AF areas I do and don’t want to use. This setting allows me to eliminate the ones I don’t use from the menu when I’m cycling though, making it faster for me to get to the AF area modes I DO want. I never use D153 or Auto, so those two are turned off. I’ll probably also turn off 3D as well (see the video for why). However, if YOU do use those modes, then don’t turn them off – remember, these are my settings 🙂
From here, most of my stuff is actually just the defaults. I do turn on the viewfinder grid display (D8), but other than a few minor items (monitor delay, that sort of thing), nothing earth shattering here in the Custom Functions for me personally.
One more option you should set as well – In the Tools menu, make sure to enter your name and copyright info and have the camera attach it to your images 🙂
D500 ISO Samples
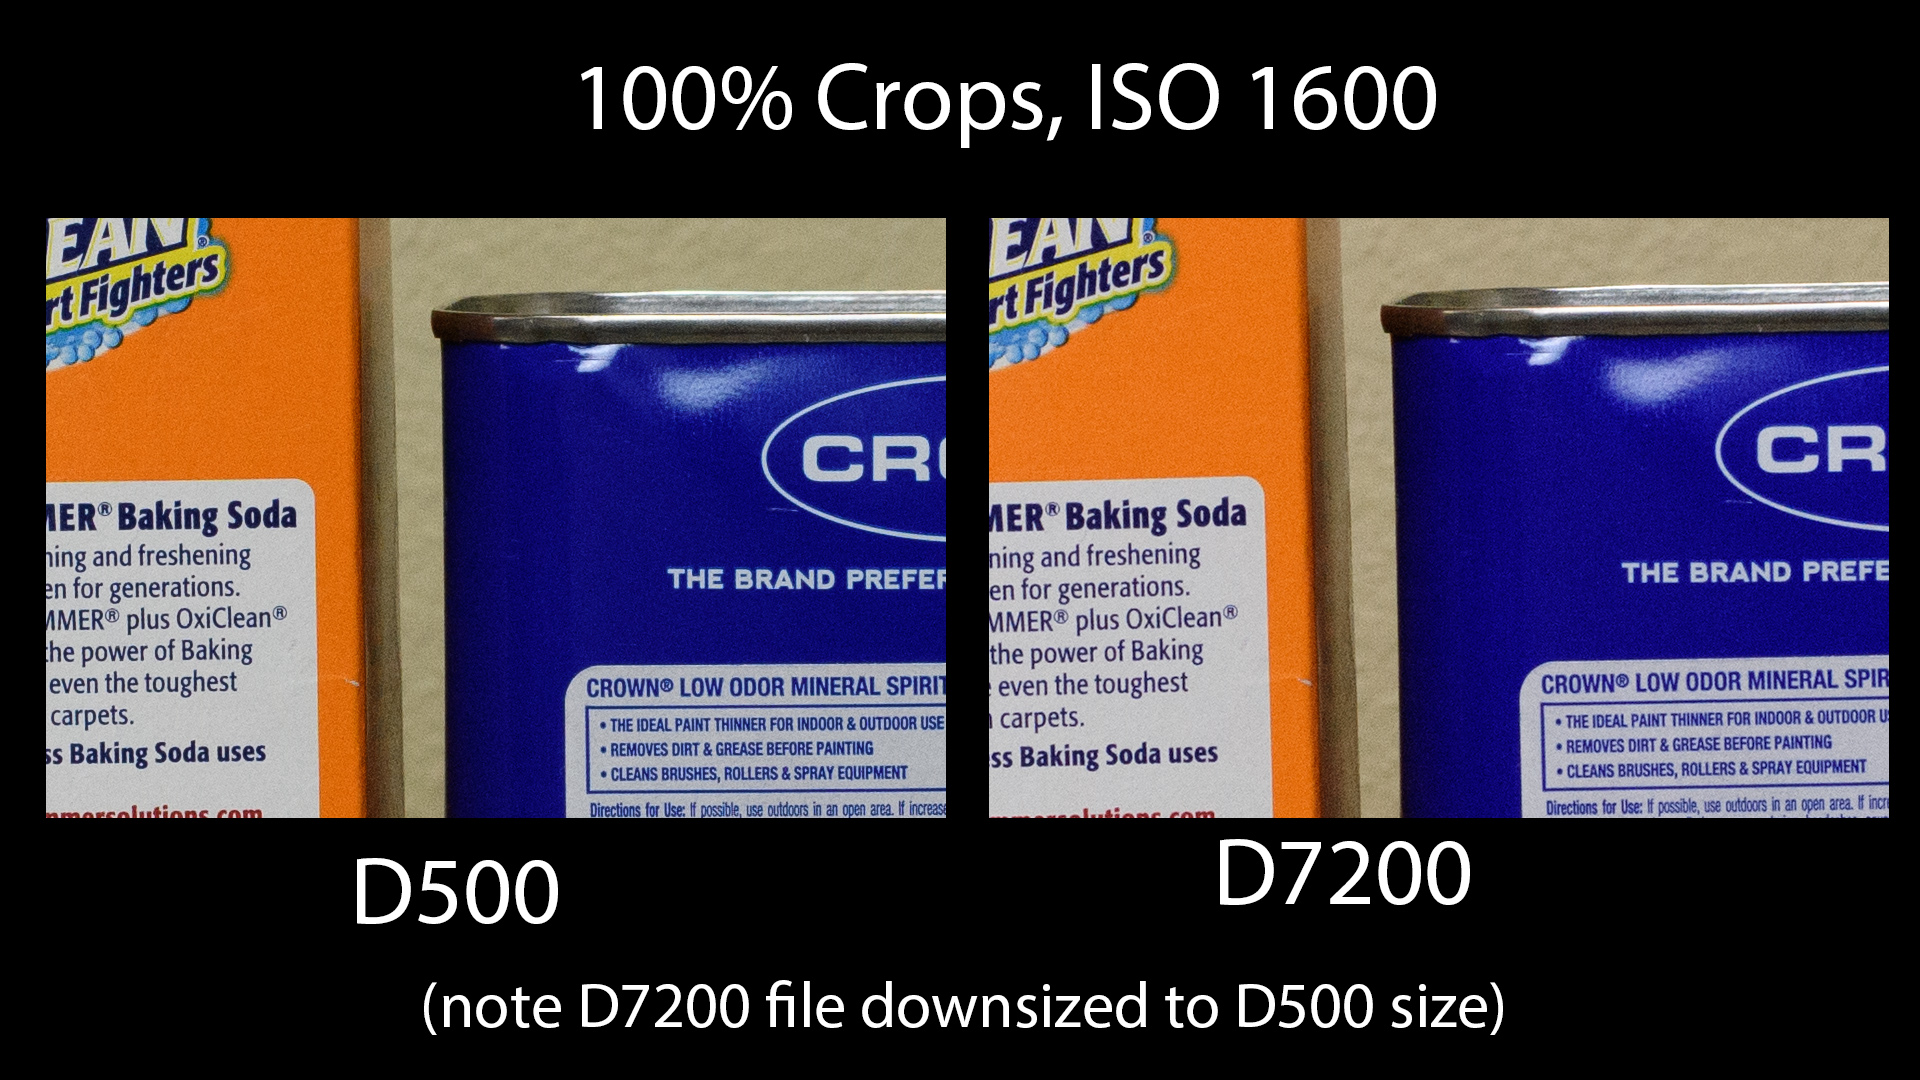
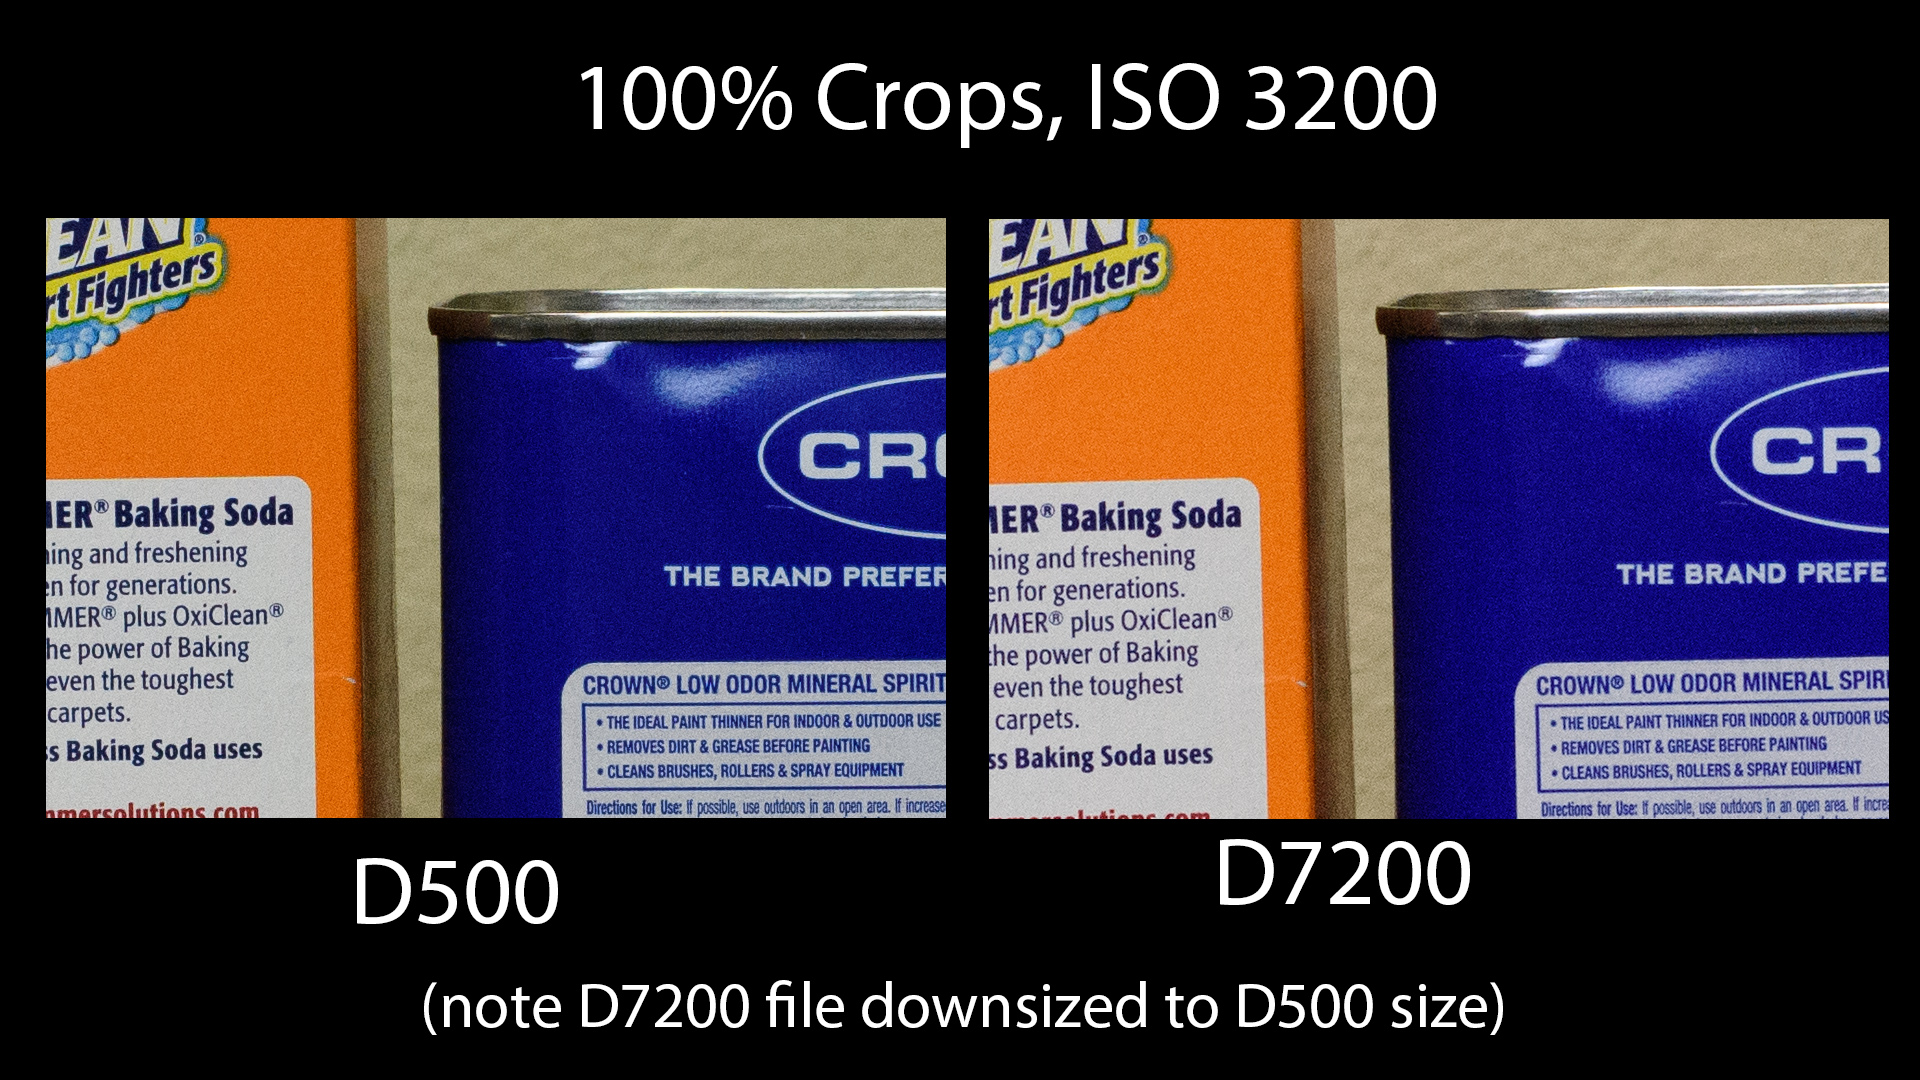
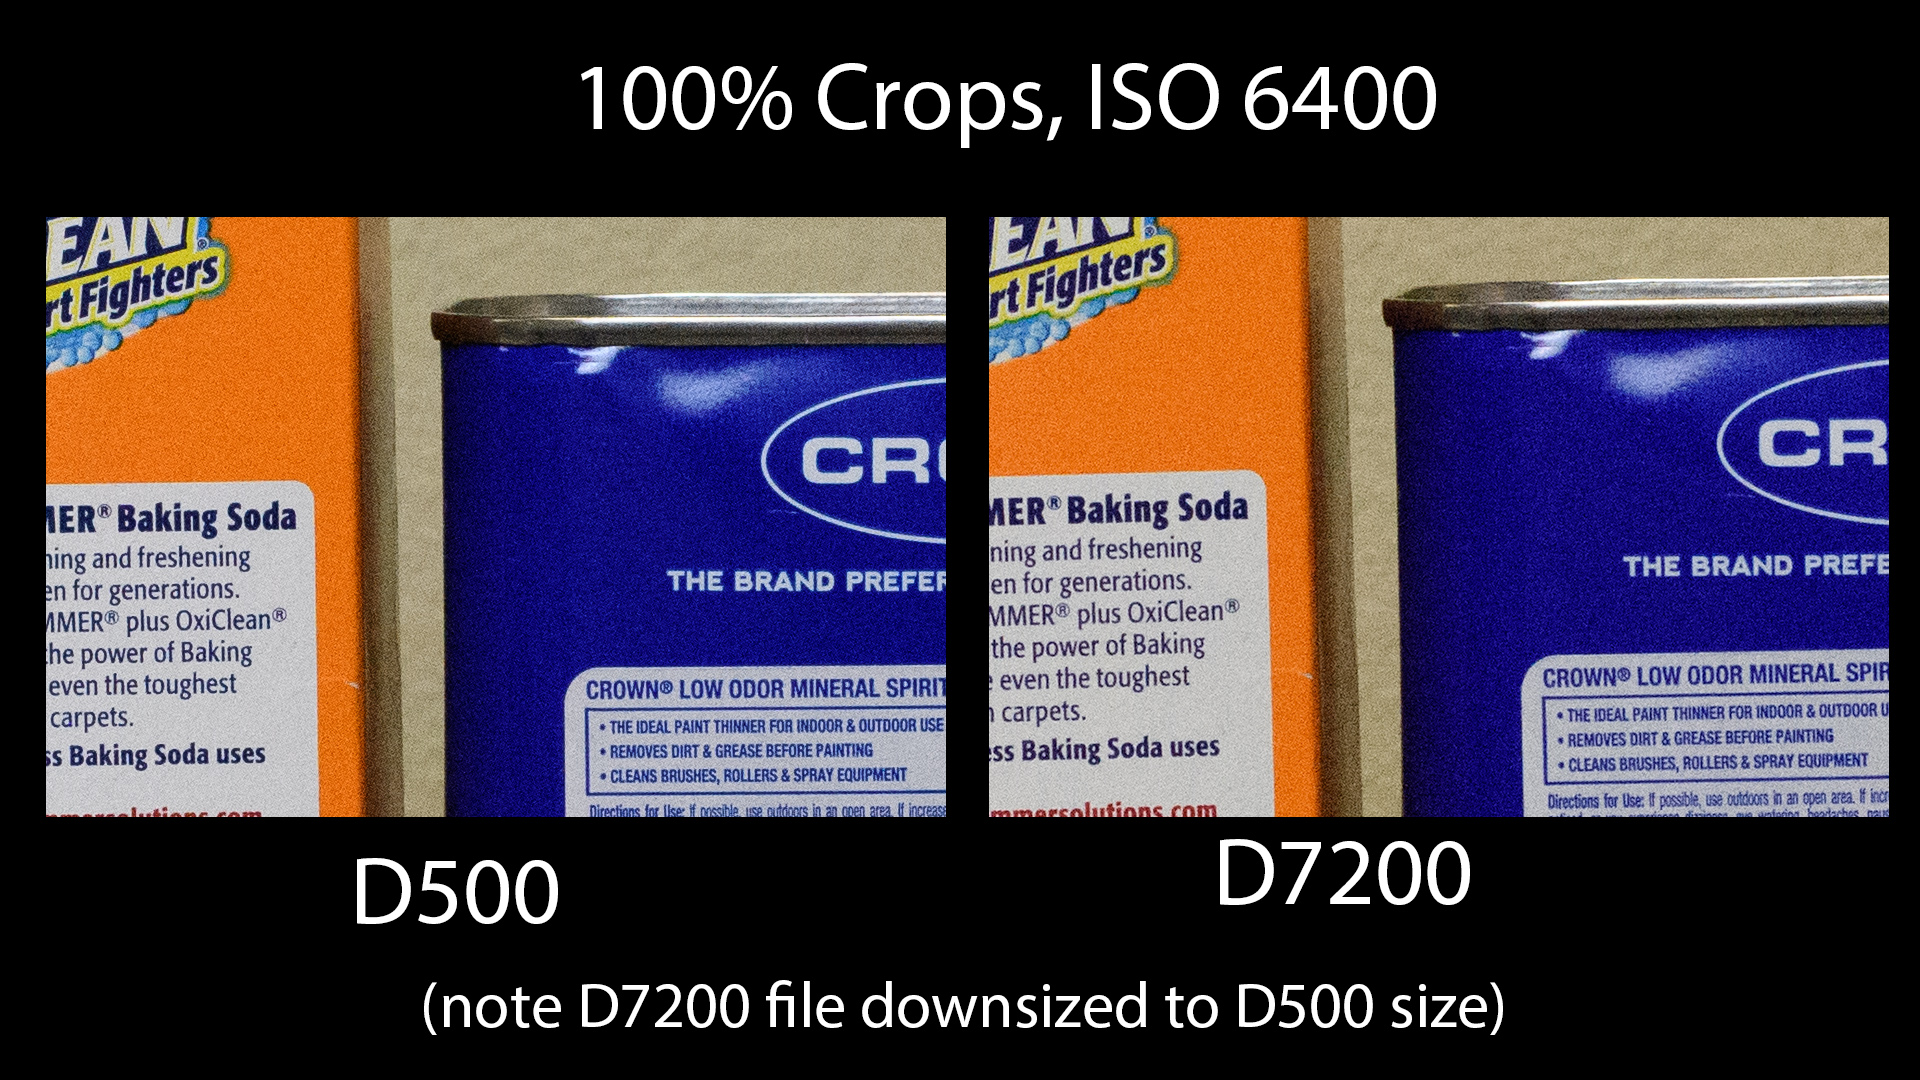
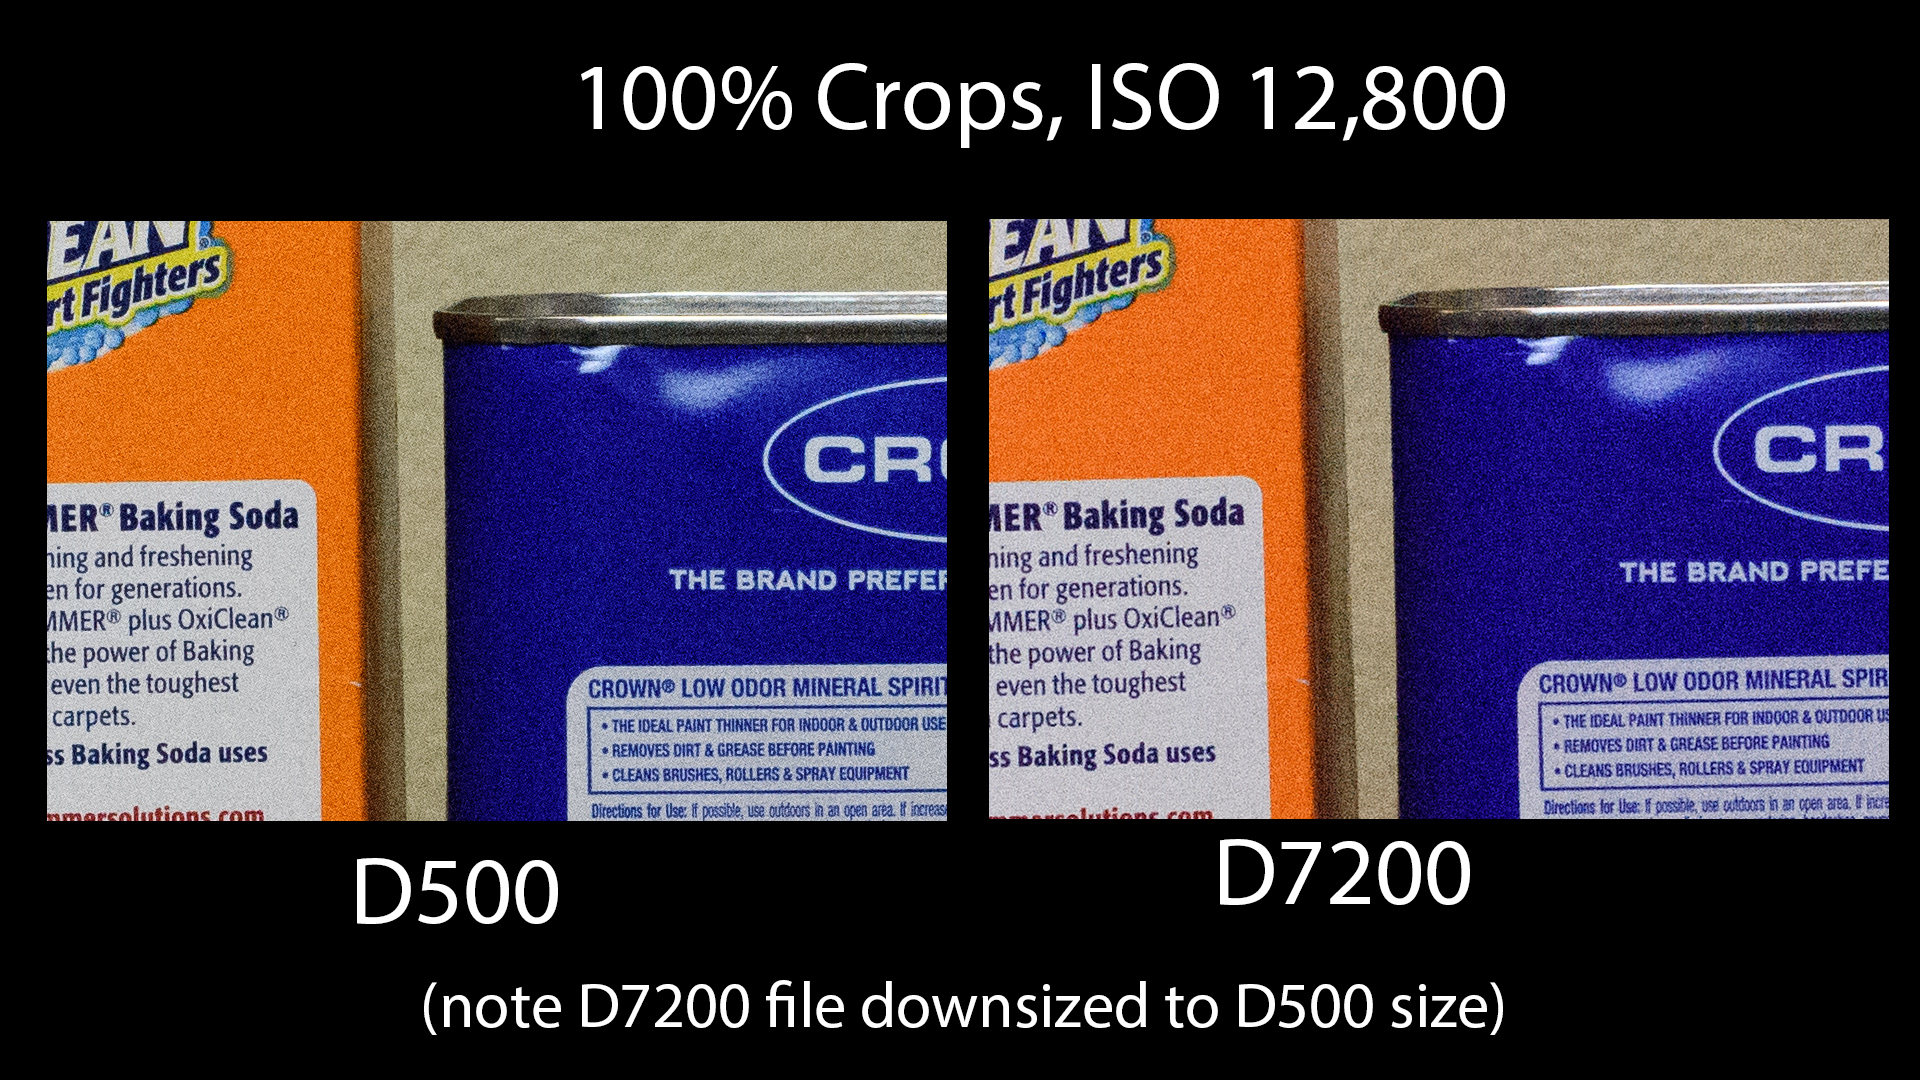
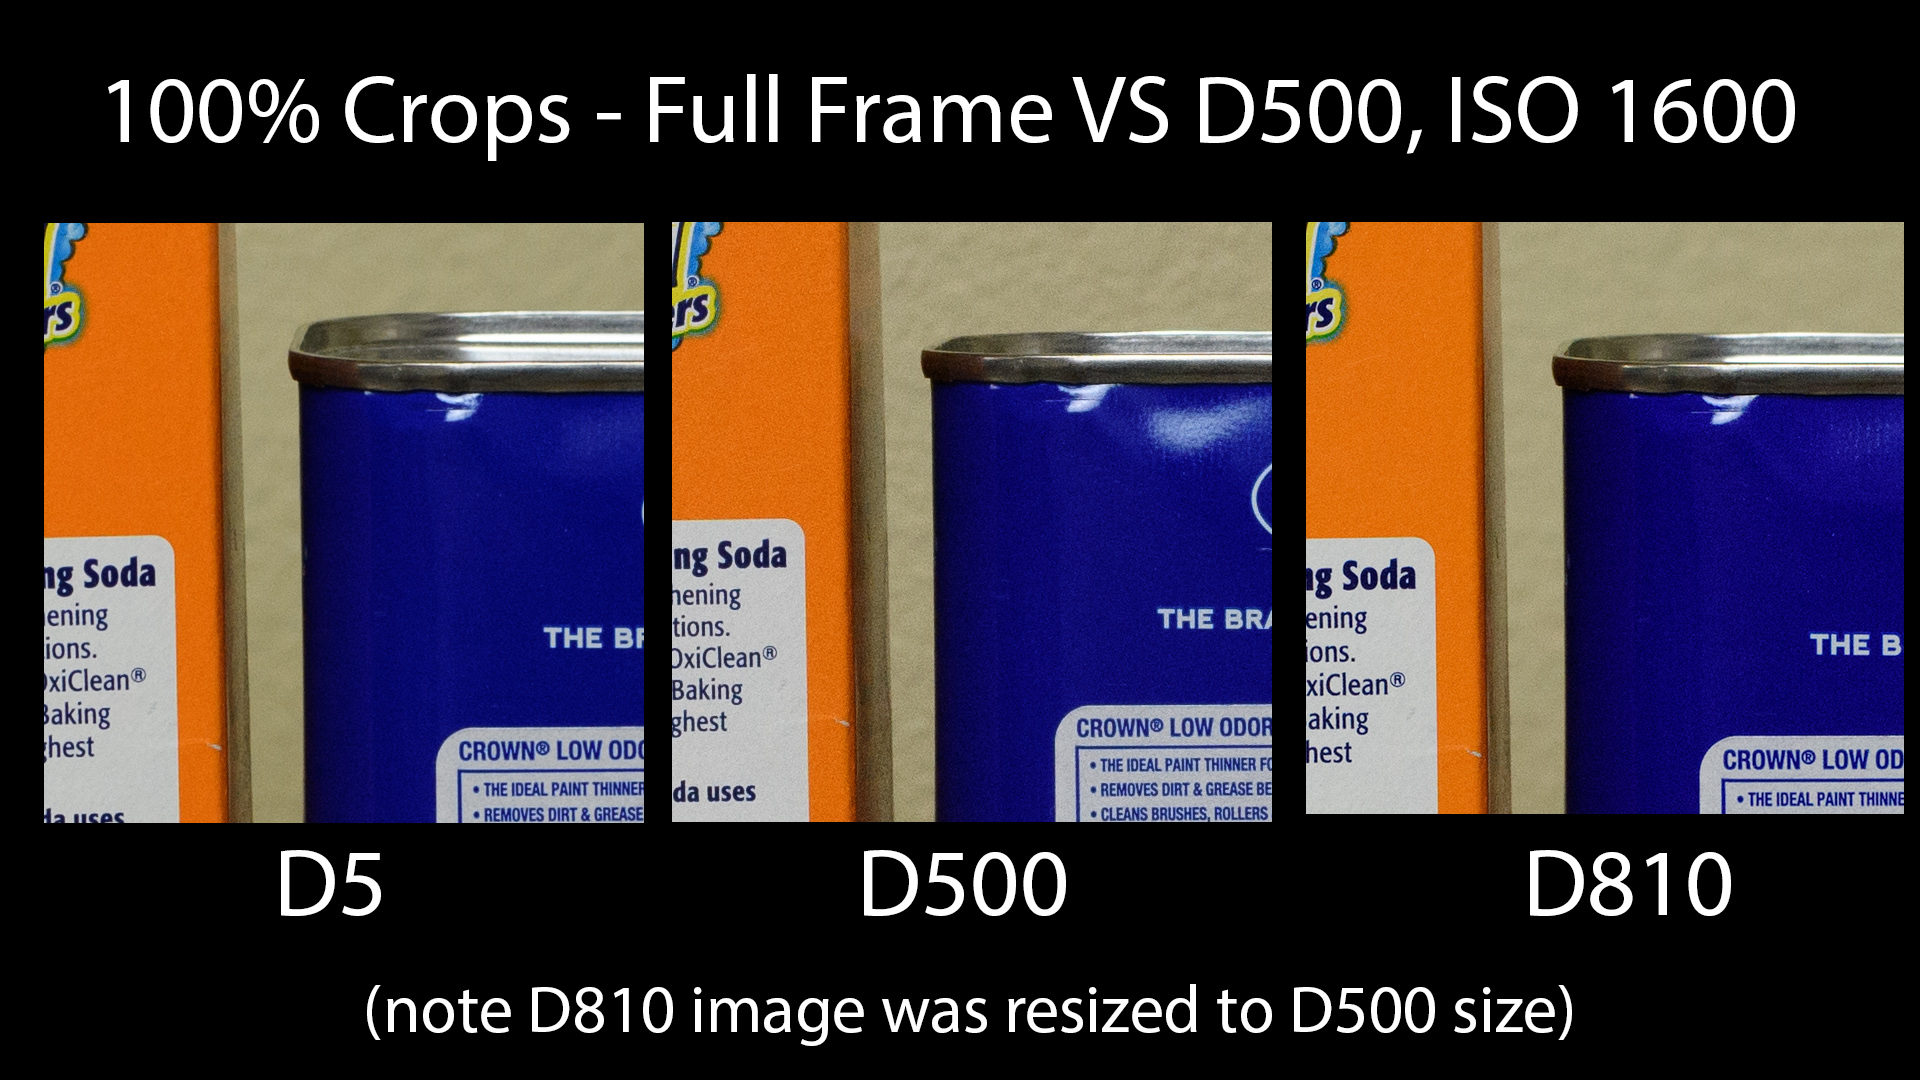
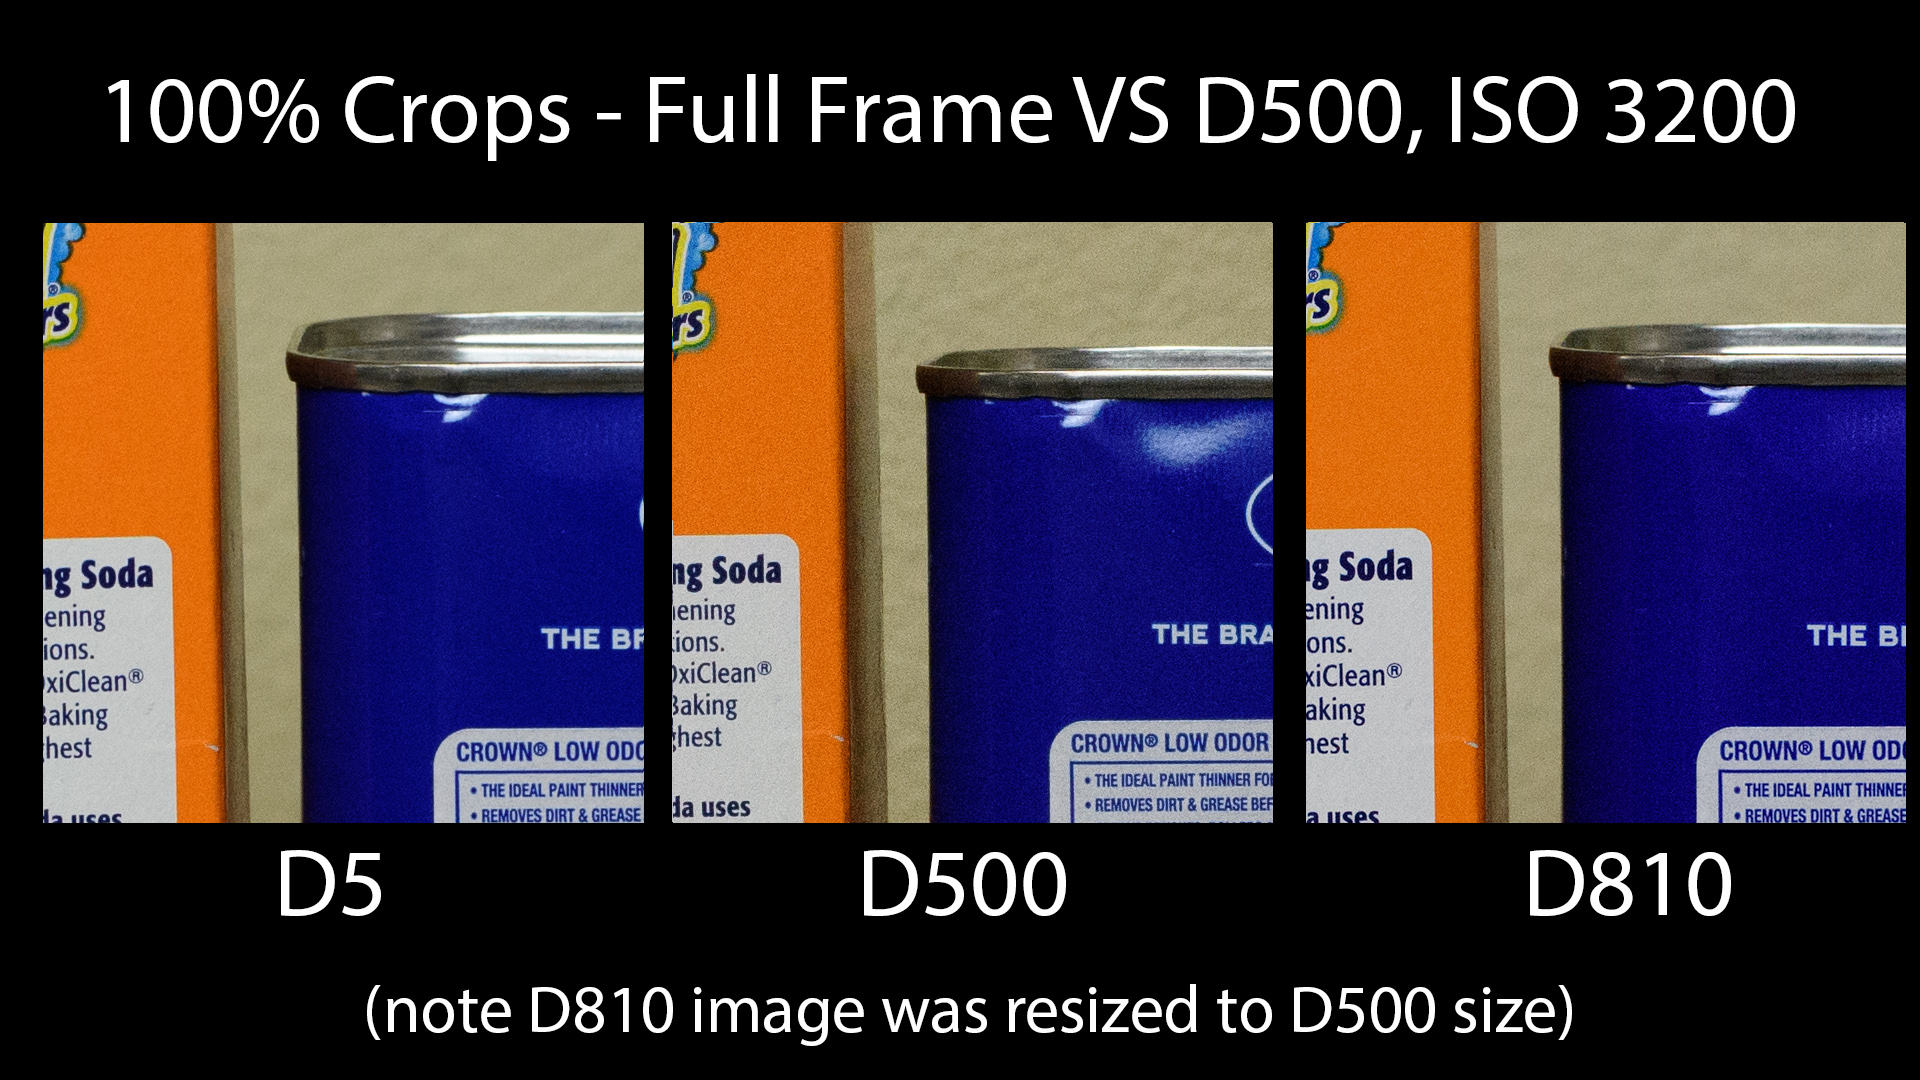
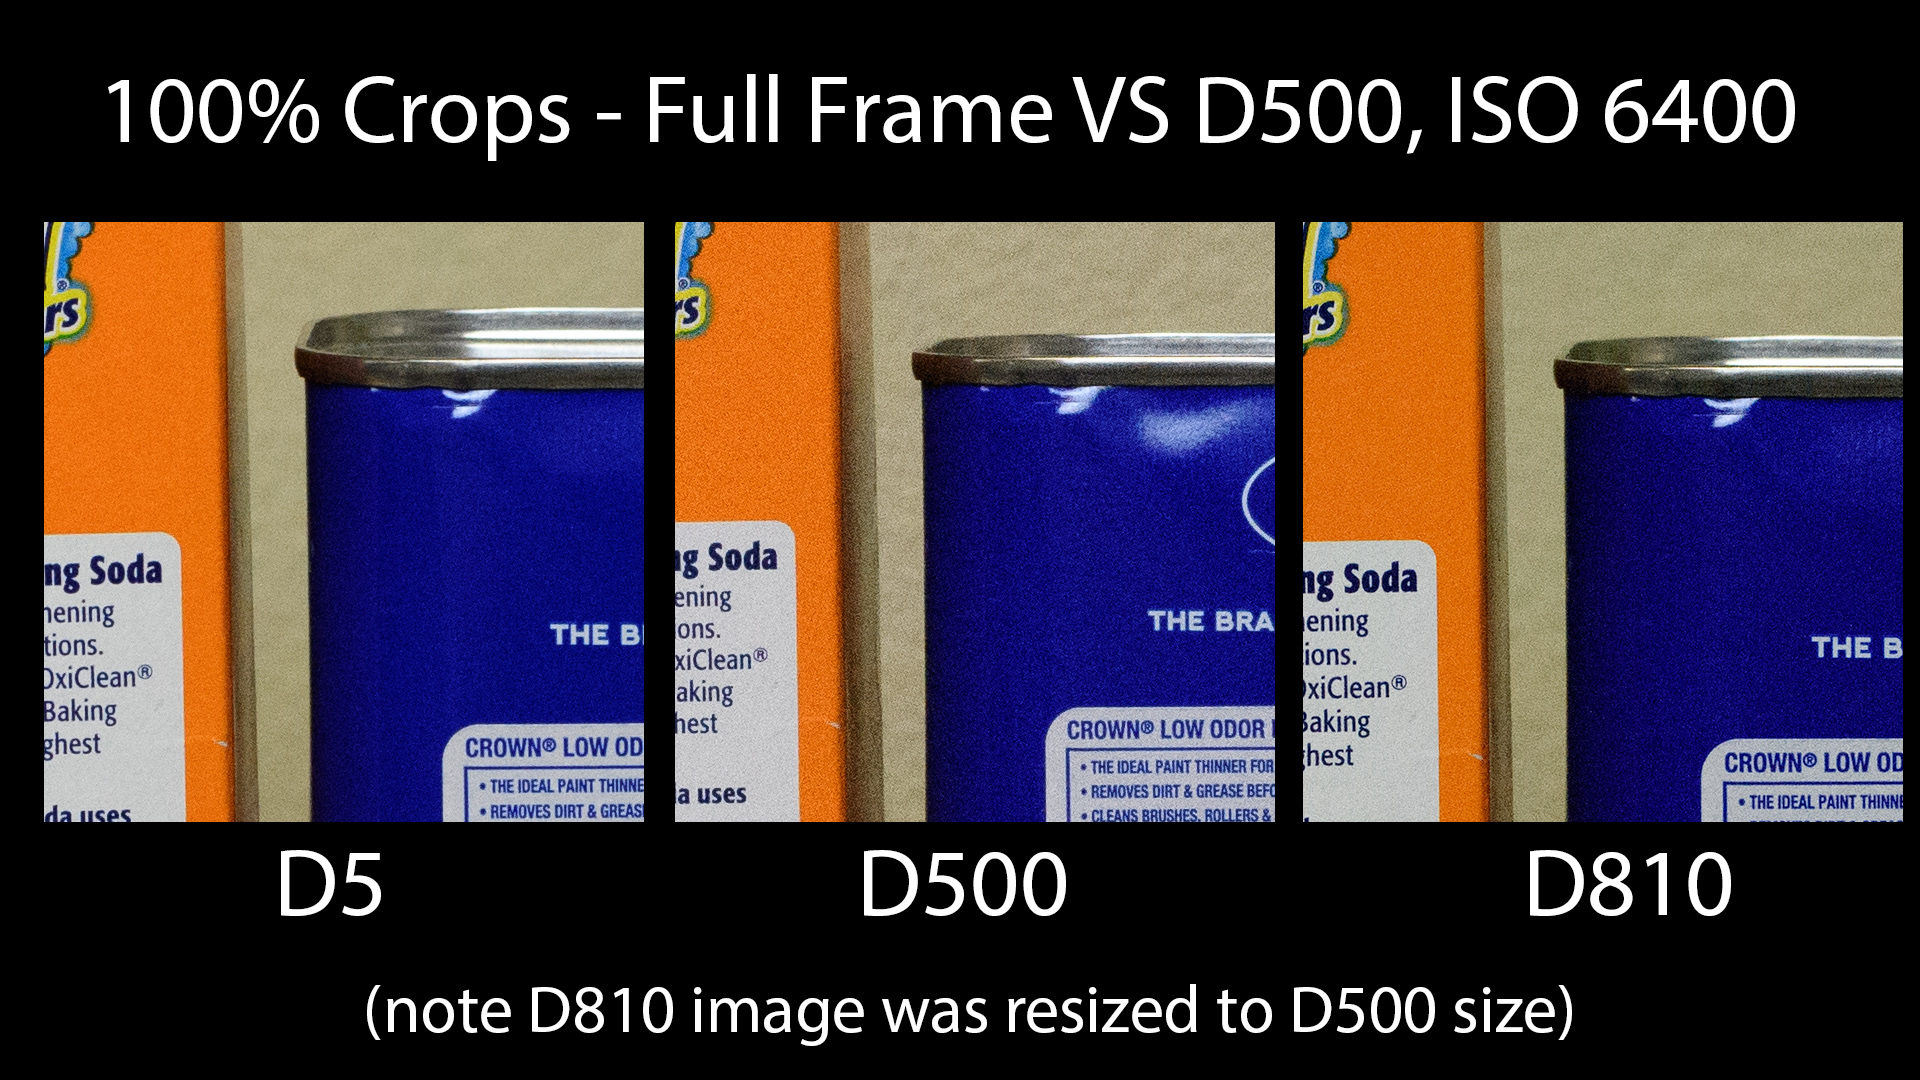
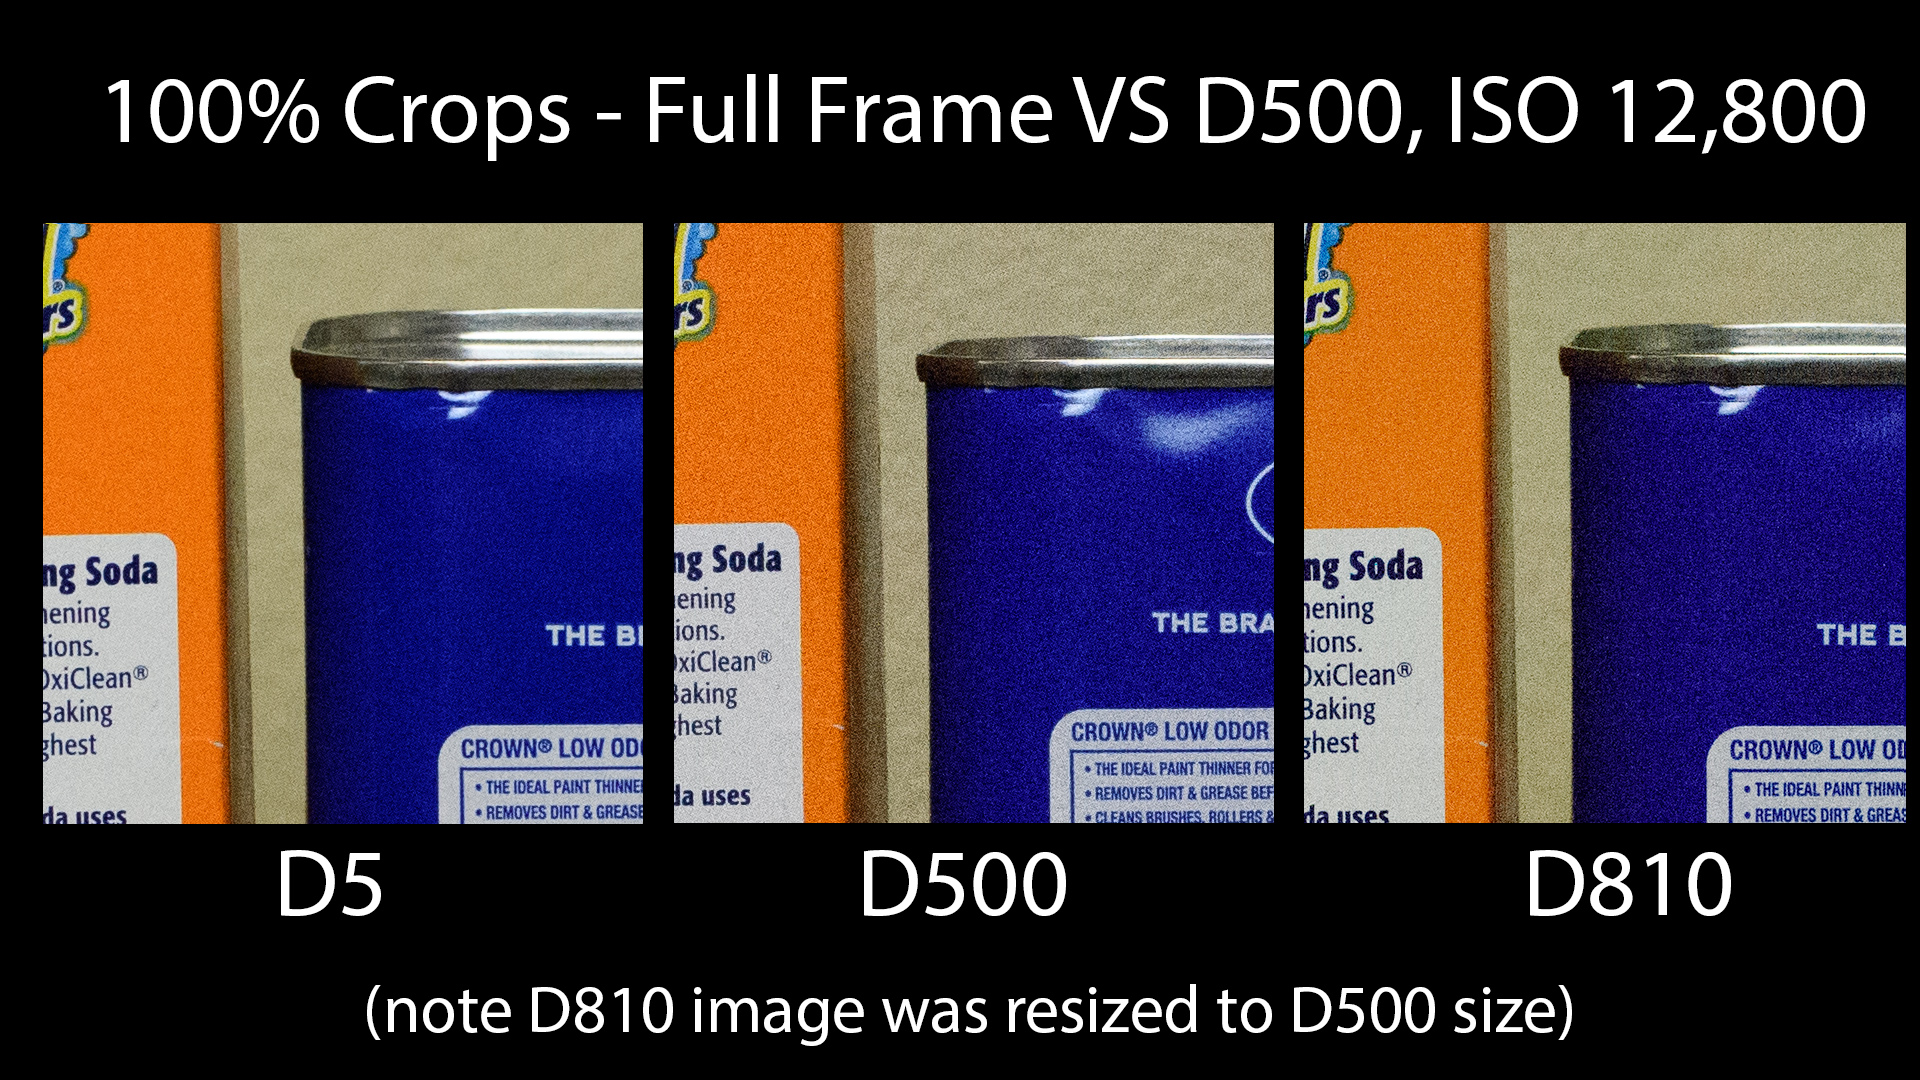
Below are a few ISO samples comparing the D500 to the D810, D5, and D7200. I had a few in the video, but the images below give you more than just the ISO 6400 slide you saw in the video.
NOTE: Please click the images to see them full size (note you may have to click a second time to see 100%). Images will open in a new tab. Look especailly at the orange and blue aras, as well as the wall behind them.
All shots were on a tripod, mirror up, focused via live view, cable release, and at the same F/stop and shutter speed for each ISO tested. Also note that these are shot in my basement and I don’t have an “official” testing facility. As such, they aren’t 100% prefect, but I think you get the gist of it. For a better test and comparison between these cameras, click here to check out the studio comparison at Dpreview – although their tests seem in line with mine.
First the D7200 vs The D500. In my opinion, these cameras are fairly close, with the D500 looking about 1/3rd of a stop better, may 1/2 stop when you get into the really high ISOs:
Next, our FX vs Crop comparisons.
In this series, the D5 just kills everyone, it’s not even fair. The D810 and D500 are actually within 1/2 stop for the most part, which is pretty impressive. In the Dpreview tests, the D810 seems to fair a bit better and to be honest, I trust their results more than mine (hey, I know my limits – I’m a photographer, not a tester 🙂 )
Oh, and before you ask, figure the D750 is going to be better than the D810 but not quite up to the D5.
That’s it for now…
PS…
If you enjoyed this article, I think you’ll REALLY like my e-books, Secrets To Stunning Wildlife Photography and Secrets To The Nikon Autofocus System. They’re filled with hundreds of pages of information just like this. Check it out – click here (hey, it’s free to look 🙂 )


Thank you! Your videos and books have helped rekindle my passion for photography!
Excellent and quite useful write up for a new D500 user. Thanks
I really liked your video. Recently I have been wanting to get the D500 because I have a very old camera (D5000). I want to know if the money is worth it. Also, by the way, please check out my website if you have the time. It is about my photography. I went to Africa last year and that is when I got into photography. Thanks for your amazing advice on photography. I hope you can check it out. Thanks!
Sorry I didn’t know I already posted.
Really like the video. Recently I have been wanting to get a D500. Your video really helped me understand the camera. Thanks. If you have the chance please check out my website (https://madelephantphotography.com/). It has photos of when I went to Africa a year ago.
If I buy a used D5 is there a date of production or serial number after which bugs have been removed. Thanks
Great post on the D500. I am buying one. What would some good starter lenses be? I’m thinking Tamron 70-300mm, a Sigma 17-50mm or 17-70mm. What do you think?
300PF, I cannot state enough praise as to how great this lens performs on the D500.
I am using the plder version Nikon 70-300 on my D500 and have been impressed with the results. I used this lens previously on both a D7000 and a D7100 and the lens performs a lot better on the D500. I haven’t used the newer P version of the 70-300 but if reviews are correct it’s been improved over the older 70-300 I use.
Hello backcountrygallery,
Unbelievable post on understanding compact cameras. I saved this to my travel board on Pinterest!
Steve, Thank you sooo much for the down to earth explanations and pointers on the NIKON AF system, and specifically, the very helpful video about back button setup on the 2 different NIKON camera systems! I use a D7200 and was one of the first to receive this camera when it launched. Had like 2 days to familiarize myself with it (upgrading from the D60) and then had 2 weeks to learn in Death Valley. Well, today I setup back-button AF in both my U1 (AF-S single point) and U2 (AF-C) user settings and I can’t wait to get out… Read more »
Hi, I found this article because I was frustrated with not being able to focus/recompose with my D500. I normally shoot with BBF and (Custom menu A1 ) Focus Priority for both AF-S and AF-C. I shoot birds a lot and have a pretty great keep-rate (almost every shot is in focus) and don’t really mind that Focus Priority means a slower FPS rate. But the drawback is that I’ve found that I can’t focus/recompose UNLESS I choose a different AF-C or AF-S priority mode, ugh. A workaround is that I assigned Focus Lock to the Joystick, then I can… Read more »
Suzanne, I wish someone that knows the answer to this, like Steve, had responded, because I am now confused somewhat. Unless I misunderstood Steve’s back-button article and video, focus should ‘lock’ when you release the back-button (AF ON) (if it is set to AF ON ONLY) so there should be no point in assigning a button to further ‘lock’ focus. Therefore, you should be able to recompose and release the shutter without further steps. Therefore, either FOCUS priority mode is stepping in the way or FOCUS is not ‘locking’ when you release the AF ON button, oe even possibly FOCUS… Read more »
In AF-C mode (continuous press of the AF-ON button), when it’s set to Focus priority, you cannot focus then recompose, the shutter will not release. In use, it’s usually not much of a problem, I can just press/release the AF-ON button, then release it, which is the equivalent of AF-S. I have AF-S also set to Focus priority, but in AF-S, I can focus and recompose AND take the shot. And as I may have mentioned in my previous comment about using the focus lock button assigned to the joystick, so that I could focus/recompose in AF-C mode, that was… Read more »
I shot black vultures in flight with blue sky with my d500 using the 200-500 Nikon lens. That camera and lens picked up details under the wings and in the face. Contrast with black feathers and light feathers (fiber detail) was right on. No loss of detail due to black underside. I wish it had more megapixels but shooting DX I might get full use anyway. Great action camera. Thank you for the tips.
Watching and reading your evaluation of the D500 was very well put together as well as informative. Now should I scrap my D7000 and get the D500 or upgrade to a D759? I know, only I can make that decision. regardless of what upgrade I make I will keep the D7000 and a backup.
Having read many posts regarding your commentaries and reviews I will now put you on my check Steve Perry 1st list when looking for honest and worthy reviews. Thank you for your work and efforts.
Jake
Howdy Steve, Upon your example and advise, I recently purchased a D500, a 300mm f/4 PF with assorted accoutrements along with your two ebooks. Today I went out and had a blast putting it all, well, a lot of it, together, and not so together. My question is, how do I transfer the photo images from the d500 with both XQD and SD cards to my windows pc via the USB cable Nikon was so generous to include in the camera box. I don’t have a card reader (I gifted it to someone) and have found zilch on the world… Read more »
Hey Steve! Just wanted to send you a note of appreciation for you being such a terrific instructor – both in video and in print. I just bought both your manuals – Secrets to Wildlife and Secrets to AF – and could not be more pleased. Add on the reinforcement of your videos and it is a lock! I am a lifelong birder, and, more recently, a bird photography enthusiast. A few months ago I dipped my toes in with a P900 but quickly found myself screaming at the rotating buffering squares. So just days ago I jumped in with… Read more »
Hi Steve, I have just purchased a D500 and I’m not sure if you have covered this elsewhere. The 4 MENU BANKS (MB’s) do not seem to ‘keep’ the settings allocated to each one (I also have a D7100 with the ‘U1’ and ‘U2’ settings – these default to the settings I give them). It seems the D500 MB’s remember the last setting I used and then loses the original setting. Is this correct?
Sadly, yes. Although, I personally have very limited experience with them – I just have never really used them for the exact reason you state. I don’t see the point. I’m sure I’m missing something and I’ll probalby dig deeper one of these days 🙂
Hi Steve,
Thanks for the fantastic reviews and video tutorials, helped a lot to customize my D500. I had a great offer from Nikon India on the 500mm F4G lens and just bought one. Do you think this lens performs well with a 1.4 TC (ii or iii)? when used on a D500 body?
I configured my D500 by assigning AF-ON for single point focus, joy stick for group area and PV for Dynamic 25 points. I also configured the Fn button for spot metering.
The 500G is an incredible lens and preforms well with either TC, although if I had a choice I’d go with the TCiii. Trust me, you’ll love it!
Thanks so much Steve! I do have a choice and am definitely going to order the version iii. That really helps!!!
Hello Steve Great site/videos and advice you have here. Having read many reviews on the D500 i’m pretty clued up on the capabilities of this frame, but try as i might i have yet to read anyone who’s written about something i’d really like to know. Of the cameras i have, the D7200 is my current birding camera, used with a Nikon 500mm f/4 VRI. I’m often trudging around Sherwood Forest shooting small birds in trees at a distance so great image quality after heavy cropping is of paramount importance. I know we’re talking roughly 3MP difference here, and my… Read more »
I haven’t done anything formally, but here’s this to consider. The D7200 is 6000 x 4000 pixels, the d500 is 5568 x 3712. So, at full resolution, you’re missing 432 px on the long side and 288 on the short side – so it’s pretty close. So, yes, there are a few extra pixels there, but not enough for it to really sway me one way or the other. If the D500 is getting photos the other camera isn’t due to better AF, deeper buffer, or more FPS, I’d take that all day long. However, if none of those are… Read more »
Hi Steve, Just got my new D500, been looking at your settings guildlines and installed into my D500, can’t wait to get out and try them out, I’ve been into wildlife photography for a while now but don’t always seem to be able to get consistency in my pics, some are pin sharpe but the next set of frames go soft yet I haven’t changed settings in the same location , I do vary my ISO according to the light and maily shoot on A priority moving to Shutter priority when light and subject require it. My other camera’s are… Read more »
Just got my D500 and i am experiencing focusing issues with 70-200 and TC-20Elll. Ive tried the in camera AF fine tune but find that it doesn’t make much difference. I do use this same setup on the D750 and have had no focus issues at all. Its gotta be user error here…any advice?
This tutorial is excellent BTW, Thanks!!
It’s hard to say what’s going on for sure. I’d start by taking some tripod-mounted shots via Live View first to make sure the combo is delivering sharp images. If it is, then I’d maybe try a different AF Fine Tune option, like Lens Align.
Hi Steve I currently have a d7000 and was looking to upgrade. Just watched your video on the d500. I was looking at the d750. If you had the choice would you go with the Nikon d500 or d750?
It would all depend on what I was shooting and what lenses I had to go with it. I love the D500, but for me that camera is more about the higher pixel density / crop factor and overall speed. If you don’t need those things, then go for the D750. Unless the D500 is helping me capture an image I’d otherwise miss with full frame (again, due to the crop factor, the speed of the camera, FPS, or the buffer depth), I will always choose full frame. In fact, that’s one of the reasons I own a D5 –… Read more »
Great video, and fantastic book on how to shoot wildlife. Compared to my BIF shots I am amazed how much sharper your shots are compared to mine. My D7100 was giving me much sharper pics that what I get from my D500 with the same lens at 1/2000-1/8000 sec.. I suppose the use of lensalign is a must…….
regards
Luc
Thanks 🙂
Soft shots can be caused by a lot of things, shutter speed being the most obvious, but at 1/8000th you have that covered, so it’s gotta be something else. Like you mention, maybe the lens need calibrated, although at typical BIF distances it would have to be off pretty far to show significant softness (and maybe it is).
Good article Steve.I got my D500 setup almost the same. Only addition on my setup is I also have my half-depress on shutter set as AE-L so I can use spot metering (set on Fn1 button)>half depress shutter to lock exposure>recompose for shot. I have my PV set to highlight exposure (the one with aperture with the asterisk?) and Fn1 for spot metering so I can also reach it with the left hand ring finget in both horizontal and vertical shooting. Until I read your article on AF-ON, I have always ignored or re-asigned the function on that button on… Read more »
Just got my D500 today and have adjusted all my settings (based upon my needs and style of photography of course). Your explanation is fantastic and has saved me a great deal of time going through the manual. Thank you!
Hi Steve,
Just got my hands on the D500 and your article + videos are really very helpful. For BIF what exposure mode you normally use – Full Manual Mode or Shutter Priority?
I use a combination of full manual or manual + auto ISO as described here:
https://backcountrygallery.com/manual-mode-with-auto-iso/
Never shutter priority – too easy to run out of faster aperture and then the camera has no where to go.
Thanks Steve. Normally I shoot in Aperture priority mode but I have decided to try out the manual mode with auto ISO as I could have control over my shutter speed as well.
The dilemma however is that for auto ISO what would I set as the highest ISO limit. I have a very low tolerance for noise. I consider ISO 1600 to be the limit. Based on your experience with the D500 can you provide some insight on the noise and ISO capabilities and provide some suggestions?
Hi Steve,
Thanks for your useful information, it is helpful to me. Could I have a question? Is it possible to control shutter and focus individually by using shutter release cable like BBAF by hand held? Sometimes I would like to do trap focusing but I don’t know how to do by shutter release cable.
Thanks for your advising.
I don’t think you can do it fully from a normal cable. You can certainly use the cable to release the shutter in a trap focus scenario, but you’d have to pre-focus the image at the camera first. On the other hand, if you have the wireless WR-T10 release setup (10 pin), you can assign the Fn button to AF-On via the camera’s custom menu with most D4 and newer cameras (it’s a separate option from the camera’s fn button and shows up as it’s own item under “controls”). So, with the wireless remote, you actually could focus with the… Read more »
Hi Steve, After reading your excellent review on the D500 I purchased it and have been more than happy with my results. Also bought your book; I read it twice before going to Yellowstone in September and the techniques I learned really helped my photos shine! I do have a question for you; I’m about to pull the trigger on a used 500mm f4G VR (the one just before the new FL version); have you tried it with your D500 and if so, what are your thoughts on its performance? I’ve read online that the D500 doesn’t perform as well… Read more »
I haven’t used the 500G on the D500 (I no longer have a 500G, but it’s a killer lens), but I DO use the 600G all the time and it works fantastically. The only limitation I’m aware of with the 500G on the D500/D5 is that it doesn’t have as many cross type AF points available as the new glass. It still has all of the vertical center rows and the rest of the AF points still work just fine as line sensors, it’s just those outlying AF sensors won’t be as fast / reliable in dim or really low… Read more »
Thank you for the fast and detailed response! I feel a little better going into the purchase now with that information. I currently am using the D500 + 300mm f4 AF-S (old version) so this will be a huge upgrade for me.
Yup, the 500 F4 was one of my favorite lenses. In fact, I contemplate selling my 600 and getting one from time to time. I really like the size and weight compared to the 600 F4.
Hi, I currently own both 500/4 and 600/4. Both G models. I shoot with both FX and DX bodies. Wildlife and sport. The reach with both lenses and the D500 and it´s AF performance is outstanding. I highly recommend the 500/4G. Compared to the 600 its so much more nimble. Quick shots handheld is a breeze compared with the 600. Image for image both lenses are comparable was it not for the reach diff. Another diff. is that for me its much faster to acquire a small fast moving object with the 500. Sure, the larger field of view plays… Read more »
I had a 500mm and went to the 600mm back when I was just shooting full frame. For FX, the 600mm seems like it’s more in the ballpark for range than the 500mm.
However, on DX I often find the 600mm a little long, and I do miss the size, weight, and “nimble-ness” of it.
Both are fantastic lenses though 🙂
Hi Steve,
Really enjoy your video’s. Something I noticed you don’t talk much about is the Histogram. Do you use your histogram at all for wildlife shots on your D500?
Thankyou,
Floyd
Hi Floyd –
Histograms and blinkies are how I fly 🙂 I usually have the highlight warning (blinkies) set when I’m shooting as an early warning system for overexposure. I’m also regularly referring to the histograms to dial in the exposure. In fact, I’ll probably have a video on histograms one of these days 🙂
Hi Steve, Thank you for the ebook and this website. Both are very helpful as I am new to Nikon. I have reassigned the pv button to single point af too. Is the technique based on continuing to hold your thumb on the back button af/on (or the one next to it) in the usual back button focus way and continue to hold – then – press the pv button with your middle finger at the same time? I guess I am also trying to clarify that the pv held on its own won’t focus? Also in your article ‘Understanding… Read more »
Hi Colin – The way I have it setup, you press both the Pv button and the AF-On button. However, there is an option under the Pv button under the first to have the button also AF as you push it in. My fingers get too confused for those sort of shenanigans so I only AF with the back button 🙂 As for exposure, I’m usually in Matrix and use either exposure compensation or full manual mode for the correct exposure. Also, Nikons are very ISO-invariant so you can underexpose the RAW files a touch and easily bring them back… Read more »
Just got my d500 and want to use (and understand) all that this amazing camera has to offer (coming off using a d7200). Primarily shoot birds and birds in flight, my best lens is the Nikon 200-500 f 5.6.
This tutorial is priceless!
Thank you