NOTE: I’ve had a few comments / e-mails asking if this is how I AF fine tune my lenses. I wanted to mention before you start the article that this testing technique is NOT for that purpose. This is simply for sharpness testing between optics, not for AF fine tuning. For AF fine tuning, I use LensAlign. On to the article 🙂
Lately, I’ve been producing quite a few videos featuring sample shots from various lenses, each time briefly describing the procedure and the test methods employed. I’ve also received quite a few e-mails asking if I could provide some tips for testing lens sharpness at home, so this article was born 🙂
First, though – a couple of thoughts…
My whole testing philosophy is this – I want to eliminate as many variables as I possibly can and test only one thing at a time (most of the time, sharpness). Pretty much the basis of the scientific method we all learned in junior high. (Note to wife – see, I DO remember stuff!)
The problem with many of the casual tests I see online (mostly but not exclusively limited to internet forums and blogs) is that the tester simply allows for too many variables.
For instance, on more than one occasion I’ve examined “tests” that featured different subjects, at different distances, with different settings and usually hand-held. These variables are often dismissed out of hand by the poster, citing something along the lines of, “Hey, both images were shot using the same techniques I use in the real world.”
Sigh…
Real world results can be interesting, but without some degree of consistency between the images, they really don’t mean much. In reality, the only thing that these seat-of-the-pants shooting shenanigans prove is that the poster shouldn’t be testing lenses.
So, here’s my step by step guide. I’ll admit that it’s not at the level of having a real optical testing bench at your disposal, but in my experience, it has been a very consistent way to compare optics on a budget.
The Setup
1. Tripod – I use a Gitzo 3 series tripod and a Really Right Stuff BH-55 ball head. This is an incredibly stable setup and works especially well for testing optics. Now, I know there are a lot of folks who just want a quick test and might be tempted to rationalize away that old tripod, but in my mind it’s critical to have a very stable platform.
I realize that many folks believe their hands are as good as a tripod – and for field work that may even be true sometimes – but for testing it’s just not the case. Unless your family tree includes a branch that looks suspiciously like a Gitzo, there are always variations from shot to shot when hand-holding – you HAVE to eliminate that variable.
Also, it’s important that you’re honest with yourself about your support rig and its stability. After all, if there’s any possibility that the tripod and head are allowing even slight movement, then you have no way of knowing if shot “A” really is sharper than shot “B” or if the tripod moved a little during shot “B.”
That said, you don’t need to gut your retirement fund for a good tripod either, but make 100% sure your tripod is actually stable if you want accurate results.
2. Shoot Indoors When Possible – I also like to shoot indoors whenever possible.
Why?
In a word, control.
When you’re outside, there are just too many variables. You have the wind that can slightly vibrate / move your test target or tripod, you have the possibility of heat distortion coming between you and the target, you also have potentially variable light levels if you’re trying to shoot in overcast. I much prefer setting up a test target indoors when possible to eliminate those variables.
That said, I will occasionally do some outdoor tests along with my indoor tests so I can see how a lens performs at a distance, how it handles heat distortion, etc.
However, when you do your outside tests, make sure you account for and eliminate any variables as you shoot. I can’t tell you the number of times I had to put off a test for a day or two until the conditions outside became more cooperative. Don’t be tempted to test on a day that won’t give you consistent results.
3. Live View – Whenever I do sharpness tests, I always use Live View. The reason for this is simple – I want to take the phase detection AF (viewfinder AF) out of the scenario.
The problem with phase detection AF is that while it’s generally reliable, it can still slightly front or back focus from shot to shot. This behavior is usually not a critical factor in real world photos, but when you’re testing it’s another unwanted variable meandering into the equation. Live View, while still not perfect, tends to be more accurate from shot to shot.
4. Mirror Up – I also put the camera into Mirror Lock Up mode to avoid any vibrations caused by mirror slap. In some cameras it’s minimal, in others, the mirror slaps the inside of the camera like it was a misbehaving child talking back to his mother. Additionally, when shooting indoor test scenes, I’m often at slower shutter speeds than I’d really like, so preventing mirror slap is critical in my opinion.
5. Electronic First Curtain Shutter – My Nikon cameras also have a cool feature called “EFC” – short for Electronic First Curtain shutter.
EFC eliminates the initial snap of the shutter’s first curtain during exposure by lifting that curtain out of the way and allowing the sensor to act as a shutter instead. The beginning of the exposure starts when the sensor begins recording, rather than when the first curtain pulls away (since it’s already up). Once the exposure time is reached, the second curtain slips into place. Now granted, the first curtain moving out of the way isn’t a lot of vibration, but why not eliminate it if you can?
6. Exposure Delay – Despite locking the mirror up and using EFC, I also take the extra-paranoid step of setting in an exposure delay of 3 seconds for each shot. Doing this helps insure that any lingering inadvertent vibrations are completely gone when the shutter is released.
7. Cable Release – I also believe that a cable release that is AF capable (most are) is critical for consistent test results. More on this later.
8. Shutter Speed / ISO – We also have to consider shutter speed. Despite all the precautions above, I do everything I can to keep my shutter speed above 1/60th of a second. This sort of becomes a bit of a song and dance with ISO. Ideally, we want our ISO as low as we can get it – in fact, ideally you want your ISO at the base ISO for your particular camera (usually ISO 100).
However, we still want to keep that shutter speed up if possible.
Slower shutter speeds can still introduce problems even when used with the techniques described above, usually as a result of very slight leftover movement (that may happen during one shot and not another). In most cases, current cameras show nearly zero difference between ISO 100 and ISO 400, so I try to keep ISO in that range, always favoring the lower values. Of course, you may have to make compromises in speed and ISO if you’re testing smaller F/stops, so there’s definitely a balance to be struck here.
9. Set the camera to shoot RAW – I also have my camera set to shoot RAW instead of Jpeg. The main reason is that the camera likes to “bake” sharpening settings into the Jpeg file – and while baking may be fine for Betty Crocker, I’m not thrilled about it when it comes to my Jpegs.
So I shoot RAW instead so that I can guarantee each file has the same amount of sharpening applied to it (or lack of sharpening as the case may be). That, and I can adjust the white balance between shots to match as well (although sometimes for sharpness I think it’s easier to convert the images to B&W – sometimes the color itself can give an impression of sharpness that’s not really there).
10. Targets – Finally, you’ll need some good targets. Too often I see comparisons where it looks like the testers picked objects that were printed on a pillow using the soft side of a cotton ball.
Ideally, you want to find flat objects featuring sharp, distinct fine printing on them. As an added bonus, it’s nice to either have different size print on a single target or use multiple targets with different size print.
However, the biggest trick is making sure the print is sharp and very well defined with no soft edges. In many cases, the text on the back of product boxes are excellent, but printing on something like a newspaper sometimes isn’t.
The Technique
Whew, enough background already – let’s go ahead and do this!
The first step is to carefully set up your target. The distance will depend on the lens, but for my moderate telephoto shots I’m usually around 30 feet or so. For wide angle lenses, I may be as close as 8~10 feet for the indoor stuff. It’s also important that the targets are square to the camera and lined up evenly. I usually use a flat, level table for this purpose. If you’re testing the corners and edges, you’ll need a big enough target(s) to cover the entire field of view for the lens (this is one of the reasons a lot of my ultra-wide angle tests are outdoors).
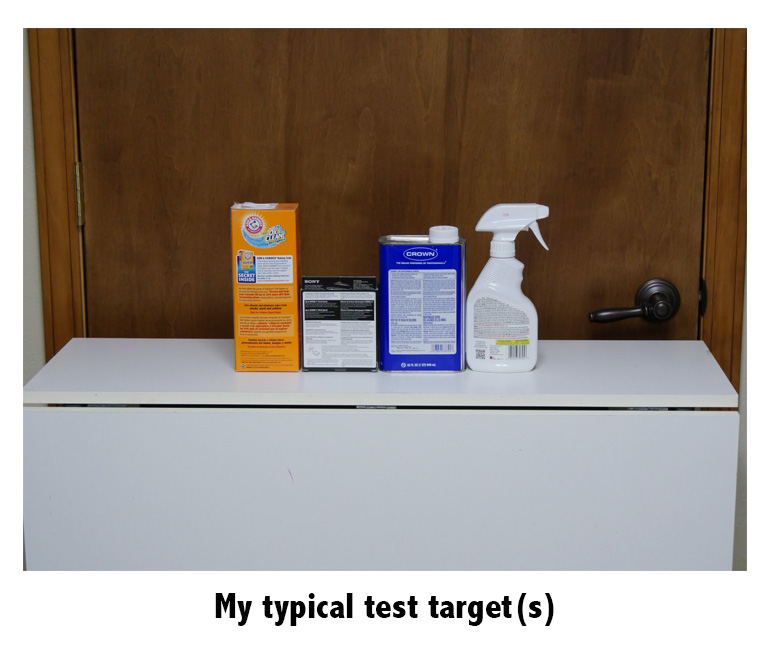
Next, you’ll need to set up your camera and tripod. Although it’s tempting to shoot at eye level, if your target isn’t eye level, you shouldn’t be either.
Ideally, take your camera and tripod to the target and set it at a height that puts the center of the lens at the center height of your target(s). It doesn’t have to be perfect, but it should be close. You don’t want to shoot up or down at your target since the angle can introduce focus error and consequently unreliable tests.
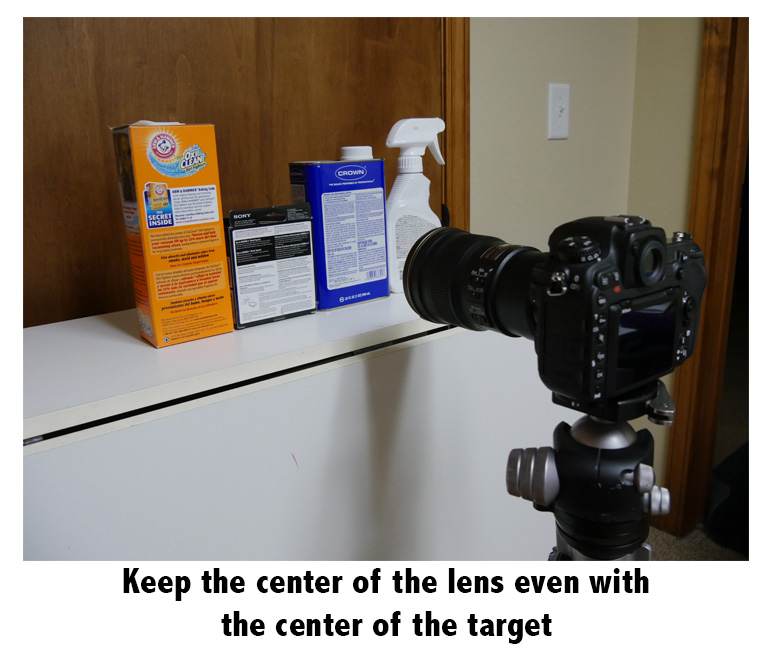
Once you have the tripod height set, move the rig into position, again, doing your best to keep it square to the target.
Next, turn on Live View and center up / level the target on the screen. I like to use the built-in artificial horizon on my Nikons for this purpose.
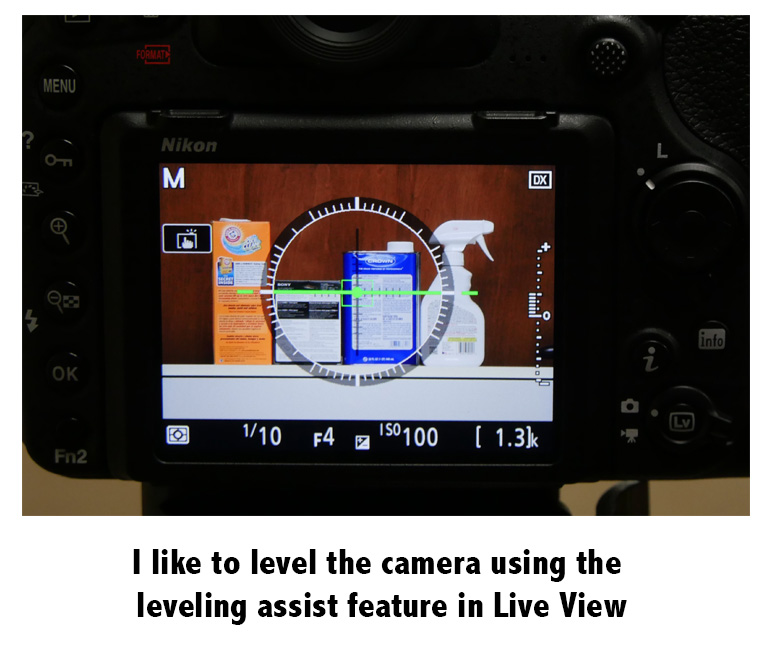
Now, keeping in mind all the setup techniques described in the first section of this article, plug in your cable release.
From here, you’ll want to zoom in using Live View. On my Nikons, I zoom into the point just before the focus box disappears or even one step below that. Never focus without zooming in, but don’t max out the zoom either.
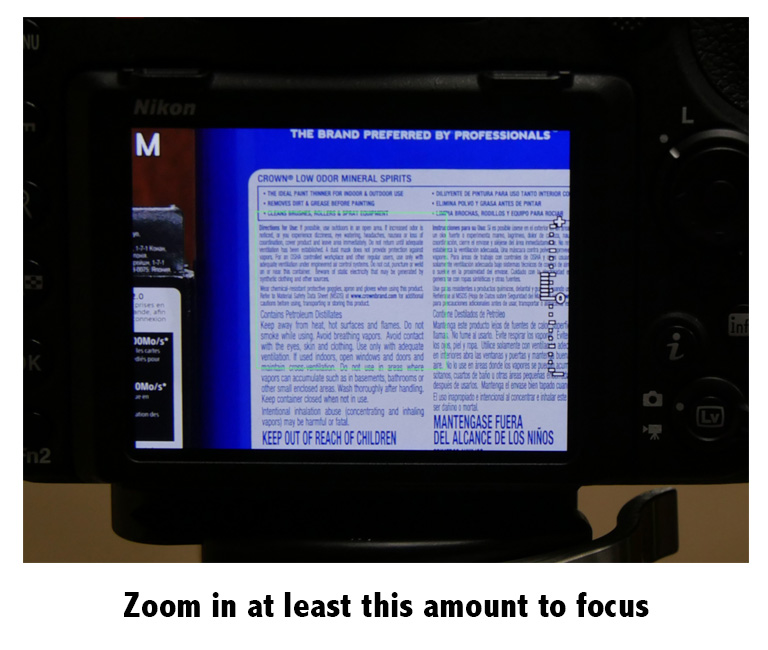
Once you’re zoomed in, it’s time to focus. From this point forward until you have the shot safely on your memory card, you won’t touch the camera. Instead, you’ll focus with the cable release to prevent any inadvertent movement during the procedure that might occur when using the shutter release. Note that if you have your camera set for back button AF, you’ll need to switch that back to shutter release AF for this to work.
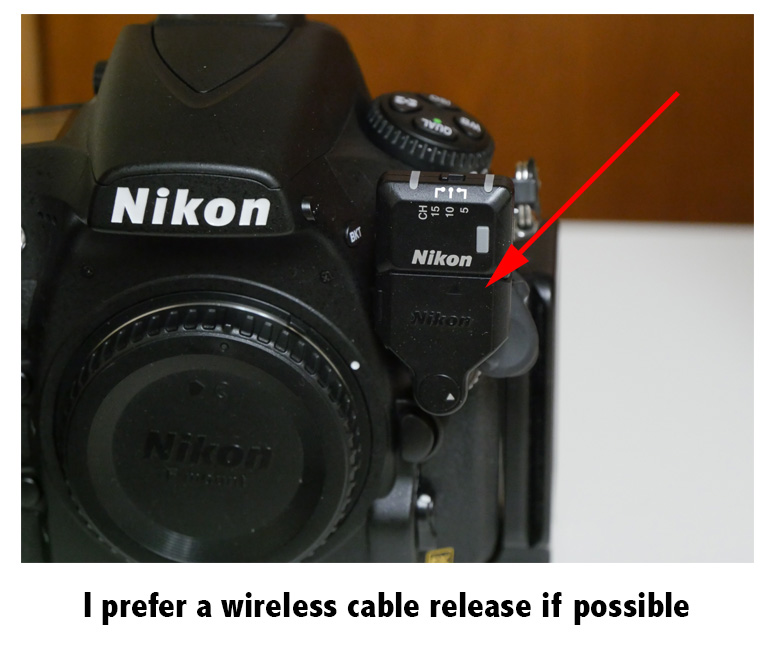
To focus, half-press your cable release button – that should activate AF and focus the image. Stick with the very center of the frame if you can. If you do need to move off for a better AF lock, only do so by the smallest amount necessary. Also, check to make sure it seems like the camera properly focused the image – sometimes they will miss, even in Live view. Make sure you keep the half-press in place even after focus is achieved (at least with Nikon).
Now, press down and release.
Depending on how the camera handles mirror lock up / EFC with Live View and exposure delay, you may need to press the cable release a second time to activate the shutter (my D810 needs this sort of attention). Otherwise, the camera may simply shoot after the exposure delay you set in has passed (my D5/ D500 are good like that).
If you’re using a wired cable release, keeping it perfectly still throughout this process is ABSOLUTELY CRITICAL. Moving the cable, in particular with a large lens, can introduce micro movements that could potentially affect quality. One of the reasons I like to use a wireless cable when I can. (I use the Nikon WR-R10 setup with the 10 pin adapter)
Once you have the shot, take a few more. I like to shoot 4~5 images each time and then pick the best in Lightroom. The reason for these extras is that I find even Live View focus is not 100% perfect each time. Most of the time the images I take are VERY close and it’s a struggle to tell which is better.
However, there are times when one or two are just not as good as the others and they are the reason I take multiples. I don’t want to accidentally think one of the outliers is representative of the optic.
Once I discover the sharpest image, I tag it or flag it. I do this with each set of test images and then compare until my eyes are sore.
That’s pretty much it. I know it seems complex, but the truth is once you get used to it, it’s really not that bad. It is very consistent though and works well to test one lens vs. another in a consistently reliable way.
~Steve
PS…
If you enjoyed this article, I think you’ll REALLY like my e-books, Secrets To Stunning Wildlife Photography and Secrets To The Nikon Autofocus System. They’re filled with hundreds of pages of information just like this. Check it out – click here (hey, it’s free to look 🙂 )


Testing your camera lenses for sharpness at home is easy with simple techniques like using a tripod, proper lighting, and a detailed test chart. This helps ensure your lenses capture crisp, high-quality images for photography or videography. Just like sharp lenses enhance photos, quality cookware improves your cooking experience. Upgrade your kitchen with long-lasting frying pans for better results.
Steve was very helpful. any plans to update this for the mirrorless cameras? Would the testing be much different from the camera controls since there is no mirror?
Thank you for your insightful article. When comparing the sharpness of lenses of differing focal length, should the camera be positioned so the test target occupies the entire viewfinder?
[…] Lens Sharpness Testing […]
I really enjoy your book and your articles because to be honest it comfort me in my choices: D750+D500+300mm f/2.8+200-500mm f5.6+TC14EII
What do you think about the combo D500+300mm f/2.8+TC14EII to get an equivalent 620mm f/4?
I saw that that the TC14EIIl is better than the TC14EII, from you is it worth to upgrade to the lll ?
Thanks for the kind words 🙂
I’ve not used the 300 2.8 with the D500, but having used that lens in the past, no doubt it would be stellar. The combo of the 300 2.8 and 1.t TC III would be fine on the D500, I’d have no fear of poppin’ off shots with that combo. The 300 2.8 takes a TC really well. It won’t be the same quality as a straight 400mm (or 600mm eqiv), but it will be decent.
Hi Steve, I have been photographing wild life for year and still found your book entertaining and informative. You mentioned having to go through three copies of the 200-500 VR and I wonder if you care to elaborate on what was off with the ones you did not keep. Mine appears sharp, but your method does not permit a direct comparison of my copy to yours (unless I buy the same brand o household goods)… How about putting up Bob Atkins target (http://bobatkins.com/photography/technical/lens_sharpness.html) and than we can all test at the resolution of our glass under similar conditions… Thanks for… Read more »
Nice article. My question concerns focus. How close can one zoom in either on the camera screen or a computer monitor without the subject going out of focus. I have a D5500 and regardless of weather the photo is taken outside in sunlight or inside under light, the item that I am photographing will lose focus. It looks ok without the zoom it’s just when I zoom in that it breaks up.How fair is this test? Should I just use 100-200% and not go any farther? Programs that I am using is Lightroom 6.x and current ver of Photoshop. Any… Read more »
Always use 100% for sharpness. At 100% every pixel on your monitor corresponds to 1 pixel in the image. Beyond that, you need multiple pixels on the monitor to make up a single pixel, so that’s why things start to get blurry. Also, less than 100% uses multiple pixels from the image to 1 on the screen, making the image seem sharper than it really is. 100% is what you want 🙂
Thank you for the very nicely written article! However, it doesn’t seem that your targets allow for front and back focus issue identification since all of your targets are perfectly in line facing you. If you used cracker or cereal boxes aligned side to side and then offset front to back, corner to corner and facing you, I think it might help the process. The addition of a ruler adjacent to the box edges and set at an inclined angle front to back, approximately 6″ high or so to also focus on the markings, might be a wiser choice of… Read more »
Hi TJ –
This is just for testing pure sharpness of one lens against another using Live View, not Phase Detect AF. For AF tuning, I don’t use this method at all, I use LensAlign.
Hi Steve
Like your test of lenses, yes and the zoom test as well (300mm f4 and 200-500mm f5,6) and will do some test myself on other lenses, but my question is do you use flash, led light, og daylight or——, just to keep that constant too, indoor as you do ?
Do you use lee graduatet filter for landscapes ?
Thanks Gert Denmark.
I have a couple of studio lights (daylight balanced bulbs inside) so I have a constant light source.
For landscapes, I exposure blend and never touch split grads 🙂
If you shoot inside, why do not use flash light?
I’ve tried it before, but there’s a couple of problems (I’m assuming you mean flash, not flashlight 🙂 ) The first is that I tend to get a lot of reflections when I use flash on the targets, which kind of defeats the purpose. Second – and more importantly, the light from a flash is very contrasty and sometimes will make things seems sharper than they really are. Take a photo of any subject with detail under a constant light source and then again with flash – you’ll see the difference in a hurry 🙂 Additionally, there’s also potential for… Read more »
Very good detailed article, thanks for sharing.
Is this the way you fine tune your lenses using the AF Fine tune feature? Do you change settings and test repeatedly until you find the sweet spot?
How far away do you recommend putting the target for a 500mm on the D500? Do you test shoot at the widest aperture?
Thanks again!
Hi Monte – Actually, this is for testing – but not tuning – my lenses. I use LensAlign to actually dial in the AF fine tuning. I use this test when I want to compare a couple of different lenses against each other. That said, if you have a good AF target, you could use the tuning feature built into the D5 / D500 and likely be able to tune it (or get it close). Note that I think LensAlign is still better. However, if you do try to tune the lens using the built-in feature, then it’s best to… Read more »