
OK, I’ll admit it, this is a weird post for me. The thing is, I realize I’m covering a topic that pretty much every photographer already knows:
If you want better wildlife photos, get to eye level or even lower.
In fact, getting eye-to-eye with my subject(s) is something I’ve been doing for a couple of decades now and is one of three techniques I would classify as having a “game changing” effect on my wildlife photography. (The other two are ensuring critical focus is on the eye and watching your background. We’ll probably do an article or two down the road, but all three of these have been in my back pocket for decades.)
The thing about eye-level wildlife photography is that it starts off as an instinctive way to shoot for most lens jockeys. In fact, if you take a new photographer with a 70-300mm lens on an entry level camera, you’ll frequently find them hunkering down to get a lower perspective.
However, over time and seemingly as the gear gets more expensive, this seems to fall by the wayside. And I’m not sure why.
The thing is, although everyone knows they should get down to eye level with their subjects, the vast majority of shooters avoid the ground like it’s made of hot lava or something (come on, you played that game as a kid too).
Without fail, it seems like whenever I end up shooting a wildlife subject with a group of people, I’m about the only one getting low and/or attempting to get to eye level – the rest of the crowd just stands there, lenses pointing down at angles that would intimidate even the most ardent roller coaster enthusiast.
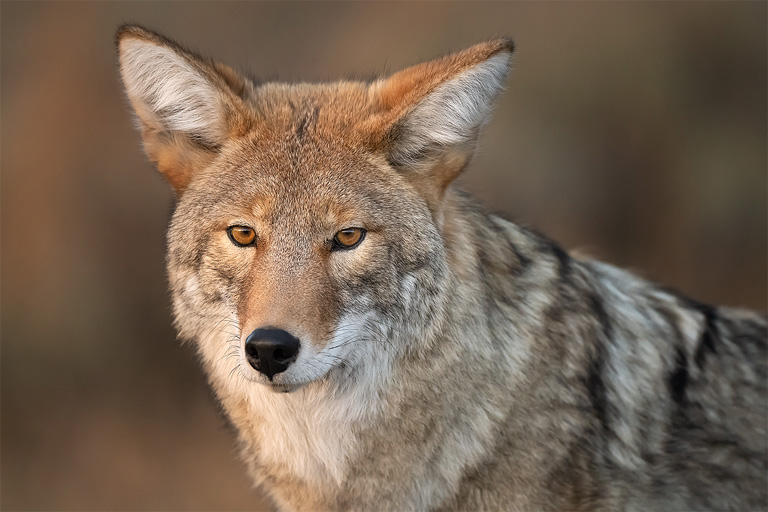
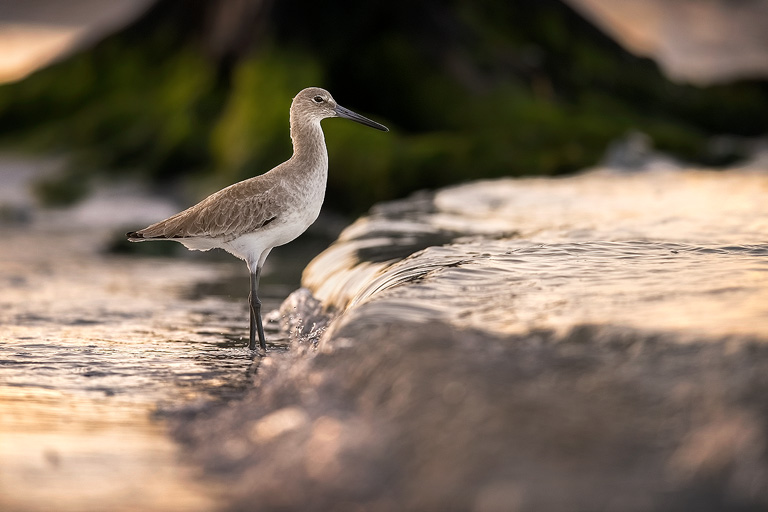
Heck, I remember photographing a coyote in Yellowstone last year near the roadway. I jumped out with my 500PF and got as close to eye-level as the scenario allowed. A van pulls up and a “photographer” pops out of the sunroof, big glass in hand, and shoots from a height of no less than eight feet with the coyote right next to the vehicle! I guess if you want a shot of the coyote’s back, that works, but I think the image below makes a much nicer portrait.
I can only conclude the reason for all this “shooting down on the subject” I see in the field must be that while everyone “knows” getting to eye level or getting low can improve an image, they don’t fully appreciate the incredible impact it can have.
In addition, I suspect that the larger, heavier gear – and tripods that often go along with it – play a part, since getting low with the big stuff isn’t as easy or fun as that old 70-300 was. The sad thing is, most images are much better off captured with smaller, lighter equipment and a lower/eye-level perspective than they are with high-end gear at the wrong height.
OK, I know that seems a bit harsh, but when I said eye-level photography was a game-changer for my portfolio I wasn’t exaggerating – this one simple technique really did catapult my work to the next level – and I’ve stuck with it (whenever possible) ever since. Once people fully embrace it, they too find themselves avoiding downward sloping lenses the way my cat avoids the pet carrier when it’s time for a visit to the vet.
I can’t tell you the number of times I’ve passed on a “great subject” if I have no choice but to shoot down on it. Why? I know I won’t use an image shot at a steep, downward angle. Eye-level shooting is like an addicting drug for photographers – once you start doing it, you can’t go back.
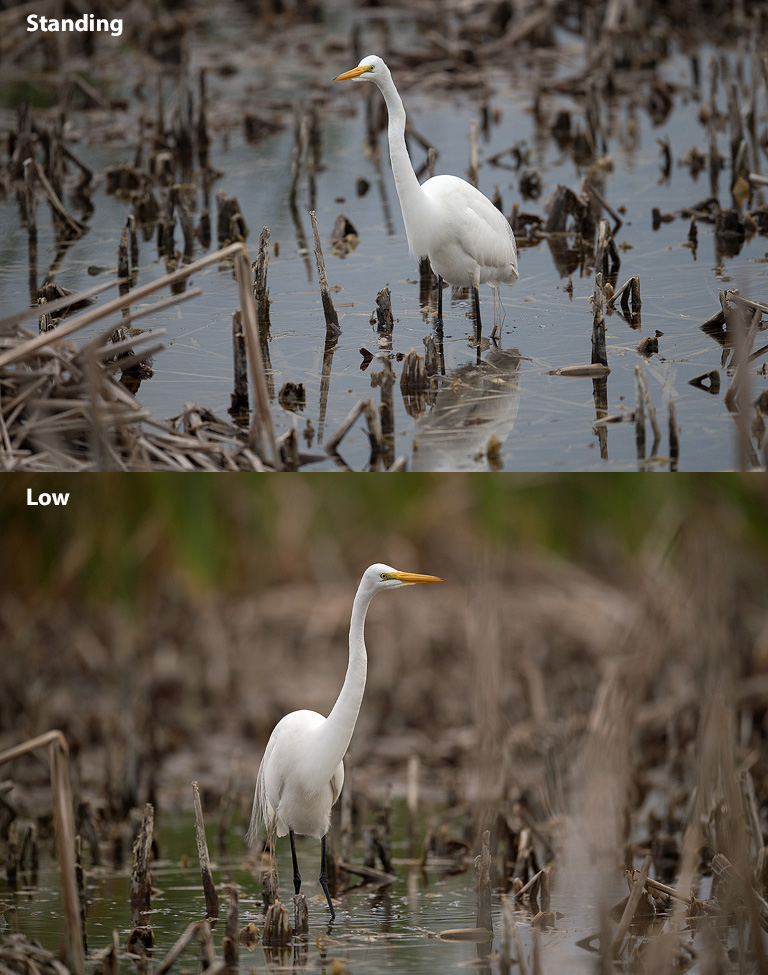
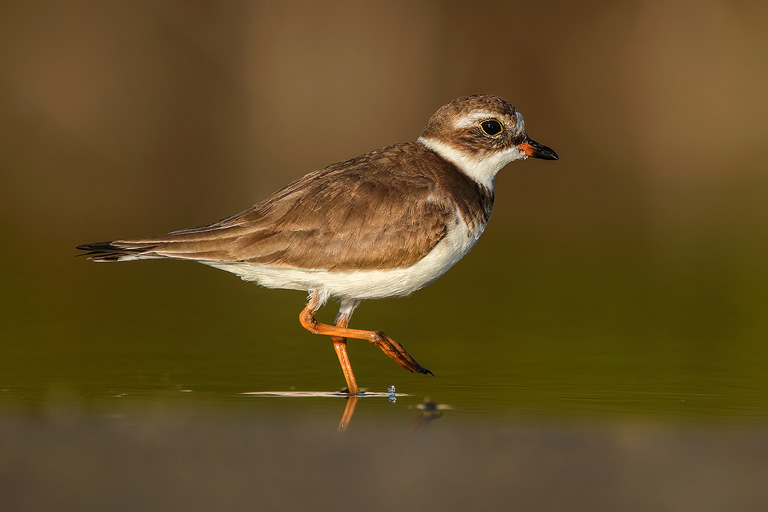
To get an idea of the difference, check out the images below, one from a standing perspective and one from an eye-level view. Yes, it’s the same bird in the same spot taken moments apart. (No it’s not “art” but serves as a good example.)
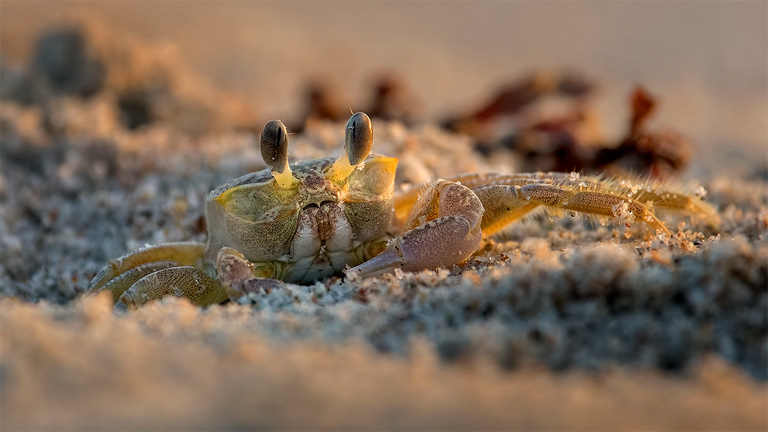
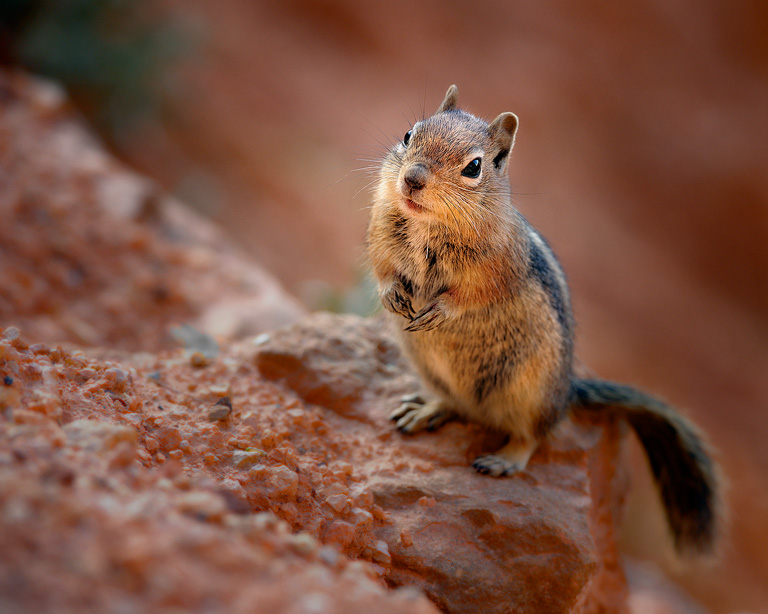
A casual glance through my wildlife gallery will reveal that in the vast majority of cases I’m shooting at eye level or even a bit lower. The only time I deliberately shoot down on a subject is when I’m using it for creative effect, such as you see with the little Bryce Canyon chipmunk below.
Advantages To Shooting Eye-Level
So, why does shooting at eye level work so well? Simple – it puts your viewer into the scene and into the animal’s world in a much more intimate way than the typical “standing and shooting down” stance does. Rather than feeling like a human looking down on and “dominating” the animal, your viewer feels more like a kindred soul, experiencing the world the same way the critter does.
It’s actually surprising how often the difference between a “no shot scenario” and a “great shot scenario” comes down to a difference in tripod height!

Another aspect of shooting eye-level that I absolutely love is that it often gives your photos an interesting, uncommon perspective. In my experience, one of the easiest ways to get a unique-looking shot is to shoot it low when everyone else is shooting the same thing standing up.
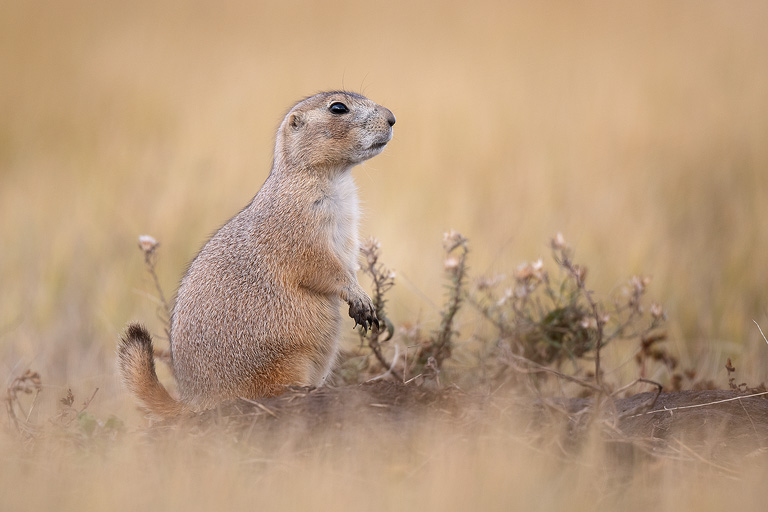
An additional, sort of “hidden” benefit of a lower perspective is that it often allows the foreground and background to compress and “pile up” more in the image than a higher stance does. This effect can lead to a better sense of subject isolation, such as what you see here with the prairie dog. From a standing position, this image would have had quite a bit more grass in focus in front of and behind the little guy.
Finally, I find an eye-level perspective can provide a greater sense of “intimidation” when dealing with a more formidable animal. When you’re at eye level or lower with a predatory or potentially dangerous creature and it’s looking right into the lens, it provides the viewer with a truer sense of just how powerful or threatening that animal is.
As a guideline remember that the lower you are, the more dominant the subject feels, the higher you are, the more dominant the viewer tends to feel.
Tips For Getting Low
OK, so you’re convinced, but you also know there are situations when getting low isn’t as practical as I make it sound. In some cases, there are environmental or physical limitations preventing you from achieving the height you want (like if you’re on a hill and the animal is lower, or if you have to shoot from a vehicle in order to avoid becoming lunch). And of course there are times the body doesn’t want to cooperate either – a new friend I met in Florida put it this way, “Getting down is easy, but sometimes getting back up, well, that’s the hard part!”
So, let’s go over some tips for getting that low-angle look.
Drop Your Height
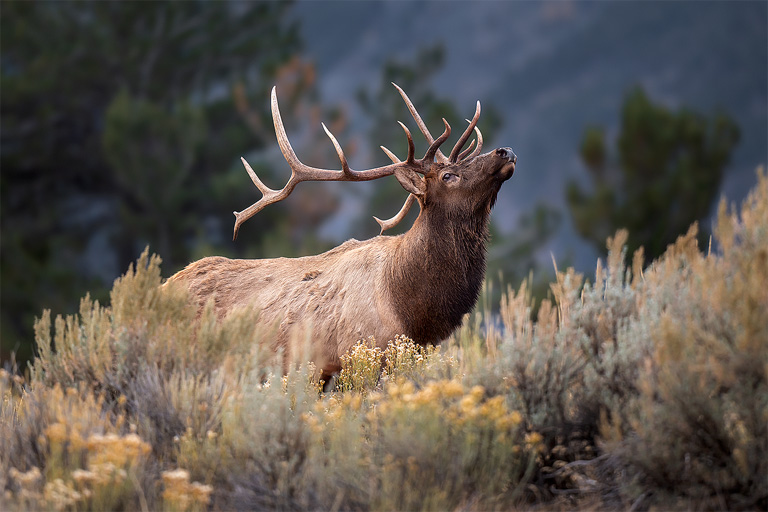
The first and most obvious way to get low is to adjust your own height so you’re at or below eye level with the animal. Keep in mind that this doesn’t always mean crawling around on your belly either – there are plenty of occasions you can set your tripod for your own standing eye-level and stare into the subject’s peepers. Some examples that come to mind include photographing elk, moose, larger deer, an animal in a tree, most flying birds, a standing bear, Bigfoot – those kinds of situations. For the image below, I was standing behind the tripod and I’m perfectly happy with the height.
Of course, there are times you’ll want to get lower. I’m frequently adjusting my tripod height so I can achieve an at-or-slightly-below eye level shot with my smaller subjects. Often, this puts the tripod at a comfortable height for kneeling, other times I have all the legs spread out with the tripod base firmly planted in the mud (my head awkwardly tipped to the side peering through the viewfinder – I gotta remember to bring that right-angle viewer).
In fact, for the shot below I set the tripod aside and set the D850 directly on the ground, using Live View and the tilt-screen to focus. (Hint – using Live View + the tilt screen with a slower moving subject is a great way to shoot low comfortably.)
By the way, if you’re planning on getting low, my recommendation is to consider pants that can keep your knees dry and even grab a set of knee pads (or a small square of foam can also work well and is more comfortable when hiking). Having a little knee protection is especially handy when the ground is full of tiny, sharp little pebbles or shells.
By the way, I’ve discovered over the years that kneeling works far better than trying to squat. Sure, squatting can give your legs a nice workout as the minutes pass by, but this is diametrically opposed to my “no pain, no pain” exercise philosophy.
Use The Terrain
The other trick is to use the terrain to your advantage – and this can help if you have a difficult time physically coaxing your body up and down.
For example, when I’m shooting from a vehicle, I try to position myself downslope from the animal I’m photographing whenever possible. (Or I bribe the driver to do so).
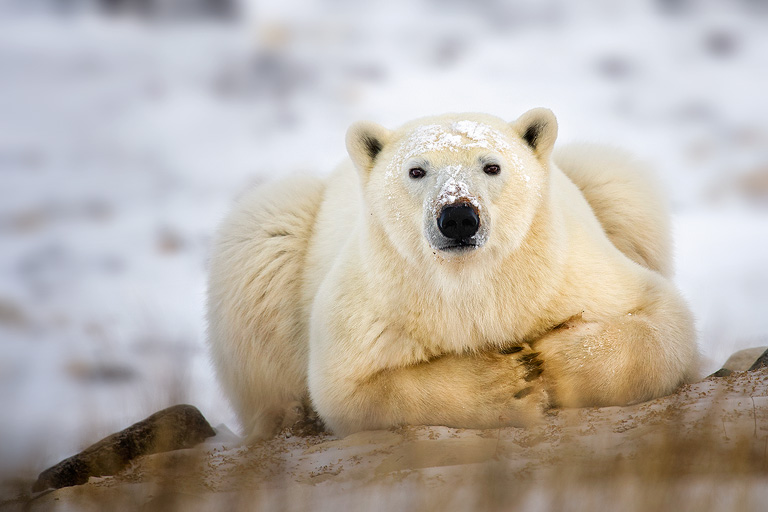
For example, I captured this polar bear image from a deck on the back of a polar rover that was probably ten feet off the ground (at least). However, the driver positioned the vehicle in a dip that was at a lower height than the bear, so the shot appears much more eye-level than it otherwise would have been.
Leveraging terrain also applies when you’re on foot – I often use the topography of the area to position myself lower than the animal so I’m shooting at either eye-level or upward. This elk photo was captured using that exact technique from a standing position.
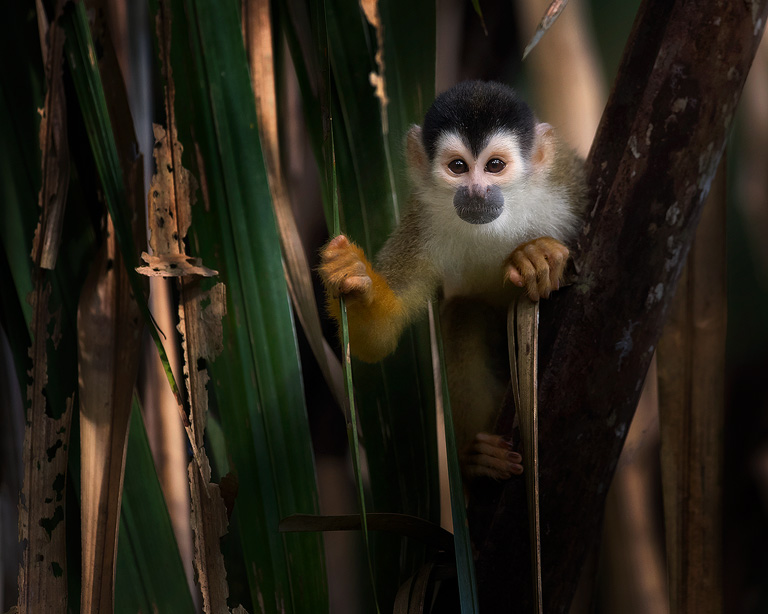
Finally, I find that animals in trees usually lend themselves to a comfortable standing position. I captured the image below while I stood leisurely behind the camera.
Stay Back And Use Long Glass
The other trick – and you can use it in conjunction with the first two tips – is to stay back and use longer glass. I know, seems odd, but stick with me here.
The further you are from your subject, the less extreme the angle is between your height and their height. The best way to explain it is with this diagram:
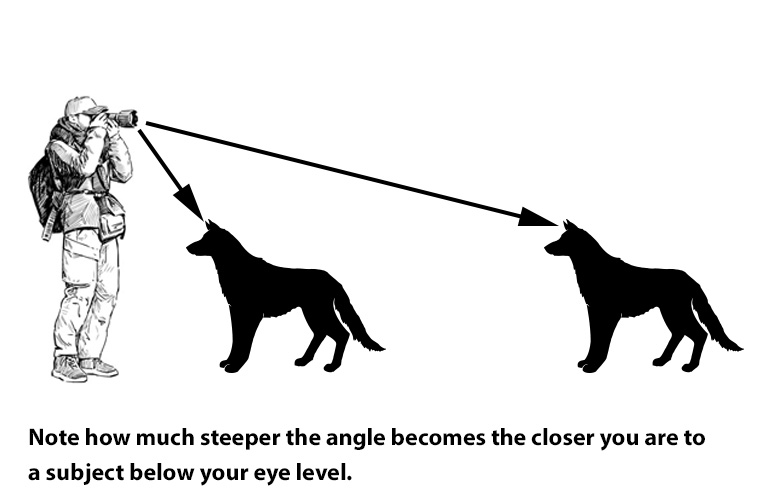
I leverage this little bit of geometry all the time when I can’t quite get to eye level. I was recently in Africa and, although we could easily get right next to many of the animals, we instructed the driver to stay back farther. So, even though we couldn’t get to ground level in the vehicle, the increased distance to our subject made it appear that we were eye-to-eye with our targets. Had we been right next to the subject, we’d have been forced to shoot at a much steeper downward angle and the images would have suffered as a result.
However, this isn’t an excuse to strap on a long lens, stay back, and shoot from your normal standing height either. Although it’s a workaround and can help, you still can’t beat physically changing the perspective by getting lower. I use this “distance” technique in combination with first getting as close to eye-level as I can on my end.
Don’t Go Crazy Either
Finally, I want to mention that anything – including this guideline – can be taken too far.
First, there may be times that, for creative reasons, you want to shoot down on your subject. (Remember the ground squirrel from the beginning of the article?)
You’ll also encounter times when a low tripod places too much grass or vegetation between your camera position and the subject. In those cases, I’ll elect to go a little above eye-level and capture an image where I can actually see the subject.
In addition, you may have to contend with the sky more frequently when you start shooting lower-angle shots. In some cases, this is just fine (like a pretty blue or partly cloudy sky), but in others it’s a non-starter (i.e. plain white or gray sky). So, keep an eye out as you drop height and make sure you like what you see in the background. In some cases, a distracting sky in the background hurts the image more than a lower perspective helps it.
Then there are shots in trees – at times shooting up at too steep of an angle is just as bad as shooting down. I love a nice shot of a bird in a tree, but not if it’s a belly shot! (Think about it – would you like someone to take your portrait from that angle?)
Of course, other times shooting straight up can produce a fun shot like the one below. So, remember that everything in this article is meant to serve as a guideline, there are always times you’ll want to break the rule for creative effect.
In the end, you have to balance getting an eye-level or low perspective shot with both the environment and your creative goals. Like any photographic guideline, use it when it works but remember the camera police aren’t going to drag you off in chains and whip you with camera straps if you don’t always shoot low.
Give It A Try
So, I hope if you’re not already in the habit of getting eye-to-eye with your subjects you’ll give this some real consideration. Like I say, this was seriously a game-changer for me, and I would like to challenge you to try it on your next few outings. I think you’ll enjoy the results 🙂
~Steve
PS – If you enjoyed this post, I think you’ll REALLY like my e-books and video workshops! Thousands of pages and hours of videos filled with tips, tricks, and techniques – all my best content! Check ’em out – click here (hey, it’s free to look).
Ahhhhhh, Steve. With my age and back, hip and knee issues, getting down low is not so easy. The getting down is, but it’s the getting back up that’s the hardest. I love watching my 10-year-old granddaughter, who’s now graduated from the old Nikon D40 to a D7100 (I’ve kept all my old cameras for the kids to learn on) and, with a passed on 18-300 Nikon lens, she will get down on the ground to shoot bees (one of her favorite subjects.) If it could only be that easy for me (10 was a lot of decades ago). But,… Read more »
Thanks Steve, for an excellent article, I am hoping after my hip replacement I will be able to put your suggestions into practice. At the moment I can get down but not up. I have resorted to using live view and holding the camera down low but still trying to master this technique.
Been there, done that. 🙂 Mud on the clothes, sand in my shirt and down my pants, cactus thorns in various body parts, all in the name of getting the right shot angle.
Hi Steve, I just returned from a road trip to Bosque del Apache (I know, way too late for “the spectacle” and too early for spring migration, but I can’t convince the university to schedule spring break to facilitate my photography). I learned that when bird watching in NM in March, it pays to occasionally look down. We surprised a 3+ ft long western diamondback rattlesnake on a trail. Or I should say, it surprised us! After the “oh sh*@!” moment, I belly-flopped on the trail with my D500 and 200-500 zoom. Obvious differences aside, the feel of the images… Read more »
It can also work in the opposite direction. Often when I’m photographing in Denali Park, the animals may be up a slope from where I’m parked, so I get up on my camper to get a better eye level shot.
I agree 100% – eye level doesn’t always mean down low. I recently posted a lion cub on my instagram feed where I had to get as high as possible in the safari vehicle to get eye level!
Hi Steve,
All great suggestion. I’ll be more conscious of my angel when shooting
Hi Steve,
All great suggestions, I’ll be more conscious of my angel of shot going forward.
You inspired me to get out in the yard, chase around my 3 doggies and get low and even close. I stuck 28mm on to exaggerate the point. Great exercise.
Great article, but in the two pictures of the white bird close to the beginning, looks as though you used a different F stop in the first image causing the bird not to be as isolated as in the second one. I think the first one would have been as good as the second one if the same aperture had been used. Enjoy reading your articles. Keep them coming.
Hi Jerry – sorry for the delay, I was out of town and wanted to check (photos were at home). But nope, both were at F/4. The reason the second one looks more isolated is discussed above in conjunction with the prairie dog photo.
I stand corrected Steve. After examining the bird images closer, I see that the stalks of grass toward the foreground look the same in both images. I failed to notice the small details. You did explain the exact same situation in the prairie dog picture. Thanks for taking the time to reply.
Steve – I agree 1000% about getting low. Also, when sitting on the beach shooting birds flying by low I have stuck a monopod on an upside down frisbee and found it works well and
stops the monopod from sinking.
Hi Steve – I enjoy your posts and vids! On a minor note, I just wanted to mention your “Bryce Chipmunk” is actually a Golden-mantled Ground Squirrel. Those little guys are are found in the Western US and Canada and are often mistaken for chipmunks because of their striped body. Note that they lack the striped face often found on chipmunks, however. 🙂
https://en.wikipedia.org/wiki/Golden-mantled_ground_squirrel
Keep up the good work!
Thanks so much! I’ve corrected the article 🙂
Great article Steve. It’s something that I forget easily, but what a difference in the shots! I never thought of it for the larger animals, but your shot of the elk is wonderful.
Like your friend in Florida, getting down is the easy part. Getting back up is another story. But I guess public embarrassment is life affirming in a way…
There are a few devices that can help level and manage heavier telephoto rigs. One is the Steadify that turns the photographer into a tripod….have this ordered so waiting to try. This should also work sitting but in this position elbows-on-knees is probably more flexible (as any rifleman knows). The other simple gadget I still have to finish off making myself. A Ground-Pod. But it is probably easier to buy one of these gadgets – eg the Badger Gear Ground Pod here in S Africa. BandH sell a Skimmer that’s similar. But some finds of frisbee could probably be adapted… Read more »
A great refresher Steve. This was actually one of the first lessons smashed into my brain learning/doing wedding photography all those years ago. Weddings, Wildlife, not much difference, in more ways that one…
Hi Steve
Another excellent article
Only thing I can add is that I always carry, (at least in the truck), is a right angle viewfinder
Have a bad neck and find it easier to look down when I have the Gitzo laid flat
I enjoyed the article….I love the looks I get doing that. People look at this old mule on his belly and giggle, but I’m sure their Iphone shots are great on Facebook! And no camera police !!! So much for those summer camps in Turkish prisons…dang!
So true every one seems to shoot way to high now a days Great article !!!!! I was wondering why the camera setting on the Coyote Portrait, Nikon D850, 500PF 1/800th, F/5.6, ISO 6400?????? Thanks we watch all of your videos and have all your books great info. Thanks for the help.
Cuz it was dark 🙂
If you have the option e.g. Okavango swamps Botswana or anywhere with water, shooting form a small boat will not only bring you eye level with major game but much closer than on foot or in a vehicle. Getting up off the ground in front of a lion, elephant or buffalo good be fun!
Tried lying on the sand for the first time at the last beach shoot of Hooded Plovers. And wow, it made a big difference even over kneeling. I’m sold!
Hi Steve,
what are your thoughts aout using a tripod as a monopod for a little more stability? and I try and get down low as often as I can too, it makes a huge differance. Thanks for the tips.
Hi Steve,
Did you use any post processing on the Custer Prairie Dog photo to get that wonderful foreground and background effect? Love the picture.
Not really – just a touch of contrast and I had to nude the color a little bit (AWM made it too blue). Probably one of my least processed shots. The effect you see if 100% from the low perspective and the “piling up” I mention in the article.
This is sound advice but if you’ve read Steve’s books you should already know this. As a person that has read Steve’s books he has shaved off years of learning and I wish I had found the book sooner. The price is cheap for what you’re getting. No I’m in no way affiliated with Steve P. I’m just a fan.
Superb article and refreshes what many knew but don’t necessary practice. All truly excellent points Steve and all well worth keeping in front of the mind when out & about.shooting. Unfortunately getting down can be a pain nowadays, getting up even harder; back, neck, knees, etc they all seem to go at once….but ya gotta try using all options with smaller tripods, taking advantage of the terrain, angles and using the LCD/Live View to get even lower.and any other trick you can think of. Thanks again for the article. Now I have to go out and and practice, getting up… Read more »
With 2 knee replacements, I found that I like to use a monopod w/gimbal. I can use my 200-500mm and still sit on the ground, kneel or use a small camp chair (or other local objects). If the action moves it’s easier for me to repostion than with a tripod.
Good advice, but like stated above getting down is not the hard part, it is getting up that is the hard part. I try to use the LCD @ live view and hold it lower, works some times.
Great ways to get low is to use a yoga mat for the shooter and a piece of HDPE with a 3/8″ bolt for mounting a ballhead. I use an old 11×14 black kitchen cutting board with a stainless bolt and it works perfectly on dirt and on sand and my outlay was a couple dollars for the stainless fastener parts.
Great idea – thanks Bruce!
Using big glass entails the use of a tripod and this keeps people shooting 5-6 feet above the ground. Shooting in May in Yellowstone NP I saw groups of photographers locked in place with their big lenses mounted to tripods. I grabbed the 80-400mm and on a DX camera I found I was 100% mobile and so not only my height could change but so could my location and it was fast and easy to change the background of my subjects. The 500mm PF has been a revelation as it provides the same mobility as the 80-400mm on a camera… Read more »
I too have found the 500PF a real game-changer in that dept. You don’t realize how “stuck” a tripod setup can make you until you put that lens on! I still move / reposition / keep low with a tripod, but I agree 100% it’s not nearly as fast and easy with the big glass as it is with the 500PF.
One nice thing about the Z cameras is that they work as well in ‘live view’ mode as through the viewfinder, so you may not need to get your whole body on the ground.
I just tried using Live View on my Z7 with a water-level glossy Ibis – it was not good. Despite the AF area being right on the bird’s head / neck, the camera insisted on switching to the background anytime the bird moved. Then it was a chore to coax the AF system back onto the head and neck, only to have it jump to the background again a moment later. I finally got the shot, but had I just gotten low with the D850 or D5 and used the viewfinder it would have been over much faster. (Although I… Read more »
+1 agreed. In many cases the Z7 is superb – not least the silent shutter and excellent EVF. But the AFC needs work as you say. So does key customization options that are missing. The real hassle is unable to assign a AF mode+ AF-On to a Fn button. This is a showstopper IMHO
Yeah, I’m not sure why the heck NIkon didn’t include that functionality – I often find myself missing it with the Z7 – and missing shots as I switch…
I bought my first digital camera, a twist-body Nikon 4500, just so I could more easily get shots of my dogs from their eye level. I still try to shoot dogs, people, and cyclists from an eye-level (or lower) perspective. I still tend to kneel a lot. The right knee of my pants usually wears out faster than the left.
Love your books and articles Steve. I don’t know if you have heard of a shoulder stock called The BIF Bullseye. I have been using it for over a year now and as an older guy it has helped me enormously getting to the right eye level. I can use it on a tripod stood up although much prefer on a monopod with a tilt head. I can kneel with a monopod and I can lie using the Bullseye with or without the monopo for support. The Bullseye just gives me that firm steady shot that lets me get the… Read more »
I actually have one but found for my longer glass it doesn’t work well. However, for physically smaller lenses (i.e. not 600 F/4s) I think it’s far better suited and seems like a nice rig.
I saw a guy on You Tube using an old frying pan fitted with a screw to take a tripod head!! Looked a great idea and could save sand-induced tripod damage……. wouldn’t work so great for some of your ‘from the sea’ shots . I plan to try it for wader images in the summer. I know good spots for them where getting close is feasible.
Another fine topic and I like the emphasis on actually doing it……
LOL – I think I saw that same video! Was considering trying it next time I’m at the shore – although, I do like the “from the water shots” too. My new RRS tripod has o-ring seals, that should help 🙂
Take a look at the Naturescapes SKM-II Skimmer Ground Pod. It’s a plastic “dish” with a tripod mount. Perfect for mounting a ballhead or gimbal head and “skimming along the ground in sandy or damp areas.
Looks great but what a price! Will try the home made option or beanbag on a frisbee first
Thanks Steve, I have all of your books. And your video series on noise reduction and sharpening. I watch a lot of your videos on YouTube and often post links to your videos in Facebook photo websites. I believe your entire collection of materials is a must-have for any photographer. Especially if they shoot Nikon. I’ve learned more about my camera from you than any other source. and my photos have gone from amateur to serious enthusiast level from the skills that you have taught me. Thanks again for sharing your wealth of knowledge especially in such a fun and… Read more »
Getting down isn’t the problem, it’s the getting up.
Awesome post. While it may be known to many photographers I think being reminded of the importance of this is… well.. important. Also good to know that standing height usually does the trick for Bigfoot. All my Bigfoot photos are taken from treetops and I see what I’ve been doing wrong now!
I think I was doing just that naturally – but I will definitely pay more attention to my old habits 😉 Thank you for the great article AND reminders !!
This is great, and I agree totally, but find it hard when the animals or birds are down in a creek and if I even slow down the rig for the shot they fly or move off before I get out many times. So in saying this what is the best way to get close enough to get these low shots?
It’s tough – no question about it. And in some cases, the best you can do is get as low as possible and use a long lens. I was along a bank that was about 20 inches above the water yesterday shooting some little moorhen chicks at close range. I had to lie completely flat with the camera on the ground to get the eye-to-eye look that I like. The truth is, there’s just not a magic bullet trick you can use when there’s an overwhelming difference in height – I often have to just walk away from those situations… Read more »
When you get as old as I am you’re thankful that you can still stand let alone go to those other challenging positions.:):) Seriously, the low angle shots that you have shown make the subject more real and alive and prove your point very well.. I use a tripod for most of my shots and I just find it easier to move around to adjust for changing subjects while standing. Adjusting for uneven terrain creates even more problems at lower levels so I guess I’m guilty of shooting from high to low on most of my shots. On a recent… Read more »
Thanks – and there is a lot of crawling around on the ground (and every now now and then accidently laying in an ant mound – ouch!)
………..and you are closer to the snakes.:):)
Thanks Steve! Informative post. As you mention physical limitations play a big role in deterring many of us from “getting down” – and as your FL friend indicates getting back up vertical can be even more of a physical challenge not to mention embarrassment. I suspect age demographics for wildlife photographers might show a trend that many of us are not spring chickens. Lowering the tripod by shortening or splaying the legs along with camera Live View and tilting LCD screen are the best method/tools for me to lower shooting angle. For some cameras using a right-angle viewfinder attachment is… Read more »
Agree – and I just purchased a right-angle viewer – and left it at home! (I’m in FL at the moment). It looks like it would be handy…
Steve, a problem I have is if I see a cool bird sitting in a tree. Even if I get close to the tree, I’m shooting from below. I don’t have a ladder with me to get closer to eye level, nor do I have super telephoto glass (only a 300 mm PF or sometimes the 1.4 TC) to step way back and reduce the angle.
Any tips here?
It’s really tricky – sometimes, there just isn’t a good shot. Without a longer lens, or a lower bird, you;re sort of stuck. Although, with a longer lens then you run into a situation where as you get farther back, you get more branches and junk in the way…
Definitely try to get eye level all the time. I just got a old yoga mat to try out out this spring to lay on next to the lake for baby duck and other water fowl shots, not a fan of laying in goose crap.
LOL, nor am I!
Another great article, Steve. May I add to get a pair of field pants that have pockets at the knees for pads. Easy to take a knee without sharp rocks ruining your day.
Cheers
Those sound great – do you know the name of the brand? I’d like to check them out.
Fjallraven. These are the ones I have Steve. Lots to choose from. They used to have a store in Jackson, WY. It closed.
Best field pants I’ve ever had.
https://www.fjallraven.us/collections/mens-pants/products/vidda-pro-trousers-long-solid-color
Carhart also has work pants with knee pockets but the material is heavy and once wet, forget it.
Awesome – thanks! I’ll check them out.
Excellent as always Steve. Love the reminder to get to eye level and my age I fully get the “no pain, no pain” bit.
Thanks!
Fantastic examples as always Steve.
Thank you!
You can get pants with pockets for knee pads from Duluth Trading Co. They make them for gardening. My wife loves the pair I bought for her.