
So, there you are, face to face with a once-in-a-lifetime shot, but your AF seems less than confident. As you attempt to focus, it tries, misses, tries again, and finally, reluctantly, latches on. However, as you study the image in the viewfinder, the “sharpness” of the subject leads you to suspect that maybe the solid green focus confirmation dot is overly optimistic. You pop off a few shots, and a quick glance at the results confirms your worst fears – the images are slightly misfocused.
Well, here’s a dirty little secret – the PDAF system in our cameras isn’t perfect and under some circumstances it can flounder and make mistakes – I know, hardly a life-changing revelation for anyone who has used a DSLR for more than a week. (And no, this has nothing to do with AF calibration, but rather an inherent weakness in the PDAF system under some circumstances.)
The likelihood of the camera falling short of AF perfection increases when you’re photographing low contrast subjects in low light. In those conditions, I sometimes find that the system will get focus in the ballpark, but it isn’t always spot on. I find this “soft AF lock” happens more frequently with dark-toned, low contrast subjects in dim light – a few that come to mind are black bears, howler monkeys, crows, etc. However, it can also happen with other subjects, depending on the conditions – an animal in fog is a good example.
(Quick note – the images in this article are fully processed and have had brightness and contrast added in post production – the original scene was flatter and lower contrast than what you see in the example images here, but I think you’ll get the idea.)
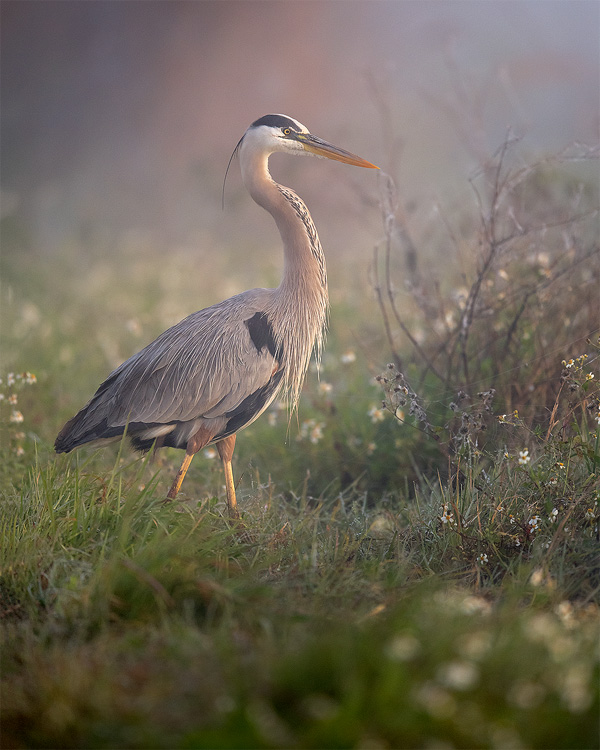
Normally, the two shots below are the type that’s easy on an AF system, however, add a thick layer fog and your focus may not always lock in as precisely as you’d expect.

Solving the problem is often pretty straightforward – what’s tricky is identifying the situation in the first place. However, there are a few telltale signs that can tip you off to the possibility of a potential AF issue with your current subject.
The first is if the camera is struggling to get an initial lock. If the focus system goes on an extended hunting safari as it attempts to snap a subject into focus, all that fumbling around is a potential indicator that when the camera finally does latch on that the lock might be suspect.
The next sign is if, when in AF-C mode, the AF gets a little “jittery” or uncertain. When the focus ring sort of stutters and strains to get and keep a lock on a stationary subject, there’s a higher probability of a soft lock where the focus is good but not perfect.
Another sign of potential AF trouble comes down to the conditions of the scene and subject. The truth is, if I’m shooting a low contrast, dark-toned subject in low light, I usually just go ahead and assume the camera is likely to struggle a bit and I’ll implement some or all of the steps below as a safety measure just in case.
Of course, the most visible sign of trouble is when you look into the viewfinder and the subject doesn’t seem quite as sharp as you’d expect.
In short, if AF seems to be struggling – especially in low light with a low contrast subject – there’s a chance it’s going to miss perfect focus from time to time. Thankfully, if you recognize the potential problem, there are a few tricks you can use to improve your odds.
1. Go For Contrast
OK, I know, we’re specifically talking about a low-contrast situation here, but unless your target is a piece of blank paper, there’s usually at least a modicum of contrast to feed your AF sensor. The key, even in a low contrast scenario, is to still look for and point the camera to areas of contrast. The higher the contrast, the better the chance for a perfect lock.
For wildlife, I always try the eye(s) first. Eyes usually afford at least a degree of contrast and besides, in nearly every case it’s where you want your plane of focus for a wildlife portrait. Sometimes, if there’s a catchlight, you can actually latch onto that – if you’re close enough to the subject.
If the camera fails to lock on the eye, look for areas and edges that are on the same plane of focus as the eye. I’ve used eyebrows, ears, necks – it all depends on the animal and the circumstance. Sometimes, I’ve been able to lock onto differences in fur or feather tonality near the eye, such as the transition between black and white on a raccoon or the black to brown transition on the snout of a black bear. In fact, at least some of the black bears I’ve photographed in the Smokies (see the guy below) have a little brown patch over their eye that makes a good target.
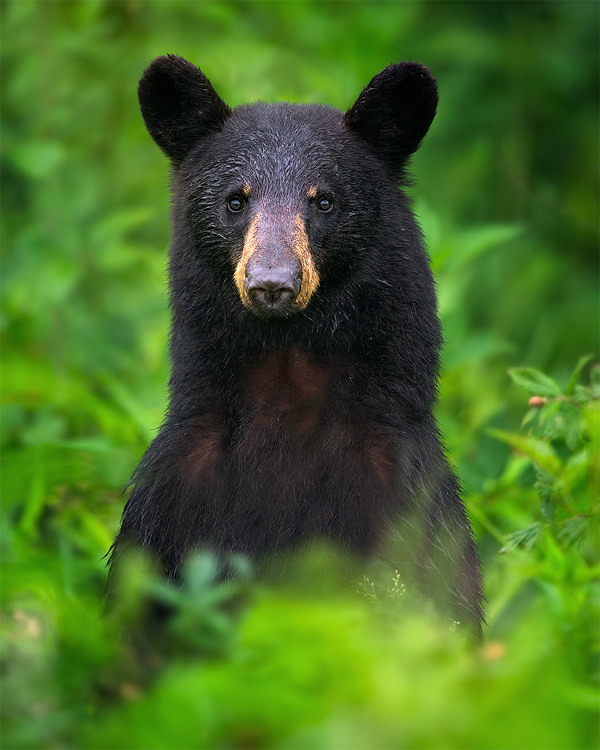
For many animals, it seems like just getting an AF point on the eye is enough for a lock. Where it gets tricky is when you have a dark eye against equally dark fur – especially when the light is low. To say I’ve had a little AF trouble photographing black bears in the woods is like saying the folks on the Titanic got a little damp. So, we sometimes have to up our game a little with the next few tricks.
2. Use The Central AF Points
The next trick in my bag is to gravitate towards the central AF points. As you probably know, the best method for normal shooting is to create your composition in the viewfinder and then shuffle your AF point to your subject’s eye; not to use the center AF point and constantly recompose. Moving the AF point to the eye makes it easier to keep focus when the subject makes slight movements one way or the other – rather than re-focusing with the center point and recomposing all the time. Normally, moving the AF point to the eye is the way to go.
Normally.
However, in dim light with a low contrast subject, that rule goes right out the window.
The reason? Your central AF points tend to be better at grabbing an AF lock than the points living in the more rural areas of your viewfinder. First, central AF points are in the best position for the way the PDAF system in your camera works. Second, they are generally more sensitive than the outer points. Third and finally, they are almost always cross-type sensors as opposed to the line sensors typically found as you drive out towards the edges of the AF field. (We dig deeper into how / why this works in my Nikon AF book.)
(Note that even if your outer sensors are cross-type, they may lose that high falutin’ status with slower glass or when a TC is attached. In fact, sometimes taking the TC off can improve your odds of getting a good lock in a tricky scenario.)
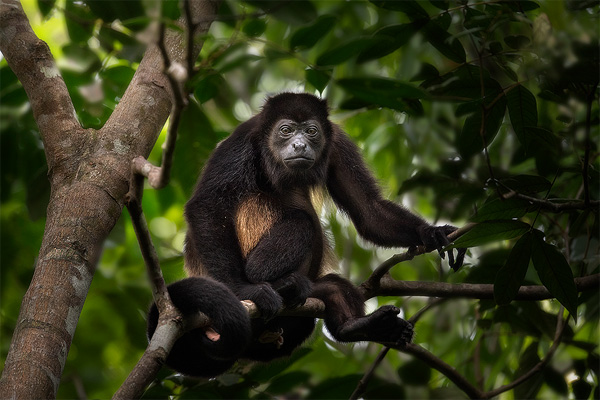
In addition, sometimes the more central AF sensors can work well for the composition you have in mind. The image below may have been trickier had I wanted a composition with the monkey towards the side of the frame (remember, contrast / clarity was added during post processing), but luckily the central AF points were on tap for this one and the camera had very little difficulty nailing the shot.
So, my number one rule is that if I can’t get a reliable lock with my outer sensors, to try again with the center AF point and see how that goes. You’d be surprised how often it locks right on. Of course, you’ll have to focus + recompose – which can slow things down – but it’s better than a shot that can win a softness competition against a cotton ball.
3. Help The Lens Focus
Of course, sometimes you can’t get a lock at all. If every press of the AF button is met with the lens mindlessly racking the focus ring back and forth, there’s still hope.
One trick I’ve learned over the years when the camera can’t quite get a lock is to help it with a manual focus assist, I simply grab the focus ring and do my best to dial in focus quickly. It doesn’t have to be perfect, just as close as you can get it with a quick turn of the focus ring.*
Once you get focus in the ballpark, try getting that AF lock again. More often than not, the camera will grab on.
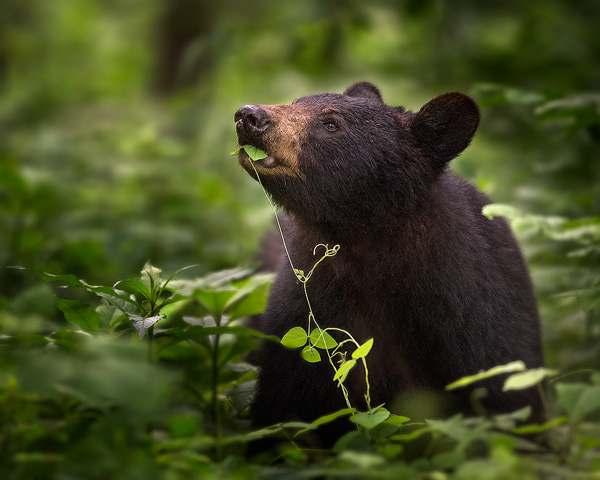
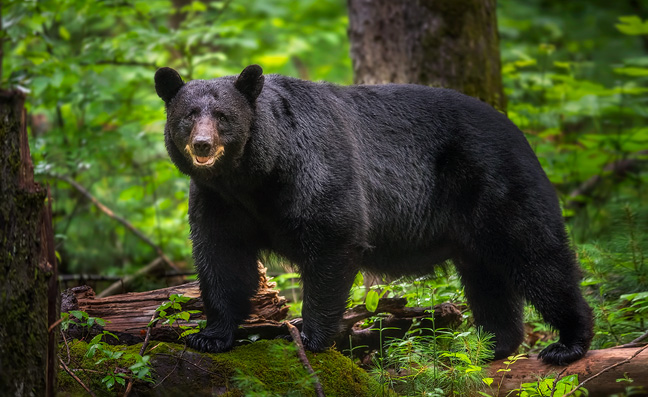
For this bear shot, the camera’s AF system kept jumping past the bear. So, I grabbed the AF ring, got focus in the ballpark, and put the AF point directly on the eye. The camera made a slight adjustment to my focus attempt and I fired away for a burst full of tack-sharp images.
*Note that you should ONLY use this method with lenses that support turning the focus ring while autofocus is engaged. The vast majority of Nikon’s AF-S lenses qualify, and I believe most if not all Canon lenses support it as well. They key is that there should be no resistance when you turn the ring – if you have to force it, you’re gonna break it.
4. Jittery AF
As mentioned at the beginning of this article, sometimes the camera sort of locks on, but the AF seems jittery and tends to stutter a bit. Instead of latching on and staying put, you can hear the lens making constant micro-adjustments as it struggles to keep a lock on a stationary subject. This can happen both in situations of low light / low contrast and also when there is some sort of precipitation between you and your subject. However, the solution is the same, no matter what the reason.
When I experience this, I plaster the AF point on the eye and, keeping the AF-On button mashed in, fire away in a long burst (using AF-C mode).
As the AF stutters and jitters, you continue to fire away and capture images with every focus change it makes. Sometimes the camera will be spot on, other times it may be a little front or back-focused, but the key is that you’ll have at least some in that group that are sharp.
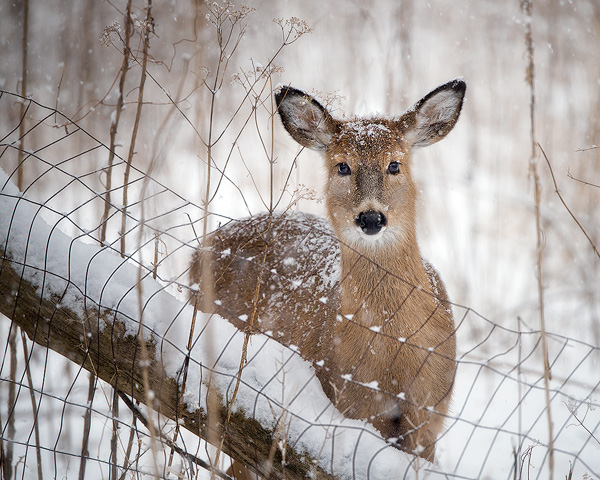
The image below is a good example of when this can happen even when you have an easy subject in good light. I put my AF point right on the doe’s eye, but my AF was jittery due to the falling snow as it passed between the AF point and my subject. So, I used the technique I describe above and fired off a long burst and let the camera make adjustments as I shot. Most are sharp, some were misses, but in the end I got the shot.
Bonus Tip – When shooting in precipitation, firing off long bursts as described above is a good way to increase your odds of having eyes clear of snowflakes or rain falling between the subject and the camera. Nothing worse than having a perfect shot ruined by a blob of snow right in front of the eye!
5. Defocus And Refocus
OK, all of the above is fine, but what happens when the camera thinks it has a focus lock, but you have a hunch to the contrary?
If you suspect the camera has a soft lock, the best move is to defocus the lens and attempt to lock on again. In fact, you can even turn this into a proactive AF technique!
When I’m in an uncertain situation and afraid that the camera might be prone to getting a soft lock, I go ahead and focus, fire off a burst, and then take my finger off of the shutter and AF-On button. Next, I’ll grab the focus ring and quickly defocus the lens just a little bit, press my AF-On button and refocus again. Once I have the new lock I’ll pop off another burst and then try the defocus trick yet again. I’ll do this several times in a row anytime I suspect the camera may not be getting a good lock OR when I recognize a difficult-to-autofocus situation in the viewfinder.
This method has absolutely saved my bacon on more than one dark, low contrast subject. When I use this technique I’ll frequently end up with a mix of sets, some tack sharp, others close but not quite perfect. Often, had I just taken the first lock and went with it, I would have been stuck with a soft set.
This giant bear I recently photographed in the Smokies is a perfect example. It was really dim in the woods and the area around his eyes offered no easy areas of contrast. I was less than confident with the camera’s initial AF lock, so I defocused, refocused, and shot off a burst. I did this several times as he stared down the camera. Some bursts were tack sharp, other times the camera missed a bit. This was from a really sharp series towards the end of the encounter. Also, this was a very interesting situation, so he’ll probably be the subject of a “How I Got The Shot” article later on 🙂
Bonus Tip – This method also works well when shooting in the rain. Sometimes the AF system gets a soft lock by mistakingly latching onto raindrops falling in front of your subject. When in doubt, run this method a few times to increase your odds.
So, there you have it. Next time you’re faced with a questionable AF scenario, give the tips above a try.
By the way, note that I cover all of this and so much more in my Nikon AF Book. So, if you’d like to learn hundreds of tips, tricks, and techniques just like these to get the most out of your AF system, make sure you grab a copy 🙂

I have the AF book and this great article further illuminated how to deal with AF “misses” (after, er, “blessing” the camera for not locking on in the first place, ha ha). One thing I also try in low-contrast (or very wiggly subject) situations is to use a smaller aperture than usual; sometimes just widening your DOF will help “trap” focus where you want it if all else fails and AF won’t lock where you want it. But I’m also curious how much the lens stabilization mechanism can impact where your focus locks in situations where you only have a… Read more »
LOL! “…So, there you are, face to face with a once-in-a-lifetime shot…” There I was, in a forest looking for jays, robins and hawks when totally unexpected black bear 10 yards away behind some bush, very low light, misty air, mouth full of salad… and everything you write about here happened. And…D500 + 300mm +1.4TC settings were on for BIF. Thanks for sharing this intell Steve, I really appreciate it and do have your very valuable books.
Hi Steve, your article describes not only the problems of wildlife photographers. The tips & tricks are universally helpful. Even for me looking at it from a completely different point of view: Indoor team sport. Not always a static subject in front but rapid and sometimes erratic movement, always low light situation, rarely misty though. Some of your tips I know about but simply can’t use in the situation, for example using the central AF-point over the short distance will mostly hit the wrong player and misfocus the target. You have to move it upwards to meet the eye you… Read more »
Hi Michael –
1. Not really, not that I’ve noticed. AF performance seems the same to me regardless of what’s running in the background. I think the camera allocates resources to critical functions first.
2. I usually go glass before bodies, unless the body is really outdated. In your case, 70-200 2.8 first. 😀
On a recent tiger safari in Ranthambore India I found that the buggers were always going in an out of the tall grass or brush so AF was a constant nightmare. Frustrating getting soft images but I think we all get lazy with how good current technology AF is so when it fails it frustrates us even more. A local Indian tiger photographer, Dicky Singh, basically told me he always starts with AF and then finishes off the final part by hand since the grasses and brush grab the AF about 70% of the time. Any movement by the tiger… Read more »
I have a question abt my expectations when checking focus on the back of the camera. After taking a shot with a long lens (100-200mm on cropped frame camera) I punch my OK button set to zoom the view to 1:1. I’m not sure I’ve ever seen something sharp on the screen. Am I expecting something too perfect blown up like that? When I shoot with shorter lenses for something close like say a headshot I can count eye lashes and blood vessels in the eye! Should I keep trying with these longer shots? Use a tripod more? Not sure… Read more »
In short, yes, it should be as sharp as the other lenses. My 300 PF and 600 F/4 (my two primary lenses) are bitingly sharp – I can see capillaries, eyelashes, even sometimes the reflection of the trees in the landscape in their eyes.
However, one thing I notice people tend to do too much of is crop. If the subject isn’t taking up at least 1/3rd of the frame, you simply aren’t going to get the level of detail you would when you have a frame-filling subject – just not enough pixels.
I read your eBooks and follow the advices for low lighting condition. Recently I was photographing a harbor seal in early morning and struggling in getting a lock-on even with a single AF point. Then the seal turned the head as the catch light on the eye appeared and the AF was able to grab right away. I got over a bunch of tack sharp images and the catch light disappeared just as quickly as it appeared. So understanding the cues in the phase detection system as you described in the book really help. Once again, thank you.
Excellent advice to acquire tack sharp wildlife images in less than ideal conditions.
Steve, great read as always! I’ll echo what others have said “we’ve all been there”. Many photographers should read and practice these techniques, then maybe there wouldn’t be so many that think they have bad equipment. Again, thanks.
We have all been there. Some times my camera never focuses. However, I would suggest a couple of points. 1: The human eye is orders of magnitude better then any known sensor out there. It can see/do things, has ranges that no sensor can ever do. Therefore, why not just stick to manual focusing and forget what the camera is trying to do which most often isn’t acceptable? 2: Lighting is one of the most important factors in producing a great image. Given the poor lighting conditions with limited/minimal contrast I would question if the photo is worth taking in… Read more »
Hi Bob – I agree that the eye is better, but that doesn’t mean it’s superior the the camera’s AF system when looking through the viewfinder. I personally come from a manual focusing background but in 99% of the cases, if the camera can get a good AF lock, it’s more precise that what I can do. Especially considering the shorter throw you have with AF lenses. With MF lenses, you had a longer throw, AF lenses are optimized for autofocus and have much shorter AF throws, making them more difficult to precisely focus. Plus modern viewfinders are simply not… Read more »
The start of your first three paragraphs suggests that you are using your eye as the focusing standard. I also believe this to be true. Yes manual focusing has it’s own issues which to me usually is timing. However, the same timing is eaten up with the auto focusing bouncing back and forth trying to get it right. As for lens “throw” I never had an issue with focusing any of my lens manually. And manual focusing rings were designed into your better lenses for the same reason which is when AF fails or is having difficulty then use your… Read more »
Hi Bob – I wouldn’t say my eyes were the focusing standard, just that I can often tell when an image doesn’t seem quite as sharp as it should be – sometimes I’m right, others I’m not. In some cases, as I indicate later in the article, I’ll go ahead and use the techniques outlined when I think the situation may cause a problem, even if I can’t totally tell with my eyes. The bottom line, as least for me, is that when looking through a dim viewfinder, the camera is still better than I am, even if it’s struggling… Read more »
Great article- I always enjoy your stuff and need to carve out some time to read your book (which I have purchased). Curious on that amazing bear shot what lens you were using? I just watched your comparison one 200-500 vs 300mm on a crop and am about to pull the trigger on a 300mm. Would love to know which lens that was? Many thanks!
Which bear?
The last photo- thank you!!
That was the 600 F4 E. I’d be much to scared to photograph him with the 300 PF 😀
Good info. Thanks for sharing these tips.
Good article. Some of this stuff I’ve started to learn on my own but you kicked my learning into hyper drive. Thanks, Erik
This article came a week too late for me. I was having this exact problem with Brown bears in Alaska last week. I tried the central focus points method and it helped some, but I still had too many not quite tack sharp shots. Oh well, I’m heading to the Smokies in late October and may run in to some Black bears. As a side note, if you are looking for a tour suggestion, the Brown Bears of Hallo Bay Katmai Peninsula are spectacular in late June/early July.
That is one beautiful bear and a beautiful shot !
Hi Steve! I could have used a couple of these tips on Friday morning (July 6). I was down at a local waterfront park taking pictures of various birding opportunities when I came across a Baird’s Sandpiper. I had difficulties getting a lock on this little guy https://www.flickr.com/photos/57707843@N03/28377681567/in/photostream/ , as focus went to the sand instead of the eye. It was frustrating and the photo you see is the best of the lot.
I think it looks more like a heat distortion problem:
https://backcountrygallery.com/long-lens-heat-distortion/
Hi Steve
As always your article is a great tool at the right time.
Thanks! A big help
Great tips and perfect timing as I was struggling with most of these AF issues yesterday evening. I knew the answers are in your book and was going to reread those parts this morning. Thanks and great photos.
Every time I see a new update from back country gallery, my heart skips a beat from pure excitement. Thanks for the fabulous article, Steve!
Great info. Thanks.
Steve, amazing photos as usual. Emily and I are in awe with every post you write. Waiting for that new book that you are writing to hit the newsstands! 🙂
Thanks! When I get back from CR, that book is getting my full attention! I’m hoping to take a major bite out of it 🙂
Great tips as always, Steve. Love that Great Blue Heron shot, too!
Steve, thank you for these tips. Here in the Pacific Northwest these will come in very handy.
I really enjoy reading your articles (and books). Your knowledge is well presented with well timed, and very creative, humor.
Thanks!
Thanks for the kind words – I always have fun writing them 🙂
These are excellent methods that I have been using for several months and found them very useful. The majority of my shooting is lower light birding and occasionally other wildlife efforts with the 150-600 G2 or 200-500 on an D850 or 500. Typically I discard the 1.4’s!
Just for giggles, after much comparison, the 200-500 locks on faster than the G2!
That’s interesting. The G2 seems to have faster AF, so you would think it would work better. However, I have heard that the 200-500 locks on more reliably.
After a few thousand shots switching lenses to test the same light, there is no contest. I own both and will go for the extra reach with the G2 with better light, but the 200-500 is my go to lens. I slightly favor it over the 80-400. I have also noticed that the 200-500 will work on the Group focus in situations where the G2 can not isolate the target when shooting through branches and I must switch to single point.. The 200-500 seems to have a narrower field. of focus. This is of concern while shooting Great Blue Herons… Read more »
As always, a well thought out and presented discussion of autofocus issues we’ve all encountered at one point or another. Well done Steve! Cheers and good light, David
As always, a well thought out and presented discussion of autofocus issues we’ve all encountered. Well done Steve! Cheers and good light, David.
Good tips as always! Thanks Steve!
Great tips as usual.