
This probably won’t come as a surprise to anyone who knows me, but as it turns out, I tend to have a lot of “random” little thoughts creep into my mind when I’m out doing wildlife photography. Some of these are actually pretty handy, others are just bizarre, and some are simply not appropriate material for an article (but they are freakin’ hilarious).
Let’s talk about the handy ones for photographers…
Most of these tips are actually pretty short – in fact, they are so quick that, individually, they don’t require an entire article to convey. Still, I wanted to share them with you and decided that maybe a series of posts featuring a handful of these little tidbits was the best way to go (yes, this is only part 1).
So, with that in mind, here are some random tips and thoughts for wildlife photographers. Note that these are not in a special sequence or anything – they appear in the order they popped into my head as I was out with my camera over the last couple weeks.
Tip #1 – Use Enough Shutter Speed
One of the most frequent questions to find its way to my inbox has to do with sharpness – or rather, lack thereof.
Almost inevitably, the sender will speculate that their sharpness deficiency is the result of an optical problem with the lens, an AF fine-tuning error, a camera issue, or some other hardware-related problem.
However, in about 70% (or possibly even more) of the cases, when I take a look at a sample shot I see motion blur. And that’s easily fixed by shutter speed.
So many times, people seem to get their gears stuck on a specific idea of what a “fast enough” shutter speed is and they cling to it like a staticky sock that finds a cotton shirt.
My advice? If you see blur in your images, start by increasing shutter speed a little to see if it helps – seriously, even if you think you have enough shutter speed, just try it 🙂
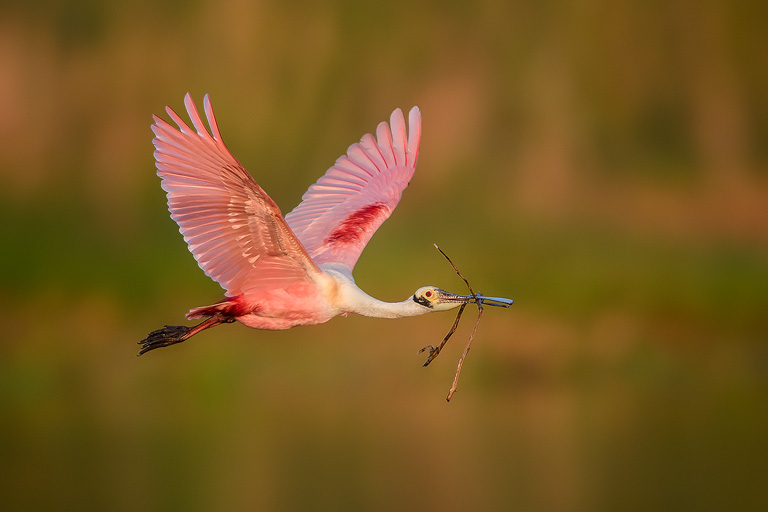
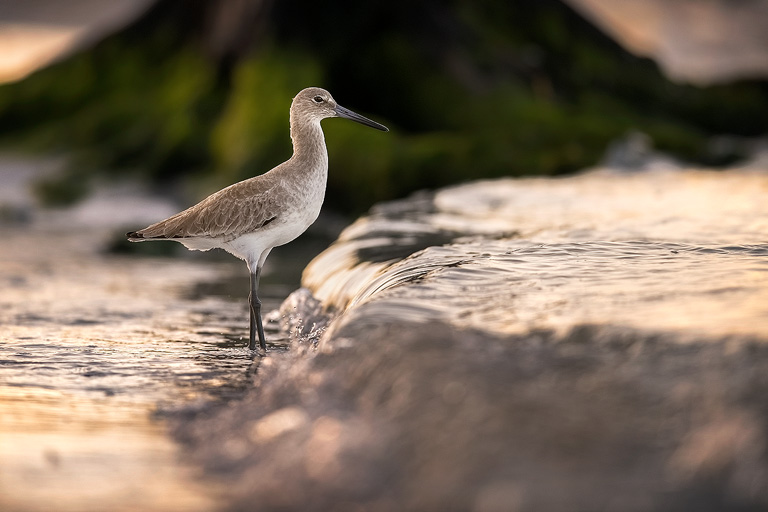
(Hint – my preferred bird-in-flight speed is 1/3200th of a second – I can’t always get it and often go slower, but I like it when I can!)
Tip #2 – Don’t Stop During The Good Stuff
Is there something awesome happening in your viewfinder? Then don’t stop shooting!
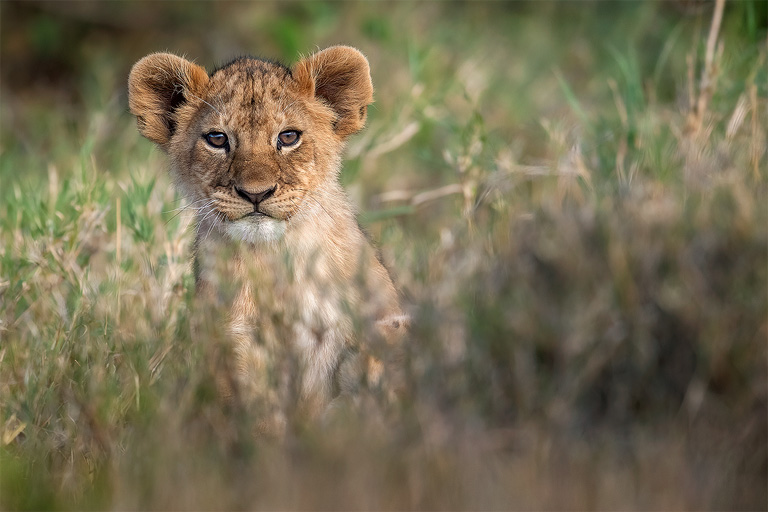
I can’t tell you the number of times I see people only take a fraction of the action when it lasts for more than a couple seconds or so. If the camera is willing to keep shooting during prolonged action sequences, then don’t let up – you never know what you’ll get. I’ve shot upwards of 150 images without coming up for air during prolonged action sequences and am ALWAYS happy I did! The image below was like #80 or so during a long 12 FPS burst while this little cub bounced all around its mom.

Sure, you may feel like you’re shooting an excessive number of frames (and the quizzical looks from nearby spectators may seem to re-enforce this), but pixels are free and your shutter doesn’t need a coffee break. Keep firing at great action until it’s done – make your buffer beg for mercy when needed!
(PS – This doesn’t mean to go crazy every time either! Controlled bursts are the key to successful wildlife photography – long or short.)
Tip # 3 – You Don’t Need The Entire Animal
You know, it’s weird how often people get hung up on capturing the entire animal in the frame. Sure, sometimes it’s necessary for the story you want to tell, but the truth is, you don’t always need the whole critter in the viewfinder.
In fact, some of my favorite photographs include only a portion of the animal.
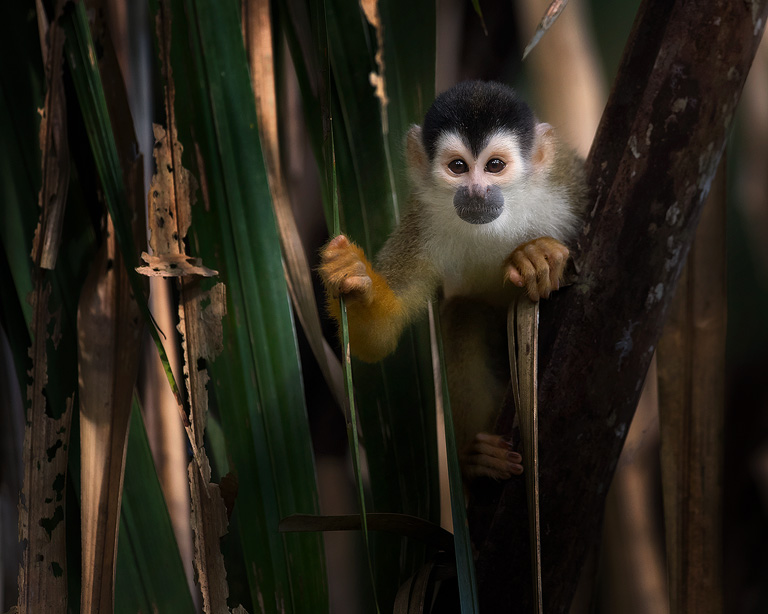
My philosophy is that I’m shooting something artistic (or attempting to), and sometimes a partial animal – like just a face or upper body shot – works better then the full-length version. Think about portraits of people – head shots are far more popular for an individual portrait than full length shots are.
Look at it this way – most of us aren’t here to shoot field guides, we’re here in an attempt to create art. So, don’t sweat it if you’re close and can’t include the entire animal or if the animal is partially hidden. Work with what you have and try to come away with a unique composition. You’ll often find it’s a more interesting photo than the full-length, out-in-the-open shot.
Tip # 4 – Don’t Freak Out Over Your Keeper Rate
People sometimes get a little crazy during their photo trip if they don’t think they are writing enough “keepers” to their cards. They spend enormous amounts of mental energy fussing over how many images they are capturing from day to day – often becoming frustrated at a perceived “low number” of photos. (I know, because I used to do this.)
You wanna add stress to your trip? Well, that’s how you do it.
If you find yourself troubled about the apparently low number of pics you’ve taken, just take a breather. Think quality over quantity. As far as I know, there’s not an award given to the person who takes the most photos on a given trip, so work towards capturing great shots and don’t worry if they are few and far between. That’s how great shots work.
Another aspect of this to consider is that, as your portfolio grows, you will naturally take fewer and fewer photos on any given trip with similar subjects. This may mean a lower final keeper rate, but the keepers you get tend to drop more jaws since you are more particular about what you spend your time photographing.
I constantly compare what I see in the field to what I already have on my cards or hard drives – if it’s about the same or better, sure, I’ll fire away. However, if I already have imagery that’s superior, I’ll hold back on pressing the shutter. This, in turn, means that as your portfolio improves, it becomes increasingly more difficult to find subjects that will enhance it. And that’s OK – that’s where the challenge is and how you learn to push your creative limits. However, this also means you often won’t bag as many keepers per day since you’re more selective.
The real trick is to head out and take advantage of the opportunities that come your way as best you can. Table any concerns over the number of keepers you have and simply concentrate on getting quality shots instead. Take advantage of the good stuff as it comes your way and do you best to put yourself into great situations.
When you think about it, doing your best to find great opportunities is all anyone can do. From there it’s essentially out of your hands – either nature cooperates or it doesn’t – so don’t stress out over stuff you can’t control. I find this more relaxed approach can actually help you snag a few more wall-hangers just because the pressure is off.
Conversely, I’ve also encountered people who were ultra-conservative with their shooting – usually because they don’t want to sort out too many photos. They only take a single shot during a good opportunity and pass on what are potentially even better shots because they “have enough” shots already. This too means a lower keeper rate, but in the worst possible way.
In my opinion, great photos are like dollar bills and you can never have too many – so shoot all you can when it’s good and don’t stress out when it’s not.
Tip # 5 – Stick With The Animal
One of the best lessons I’ve learned over the years is that patient persistence pays off with wildlife photography.
One mistake I see a lot of beginning wildlife photographers make (and sometimes the experienced ones as well) is leaving a good opportunity too soon. They come in, take a few shots, and then move on – hoping to find something “better” or “different.” In so many cases, had they just stuck around for another 15~30 minutes, they would have captured a fantastic shot.
Remember, a bird in the viewfinder is worth two in the bush.
The thing is, when it comes to patience, I’m at about the same level as a toddler in a furniture store – but even I stick around when I stumble upon a great subject in a favorable environment. I can’t tell you the number of times I’ve hung out with an animal and watched the minutes (and sometimes hours) tick by without any action – only to have that persistence rewarded spectacularly.
In my experience, if you have a good subject, it’s best to stick with it if you think there’s any potential at all of something cool happening. In the majority of cases, you won’t be disappointed and you often get a treat that you never expected!
(Of course, if you don’t see any way the situation is going to work out in your favor – like it’s a poor location, sorry looking critter, etc. – you should feel free to move on.)
Tip # 6 – No New Gear On A Trip
OK, I know – you’re going on a trip to someplace exciting and you want to express all that “before the trip” enthusiasm with the purchase of some shiny new gear.
Don’t do it.
Or, if you do decide to whip out the credit card, make sure you really use the gear first!
I’ve seen it over and over again in my inbox, in the field, and even on workshops – people buy brand new gear, take it on a big trip, and discover it’s not working the way they planned or they lack enough familiarity with it to execute quick changes on the fly.
I’ve watched people wrestle with gear that was malfunctioning, lenses that weren’t focusing properly, and cameras that weren’t performing as expected. I’ve also witnessed new button/dial confusion on a massive scale. And it was easily preventable by only taking equipment along that you already know and use.
So, if you do buy new gear for a trip, make 100% sure you take it out multiple times before that excursion (really do it – don’t just promise yourself) and become comfortable and familiar with it. Make sure your new gear is “old hat” by the time you’re on your trip – you’ll be glad you did!
Tip # 7 – Favor Great Conditions
Wanna know one of the secrets to great wildlife photography?
An ordinary subject in extraordinary conditions and great light will beat out an extraordinary subject in poor conditions and lousy light. And, of course, the pinnacle is an extraordinary subject in great light and perfect conditions!
The reason I bring this up is simple – I see so many photographers shooting in poor light and/or poor conditions (i.e. bad background/foreground, terrible scene, etc.) and wondering why they aren’t getting better images.
The brutal truth is that the best images of ANY subject happen when that subject is in a great location in great light. So, the advice here is twofold:
First, favor great light. I know, it happens at the most inconvenient times of day (I hate dragging myself out of bed too), but that first light of morning and last light of day are where you tend to find extraordinary images hanging around. Sure, sometimes you can’t hit it perfectly (nothing more frustrating than gorgeous light without a subject to stick in it), but shooting within that first hour and a half after sunrise or before sunset often works out well.
Second, favor great areas. No matter how good a subject and light, if it’s not in a great location, it’s never going to be a great shot. Sure, you may discover a handsome bear in sunset light, but if you’re shooting at the city dump no one will beg you to hang it on their wall.
In fact, I’d rather have an ordinary subject in great light and in a great setting than an extraordinary subject in terrible light and a rotten setting. I can’t use the latter, but I can certainly use the former.
So, there you have it, the first seven of my random little wildlife tips. However, I can safely say these aren’t the last (since I have a bunch more already in the wings), so stay tuned for part 2!
~Steve
PS – If you enjoyed this post, I think you’ll REALLY like my e-books and video workshops! Thousands of pages and hours of videos filled with tips, tricks, and techniques – all my best content! Check ’em out – click here (hey, it’s free to look).


Excellent tips, cant wait to try these out
Once again excellent tips and reminders, thanks Steve.
Hello Steve, I became a Steve Perry addict on a D850. I just transitioned to a Z7 so your latest information could not have been more timely. I’m in Tip #6 – No New Gear on a Trip mode. But not for long. In addition to all the other learning opportunities, all your communications promote confidence! It’s not only what you say, it’s how you say it, and how I hear it. You’re infectious. I’ve come to enjoy photography as much as it’s evident you do. And you do the heavy lifting.
Hi Steve, as always up to date with the latest developments in the Nikon world. It is almost overwhelming to now see all the new cameras on the market, I am still getting use to my D5 that I bought of a guy who replaced it with a D850 and my D500. I feel that my D810 is just run in as one of the best DSLR’s I ever used. I am still using my 70-200f2.8 vr, Nikon 200-400f4 and 24-70f2.8. The urge is to “upgrade” or “renew”, yet when I come back from the field and view the images,… Read more »
Thanks for your books and articles. Particular thanks for your instructional ability – clear and practical directions & explanations, and your extensive knowledge. Also, I’m happy to encounter an author who also reads Pat McManus (don’t claim ignorance – I know you did, or you got an implant). After I read John Shaw (even went on a workshop),I used to crawl around in the mountains in Western NC, where I lived, with my F2 and a bunch of Kodachrome and used stuff. Had a Cibachrome, too.Now I can’t crawl around so much, and I live in Montana, and I never… Read more »
LOL, yup, I have read Pat McManus 🙂 I mean, they do shoot canoes, don’t they? 🙂
I knew you were right about new stuff on a trip, but with me being smart and all, I tried it. I also learned not to squeeze the lens between your knees while driving on a dirt road – turns off the AF switch, and I missed a nice Iggle.
I’ll read these tips again and again to keep reminding myself. Do you have a quick tip (or longer tip…) on how to support a camera with a longish lens in a stationary open vehicle. I am thinking hand-held, but there might be times when a sandbag or something might work. I don’t have any experience beyond when I have rolled up my jacket on an open window. And we are going to be travelling, so carrying a heavy sandbag to our destination is not an option.
Hi David – I actually just rest the lens on the window sill most of the time. Sometimes I’ll use a little piece of 1″ pipe insulation cut to about 6″ long and slip it over the edge of the window, but most of the time I’m pretty happy with the lens just sitting there. The other option is a bean bag – those can work well and seem like they give more support, although I’ve never been able to tell the difference between a shot with a bean bag and one where the lens was just resting on the… Read more »
Always enjoy your articles Steve! Always something to learn! Thank you!
Hi Steve,
Many tanks for this new topic.
I really like the way you wrote them. Really easy to read and understand your advices.
I’ve a lot of your eBooks and love them all.
You did a great work writing them!
Thanks a lot for that, I improve my photography thanks to you.
Cheers from Belgium 😉
Laurent.
My Dear Steve Perry..Thank you very much for sending me your very valuable writings on Wildlife Photography. While going through the above notes I feel very happy and I am thinking of your great hard works behind these writings. You had devoted lot of time on behalf of this and My heartiest thanks and warm Regards over your great works. I am always learning a lot from your website and I have a deep Respect to your Honor. Once again Thank you very much and Appreciate a Lot on your works. Blessings and Warm Regards. Yours Sincerely S U M… Read more »
Steve,
Thanks so much for all of your hard work. I own all of your guides. I’m primarily a D500 shooter in the wild, with various lens to suit the occasion and the conditions. Without your help, I wouldn’t have gotten half of the keepers that I’ve taken. Thanks again and I look forward to your next publication.
Thanks for these great tips! Also appreciate the inclusion of lens focal length, fstop, shutter speed and ISO that accompanies your photos. It provides a “starting point” for those of us that are still feeling around for the correct settings, proper light, speed, etc. Many thanks!
I’m not sure if it’s good to say I’ve been guilty of all 7 of these excellent tips. I suppose it just reveals my growth and progression as a photographer. In fact I find it a bit comforting to discover others have had these issues as well. Thanks for sharing Steve and I look forward to future editions of your tips.
Thanks Steve, I have purchased & read all your E books. Only have been seriously into getting to know my gear over the last 2 year when I ceased work. Your E books are a wealth of info & knowledge and a great reference library to refer back to. I live in the Adelaide Hills in South Australia so not bear country . However we have a great open plane zoo . I may be able to get a few lion & cheetah shots? but these will be through a bus window. I have a 3 year old Nikon D750… Read more »
Hi Steve
Good advice, I recognize all of these points and struggle with several of them from time to time! Especially the sharpness one., I too have come to the view that 1/3200 is a about the minimum for birds in flight with a long telephoto.
Tony
Good tips overall, in particular about bringing new gear that has not been well tested prior to a trip. I want to have anything new for my kit in hand for 30 days prior to a trip so I have time to work with it (actually 60 days for a new camera). Excellent illustration with the monkey of having a subject partially hidden but on the other hand I see too many images where the subject is so tightly cropped that nothing shows of its environment. This is where a 600mm prime can be disadvantageous. About staying with a subject… Read more »
Hi Bruce – My view on sticking with animals is to do so if there’s potential for something good – there are always lost causes and cases where it’s unlikely anything is going to happen. If I happen upon a lion at mid-day sleeping on the savanna, I won’t stick around, even if it’s a great looking one. Chances are he’ll stay sleeping for awhile and even when he gets up, he’s just a lion in the grass. However, when we came across lion cubs lounging around in the last couple hours before sunset in the rocks, we stuck around,… Read more »
Steve, I like them all but especially #7. I’ve watched osprey at the shore for hours waiting for the optimum shot. I’ll think, “just another 10 min, then just another 5 min.”. Sometimes nothing and sometimes I’m rewarded with a parent returning to the nest with a fish in its talons.
Very Good pair of Hiking Boots.
Thick Hiking Socks.
Rain Gear.
Umbrella.
Energy Drink.
Cold Weather Jacket.
Gloves,
Balaclava.
Thermal Underwear.
Snowy Smith Photography
South Africa.
Hi Steve
Many thanks for your great tips. I find sunrise and sunset great times of the day to photograph
and as you correctly state patience is a great quality for a photographer to possess even if you have to wait through
rain, when others have left, to get the shot.
My perhaps glib position is that good shots aren’t taken, they’re given.
But you have to be ready for the gift.
I like that – it seems more accurate.
Best tip of the bunch is #3, I really hate when people tell me my bird shots need to be of nothing but the bird, sticks, leaves and such all add habitat to a photo and a photo is meant to tell a story. My story is that I always want that bird that is buried the deepest in the bushes, if I can get him tack sharp a bird in the open is easy……..Great set of tips
Thanks again Steve, I really look forward to these vignettes from your photographic gargantubrain, and your generosity in sharing is very much appreciated. I thought I was doing reasonably well with my D750 and AF-S NIKKOR 200-500mm 1:5.6E ED VR when photographing lizards, snakes and birds, but as I mentioned in another post recently I have just purchased a Nikon TC-14E III teleconverter. I am now struggling. Because I lose one full stop I’m finding I need exceptionally good light to use the combination, but no matter how much I try I find the images soft, especially when I need… Read more »
Normally the 200-500 and 1.4TC work well – I’d start by checking for front / back focusing. You might need an AF Fine tune adjustment.
I guess I don’t understand the concern about losing one f-stop. You have two other parameters to work with to make up for this loss and unless you are at extreme conditions (maxed out on everything) a click of one of the other parameters should resolve the one stop issue. What am I missing?
Thanks Bob. Perhaps a quick expansion on my comments would help, as they were specific to my home location and the type of work I do. I hope Steve doesn’t mind the intrusion! Our home is situated in a rugged, steep-edged valley surrounded by tree-covered hills, and with winter on our doorstep the area experiences predominantly low light levels for most of the day. The eucalyptus trees here are over 100’ tall with large canopies, and the sun now barely shows itself above the northern tree line, except around midday when harsh shadows abound. I like to photograph birds and… Read more »
No worries – that’s what the comment section is here for 🙂 BTW – F/8 also knocks out quite a few of your AF points as well.
Thanks Steve, I think I read that in another of your tutorials. Cheers. Terry.
Thanks Terry for the additional information. Yes, it seems like you are maxed out with your conditions and I see your point. However, keep in mind that 99% of today’s photo viewers won’t notice the noise or even a bit darkened image as we live in the world of cell phone photos and that unfortunately has set the standard. But beyond that to me the subject matter and composition are the most important features of a good photograph. As an example Nikonians recently asked for photos from their subscribers about birds. Most of these photos were truly, truly awesome. When… Read more »
Thanks a lot for your great newsletter. For a subscriber like me, here in Sweden, it is some words that sometimes can be difficult to understand, but with your excellent explenation of the whole situation it is understandible anyway.. Keep up the good work you do. Thanks again
Thank you Steve. So generous with your teaching.
Keep the great advice coming Steve! Helpful for a newbie like me.
Very interesting, thanks Steve
Great tips Steve! Talking of “ordinary subjects” in Tip #7, the bird/animal LEAST photographed and rarely found in peoples portfolios is often NOT the RAREST beast, but the commonest, most ignored one – like that male sparrow in sleek breeding plumage which actually looks a million dollars tack sharp against a nice background in good light!
Great article. Tip #1 and 4 applies to me particularly as I come from a Rangefinder/Film background of yesteryear where shutter speed was 1/1000 max and frames limited to 36 unless a special adapter is used. I subscribed, enjoyed and read cover to cover all your Secrets to ……. books. Now that I have a digital camera brand and lenses that you have written on Secrets to … books and YouTube video reviews, I am doing the level best to follow Tips #1 and 4 in this article. Look forward to more focused articles/books from you, on digital and wildlife… Read more »
Yup, I hear you about shooting film. It took long time before I could shoot more than a couple shots in a row with my digital camera!
Steve, as always I enjoy your site, and especially your E-books I own all of them. ? Do you ever shot up @ Bosque Del Apache. My favorite locale. Keep it coming!
Thanks – it’s funny, we were just talking about Bosque earlier today. I haven’t been there for years though. I’m gonna have to head back 🙂
We were there in February, and it is really a magical location.
Steve, in live in El Paso, so it’s my favorite place. Just up the road. If your planning on some thing there, place let me know. Thanks for all your efforts and time to this site.
John
Great article Steve. I chuckled at #6. Before my first trip to Katmai in Alaska I bought long glass (150-600) about 2 years in advance. I took all kind of photos with it before the trip. I am glad I did. I could almost use that lens with my eyes closed. I didn’t of course, the composition would have sucked! Don’t take new gear and know the gear you are taking backward and forward is very good advice.
Love your books. I am in the process of re-reading them again.
Tip 5…patience. Hit the camera with a proverbial hammer…
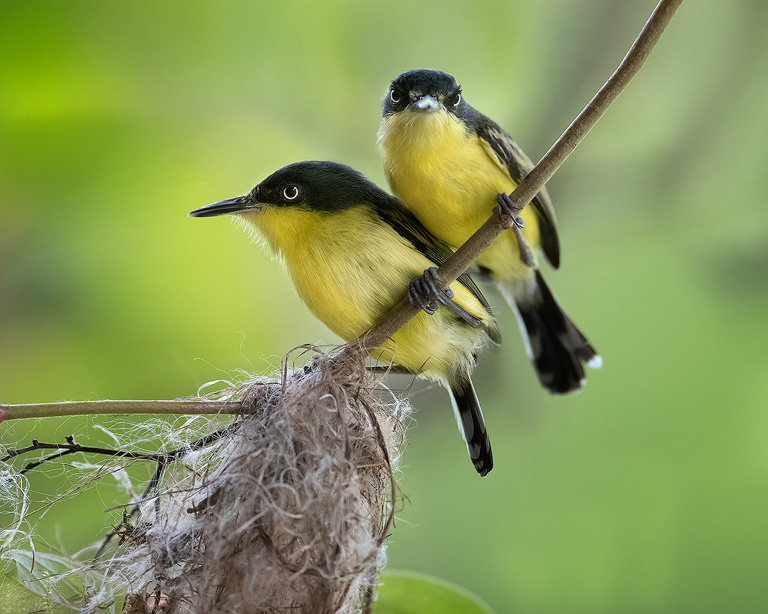
Great tips, Steve. One of Tom Mangelsen’s greatest attributes as a wildlife photographer is his patience and persistence (your tip #5). Anyway, thanks, and love the supporting images to these tips (can’t believe how clean your flycatchers image is at ISO 4000 shot with the D500; I have the same camera and do my best to keep the ISO at 2000 or below).
Yup, it needed some noise reduction work. The problem was I was trying to get them as they landed too, so I wanted to keep my shutter speed up and forgot to adjust for this shot.
Don’t Freak Out Over Your Keeper Rate. Yep, this one still bugs me after many years as a photographer. I don’t just want a Bald Eagle standing on his head at sunset, I want a Heron spearing a fish who is eating a smaller fish. 🙂
All great tips here, Steve.
LOL – I’d take that shot! BTW – this is one I still struggle with as well, but what I tell myself is in the article – helps a little.
Very nice tips. Did you take the photo of the cheetahs at f8 to achieve a greater depth of field?
A little. F/8 at the focal length (I think the lens was at 400mm) doesn’t add a ton of DoF over F/4, but when things are close to the same focal plane it can sometimes be the difference between “acceptable” and “Out of focus”. Luckily for this shot both are sharp, but I have some others where the mother isn’t tack sharp (not as good as this one though, so I’m still happy).
Great tips as usual. It often helps to remind us of the fundamental things we do wrong, and don’t really know why. I know i do it all the time. Your e books are amazing, but the tips and short videos bring the essential elements back into our conscious. I have not read two books by the same author ever before. I have now read three from you. You are a great teacher and story teller. I love them.
Chris
Wow, thanks so much Chris, truly appreciate the comment. Very kind of you to say.
Thanks for the tips, Steve! I find it interesting that some things stick in the back of my head, but aren’t brought to bear until someone points it out. This is true for using enough shutter speed. I was experiencing the same issue with slightly blurred images and even had some photographer friends suggest increasing my shutter speed, but I was looking for the cause in the lens, poor lighting situations, incorrect settings, technique, etc. However, increasing the shutter speed solved this right off! Guess I just needed to hear it from the right source. Some of my best shots… Read more »
Awesome tips – as usual – will be sharing with a few local photo clubs I recently presented at 😉 Thank you Steve !!
Thanks – I appreciate the share 🙂
Yes! And I received them through one of those local clubs. Thank you, Danielle, and Steve, for the great hints!
Great tips Steve. Thanks for sharing them.
Sound advice Steve. Picked up on the shutter speed one in particular. The VR advantage not so much for me. Guess I read over you book again and get the new one. Thanks again.
Great tips, Steve! I know that sometimes I have been guilty of the shutter speed mess up, thinking that if it is not a bird, I can shoot slower. Blur sucks!
Hi Cookie!
LOL, I still drop too low sometimes – many of the tips in the article hit pretty close to home!
Excellent tips, Steve, as usual. If you’re interested, the “flycatcher” species is Common Tody Flycatcher
Thanks Dean – I updated the article. I was going to ask a friend next time I was in Cost Rica, but you came to the rescue first 🙂 Thanks!!!
Basically I agree and find your tips quite sensible, however I will be pleased with a great bear shot in a dump!
LOL, years ago I actually did do just that 🙂 My father took us to a dump where the locals said bars typically show up – wasn’t my proudest moment, but as a kid who had never laid eyes on a bear before, it was special when he walked out. Still, it’s not on my wall 😀
Excellent tips, especially #2.
Great tips. These and your books and videos have taken my photography skills to the next level. Thank you for sharing.
Great Steve. I tend to get one or two of these at a time. I need to put all seven together! Peace
Greg
Another in a long line of very good articles Steve. The tips you pointed out are all very simple concepts, but are too often overlooked by many, myself included. Thanks for the reminders!
Nothing new but great tips as usual. Beginners can really memorize this.
ThankSteve
Another great set of tips
This time around, it didnt cost me over $1800 AUD ! 🙂
………Gary
LOL, I’ll have to find an more expensive set of tips next time 🙂
Excellent tips! Thanks Steve!