A question I get on a regular basis is “How do you get those cool starbursts in some of your photos?”
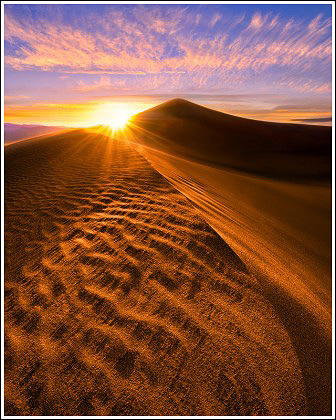
People have speculated on everything from special filters to photoshop to alien intervention (OK, made that last one up) – but it’s way easier than that. To get a starburst in your photo like the one you see below, you just need a DSLR and a couple of simple steps – and no photoshop required!
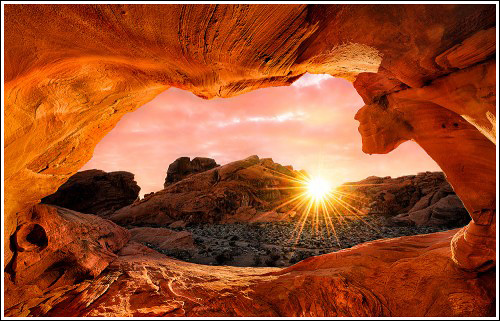
1. Set your F/stop somewhere between F8 and F16. Generally the smaller the opening (f/16) the more dramatic the starburst. I personally start at around F/11 (aperture priority) and that seems to work pretty well for most of my starburst attempts.
Tech Note – Going much past F/11 or especially F/16 starts to introduce diffraction, softening your overall image, so keep that in mind as you stop down. I usually try to pick an F/stop that will give me a nice sunstar without digging too deep into the smaller apertures. Click here for a video I made about diffraction.
2. Get the sun against a hard surface. When the sun is right against a mountain, horizon, rock, or even a tree and and you’re set in that F/11-ish range, it should produce a nice starburst. No special gear or processing required 🙂 The aperture of the lens itself produces the starburst. (NOTE – yes, I’ve seen images where the sun was not against a hard surface, but in my experience starbursts are easier to capture when you use the “hard surface” rule.)
So, what actually causes the starburst?
The starburst is basically created when the light slices past the points on the lens aperture where the blades physically overlap. The more blades your lens apature has, the more points your starburst has.
Again, keep in mind that different lenses and even different focal lengths within the same zoom lens can produce different effects. At this point I’m pretty familiar with how my main lenses will respond when trying to produce a starburst, but that wasn’t always the case.
If you’re new to creating starbursts (which you probably are if you’re reading this 🙂 ), then my advice is to quickly check the photos on the back of your camera as you shoot. Try different F/stops and focal length combos until you see a starburst you can be proud of! Each lens and focal length of a zoom can produce different results, so be sure to experiment.
Happy Shootin’
Oh, and as always, your comments and feedback is appreciated 🙂
~Steve
PS…
If you enjoyed this article, I think you’ll REALLY like my e-books, Secrets To Stunning Wildlife Photography and Secrets To The Nikon Autofocus System. They’re filled with hundreds of pages of information just like this. Check it out – click here (hey, it’s free to look 🙂 )


