OK, I know what you’re thinking, but no, this isn’s some article about heroically bushwhacking your way to a remote location for a once-in-a-lifetime photograph. (One of those will probably be coming in the future!)
So, how can a compass help you snare better images? Simple – by helping you to precisely predetermine sun and moon position. It may seem a little basic, but you’d be amazed at how easy this makes it to get better images. I sometimes feel like I’m cheating 🙂
Now, I have to admit, up to about 5 or 6 years ago I really didn’t worry too much about keeping a compass handy – you know, unless I was using it for navigation or the aforementioned bushwhacking. Well, that’s when I discovered how amazingly handy it can be for a nature photographer to know exactly where the sun and the moon are going to rise and set (not just East-ish and West-ish).
I know, it seems painfully obvious now and I think I actually heard a few of you say “Duh!”
However back in the day when photos came 36 at a time and the internet was still trickling through modems at 9600 baud, it wasn’t so simple. Figuring out exact positions of the sun and moon was still the purview of astronomers. The average photographer could only get it in the celestial ballpark.
Today, of course, it’s actually very simple for anyone to determine sun and moon positions with amazing accuracy. And heck, the software is usually somewhere between free and cheap!
For me, it started when I stumbled upon a few handy apps back when the original iPhone was still rocking the wireless world. The first app was FocalWare and then, later on, I started using The Photographer’s Ephemeris. Each app told me not only what time the sun and moon were going to rise and set, but they also told me precisely where it was going to happen.
My initial thought was simply, “Hmm, that’s kind of handy,” but at the time I didn’t realize just how instrumental this little discovery was going to be for both my landscape and wildlife photography. Over the years I’ve learned that this information can be as essential to capturing a wall hanger as having a memory card in my camera.
As I started using these tools, I quickly discovered there was no more guesswork involved when capturing images featuring the sun or moon. I could easily plan ahead and come up with a good composition long before the photo was going to be snapped. Trust me, this beats the heck out of frantically running around and trying to come up with something as the sun touches the horizon.
Just take a look at the images on this site. If you see one with the sun or moon in it, there’s an incredibly good chance that photo was planned hours, days, or in some cases even months in advance.
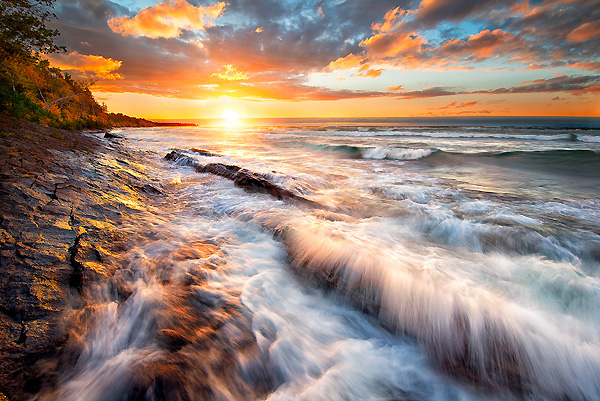
Take this image for instance. I wandered down at lunchtime and had my compass in hand. I checked out where the sunset was going to be and I discovered it was going to happen right at the tip of the little peninsula in the photo. Yup, I knew just where I wanted to be at sunset.
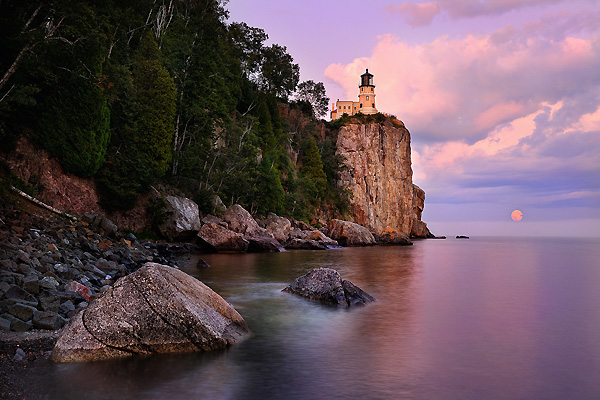
For this image, I knew just when the moon was going to rise and just where it was going to be in the photo. I figured out my composition hours beforehand and went back a bit before moonrise. Funny thing is, I almost missed it because I thought the moon was going to be obscured by clouds. I had actually started heading back to the car when it began to peek through. Since I already know my exact composition, I just went back, set up and shot the image before it was gone. No guessing, no trying to find the perfect composition once I saw the moon. (Plus, this photo went on to grace the cover of Lake Superior Magazine last year.)
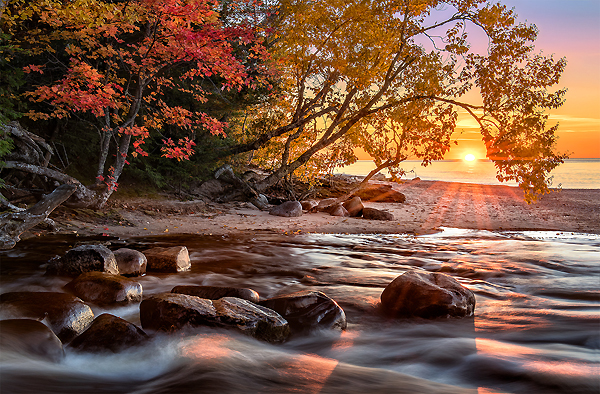
 For this image, I was looking for something new. Most photographers shoot this location from about 20 yards downstream. However, I really liked the little arch created by the tree branches and it occurred to me that it would be cool if I could put the sun in there. A little compass time and I discovered a spot that would work. I setup and sure enough, the sun landed just where I wanted it 🙂
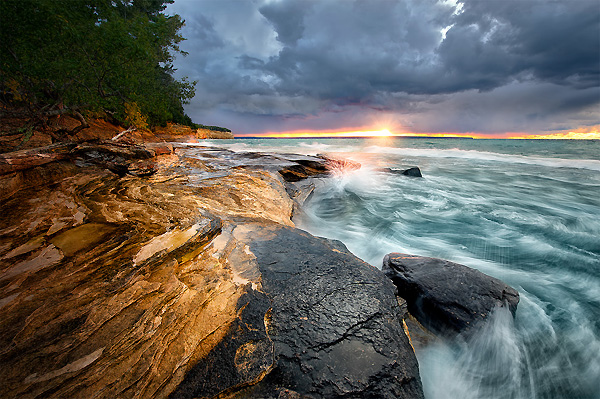
 For this image, I was backpacking, the weather was stormy and rainy, and all I knew for sure was that I wanted to capture something cool. Again using my compass, I was able to get everything set and ready for when the sun came down. I positioned myself so the curve of the rock would lead the viewer right to the setting sun. Since I couldn’t even see the sun until the last minute, I used my compass and determined exactly where I needed to set up well before the sun actually went down.
How to do it
Want to give this a try? Cool!
It’s actually really simple. First, you’ll need one of the apps I mentioned above. Note that The Photographers Ephemeris (TPE) is free for use on your computer (via a web app), but the smartphone apps are really a bargain for what you get (click here for the website).
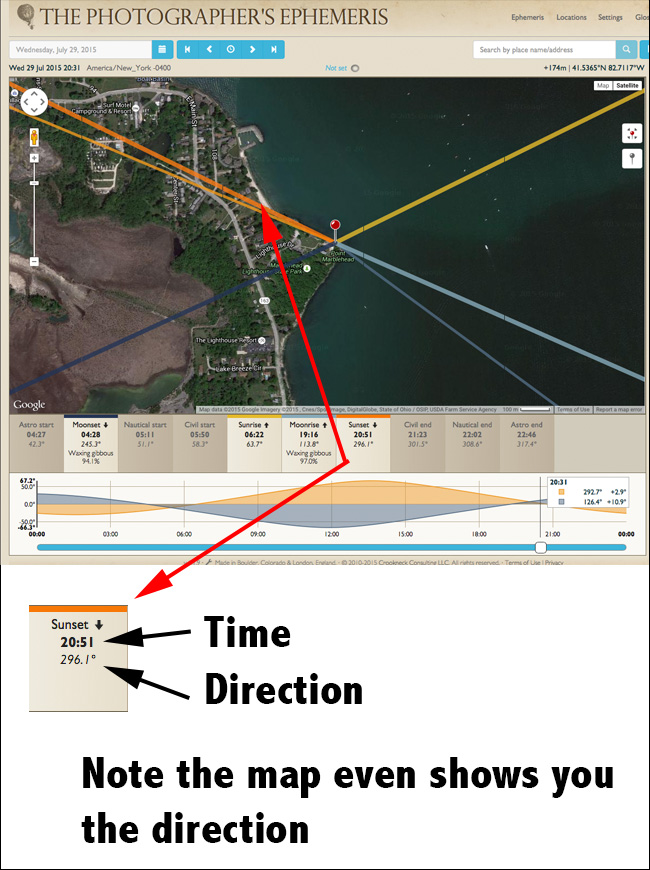
The first thing you’ll need to do is determine both the time and location of whatever event you want to capture. Let’s say it’s sunset. Here’s a screen shot from the desktop version of TPE:
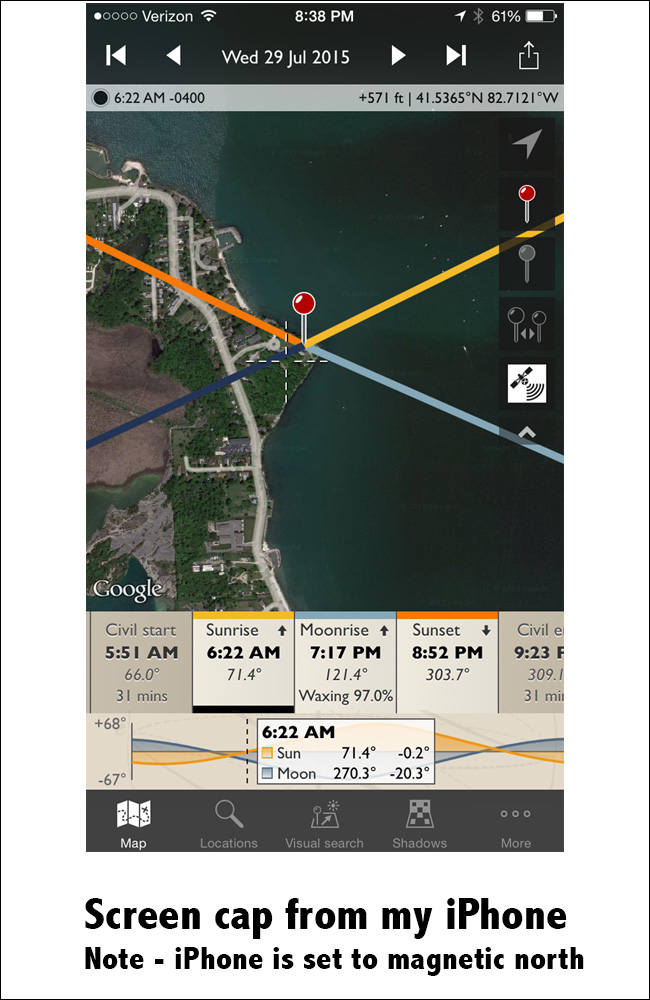
Here’s one from the iPhone app (There’s an Android app too)
Once you know where the sun is going to set, the next step is to use your compass to determine just where it’s going to land on the horizon. For this, I really prefer an orienteering compass (and one with a mirror), but you can use a regular compass in a pinch to at least get a general idea. I tend to like regular magnetic compasses better then compass apps on my phone – the real compass seems more precise to me. I personally go overboard and use a Silva Ranger 515 CL. For a more affordable route (less the mirror) I also like my old Silva Polaris. However, any good compass will do.
Also, I went into my TPE settings and turned “Use magnetic north” to “On”. This way, I don’t have to worry about adjusting for declination (sometimes called variation) as I move from place to place across the country. And hey, if you don’t know what declination is, then that’s another good reason to switch it on 🙂 (OK, declination is the difference between magnetic and true north since magnetic north doesn’t directly coincide with true north on a map).
If you don’t know exactly how to use a compass, here’s a very basic crash course:
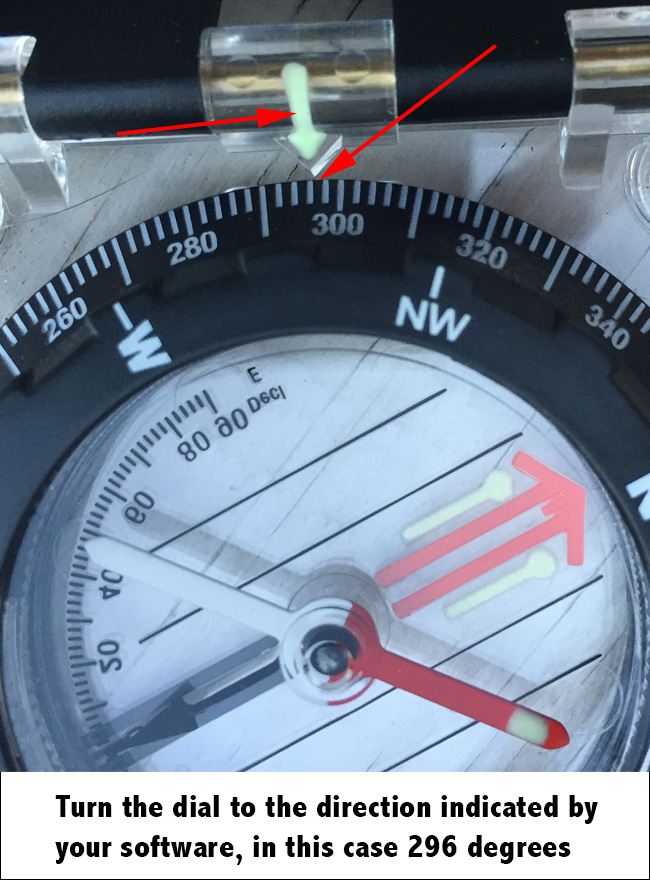
1. Turn your compass dial to the degree specified by your software:
2. Turn your entire body with your compass until the red arrow is in the red (north) orienting outline:
![]()
3. Your index pointer will be pointing directly at sunset (note the compass below has seen better days – I think it sprung a small leak, hence the big bubble).
![]()
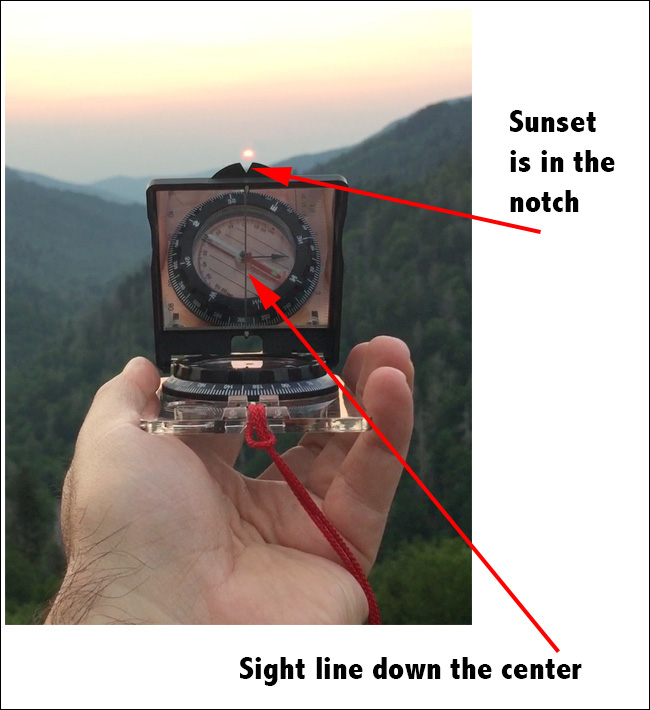
4. If you have a mirror on your compass, put the sighting line (the vertical line right down the center of the mirror) on the center of your dial and make sure you still have the red side of the needle in the red orienting outline on the dial. Now, just look through the notch – that’s where the sun will set.
There ya go!
This one little trick has helped me tremendously in my landscape photography and it’s even handy for wildlife. Although super precise locations for sunrise / sunset aren’t critical for most wildlife, I have used this method numerous times to help position myself for the best light when I’m after critters.
Finally, I urge you not to dismiss this as simply something “interesting to know” – it really has been one of my greatest photography assets. I use this technique with every one of my sun / moon photos and I sure hope you’ll give it a try too 🙂
Enjoy! And as always, your comments and feedback are appreciated 🙂
~Steve
PS…
If you enjoyed this article, I think you’ll REALLY like my e-books, Secrets To Stunning Wildlife Photography and Secrets To The Nikon Autofocus System. They’re filled with hundreds of pages of information just like this. Check it out – click here (hey, it’s free to look 🙂 )
")

")


I have tried to take snaps by using compass, it is really helpful and its result is just amazing, Thanks for this information.
Let me add one more thing, your ride become more easier if you use these compass when you are on your road trip and you can adjust them on your mini bikes.
compass camera is best for the picture i am beverage consultant and use camera for different plants picture
Very informative, i have first time seen that how compass helps to take photos, i would like to share my gallery where you can also buy products Read More
Hey! its a fantastic gallery. Versatile for bloggers. anyhow, i want to share with you my product because most of the people uses gunshot cleaner so read more
Finding the perfect rangefinder is an issue which every archery enthusiast goes through. With so many good, bad, and average archery rangefinders available in …Read more…
Such kind of errors similar to iTunes error 3194 may generate after making an update in an iOS-based system. The users face these issues regarding any Apple based server issues may take suggestions from this mentioned site.